Thursday, February 26, 2009

Finally - An Up-Date!!

MAN!! It feels like forever since I last posted anything.

A lot has been happening here. The plumbing is fixed in the upstairs bath; the stain samples have arrived and Spring has sprung - just to name a few.

Where I last left you the upstairs bathroom plumbing was being worked on. Let's start there.

As stated the plumbing is now fixed and working quit well. We were also preparing to lay some of the self sticking vinyl tiles. We changed our minds on the tile - go figure.

This is what we found under the old tile.


You can see the floor better in this photo.

The hardwood floor is sound with the exception of that directly underneath the tub and chase as well as the section I had to cut out. The wood under the toilet is not the original wood so it would need to be replaced with tongue and groove. This can be done when the floor under the tub is replaced.

Since the wood floor is in good condition I cleaned it up and have decided to wait on making a final decision before we decide on what to do with it. We kind of like the wood in there. It is definitely warmer than the tile was!

Speaking of missing flooring and the chase; following is a picture of what it looks like inside the pluming area.

Isn't this nasty?!

It is so cramped that the ONLY way to work on it is by removing the toilet. If you look towards the top right of the photo you will see a black thing with a yellow top. This is THE FIRST repair I ever made on the house.

If you remember from the beginning of our house ordeal, the plumbing had a massive breakdown. This is where it happened. The black thing is a rubber pipe reducer with a plug cap on top. The whole thing is covering the drum trap that the tub drain connects to.

Since we did not have a tub at our little house, only a shower, it was a special treat to take a long, hot, tub soak. Well, on the first day of ownership that's what we did.

Long story short, when the drain was opened we started hearing what sounded like rain. I ran down the stairs and it was raining in the kitchen!! Turns out the drum trap failed and the water was filling the space between floors. When I pried open the small hatch (about 1.5' x 2') I saw what you see in the photo - only filled with water and with a fountain gushing out of the drum trap. By the time I got the drain closed most of the water had drained out. Now all we could do was was try to bail out the crawl space and let the rest go where it wanted.

Now, if you look to the extreme lower left you will see the only piece of original molding left in the bathroom that we're aware of. Trying to match the woodwork in the bathroom is going to be a bugger.

Anyway, since we are talking about the bathroom, let me share a few pics of what we have done as a 'quick fix' till we gut the thing and rebuild it.

Remember the nasty brown and gold paneling? Here is better view of it.

Ugly ugly!! I have confirmed that the remains of the plaster under these walls is now a pile of rubble behind the paneling.


Here's the floor once it's been cleaned up as best we can. It will need to be sanded to get rid of the stains caused by the tar paper under the tile. We are hoping it isn't this bad in the kitchen. So far our test strips in the kitchen haven't been like this.


Looking into the bathroom. You can tell it's small.


Here is a better view of the same general spot as in the above picture. You can see the 'other' paneling they used as well. At least the brick motif gave us something we could work with.

We kind of did a safari/desert oasis them. We were able to use a few items we brought back from Egypt as well as items purchased, and scavenged, from the B&B we spent our honeymoon in.

The little stool came from the B&B. You can also see the original piece of Victorian cane furniture we got for next to nothing at an auction.


This is one of my favorite pictures of the bathroom for several reasons.

First off you can see the color differences in the walls and those in the tub area. The paint in the tub area was covered with several layers of poly so that the shower could be used. We thought about doing all the was like this, to get the richness of color, but it was just to 'plastic' looking.

Next you can see the little 'cubbyholes' built around the plumbing chase. We use these for towel storage and such. This is part of what will go 'bye-bye' once we gut the thing.

This pic also allows you to see the hatch opening I have to work with in regard to the tub pluming. Look right under the last cubby and above the TP. See that crack? I did that so you could see the top of the hatch. Notice how little room there is between the hatch opening and the toilet. At the risk of sounding really stupid, I can tell you I've gotten myself stuck more than once in this spot!

Here is the lav vanity. We can't wait to get rid of this as well as the mirror and swag lamps.

I did remove the matching one, sans lav, that was on the other wall (where the little stool and cane shelf piece is located). We wanted to see how it would feel with more room. We are still getting use to this. All the drawers in that vanity were SWMBO's.

I've thrown this next picture in just for fun.

See the two map plaques (There's another one in the 7th photo)? Those also came from the B&B. Remember when I said we "purchased & scavenged" items from the B&B. These plaques are part of what were scavenged.

Here's a little back history about it. We stayed at a B&B called the 'Max Paul'. It wasn't one house, but several cottages that were built around 1910 - 1920. Each building was then converted into 2 to 3 suites. We stayed in one called 'The Safari Suite'. It was AWESOME!!!

Nine years later the city/county decided the main road that was close to this area had to be widened significantly. On top of the land needed for the extra road it's self, they wanted about 100' on either side as a shoulder and for future work. So, two city blocks, on each side of the original highway, were condemned for several miles. The Max Paul sat in the path.

The owners of the Max Paul had a silent auction for everything in all the suits. We lucked out and got several items from our suite. We didn't get any of the larger pieces of furniture in it because SWMBO fell in love with all the tapestry in the 'Tapestry Suite' so we decided to toss all the money we could at it. basically, we got most of everything we wanted form our suite other than a painting, as well as ALL the tapestry.

About two months later demolition began. So, a friend of mine and I snuck into the demo site around 12:30 in the morning on a moonless night. We scavenged everything we could from our suite. We came away with about 60% of the wall paper - yep, you heard that right!! it came off in perfect strips. We also found the map plaques we have hanging on the walls. We even took the capstone brick from the fireplace in the room.

Anyway, I just thought I'd share this with you. I did not tell SWMBO what I did. Instead, I hid it all and gave it to here as part of her gifts that next Christmas.

Let's switch gears. As stated, the stain sample arrived the other day.
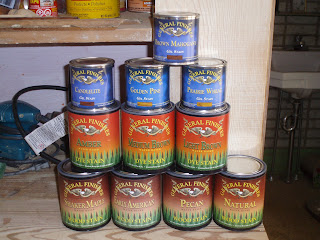
Here they are!!

They were generously donated by a company called General Finishes.

After several consultations with Charles Neil, in regard to what type of tone/finish we were looking for, we received the following colors to play with.

Gel Stain: Golden Pine; Prairie Wheat; Candlelite & Brown Mahogany.

Dyes: Amber; Light Brown & Medium Brown.

Water Based Stains: Pecan; Shaker Maple; Early American & Natural.

Right now I will only be testing them on some scrap pieces. However, there is probably going to be several things that need to be done first as we talked about in an earlier post.

Stay tuned for further up-dats on these products.

Well let me leave you with the following picture.

Yup...Spring has sprung!!

These Crocus flowers actually started blooming a few days ago, but yesterday was when they looked their best. The Daffodils will be blooming any time now.

Well, I guess I've taken a long enough break to write this post. I'd better get back to work!

Till next time...

Cheers,
Larry ~

Sunday, February 15, 2009

Plumbing up-Date

Today has gone well in regard to the plumbing.

The pesky nut that held the p-trap tail pipe came off easily after soaking up the PB Blast all night.

The run to Lowe's wasn't bad either and I got what I needed.

However, upon further inspection of the water lines, we have decided to leave them alone for now. They are not leaking. The slow leak from the hot line will cease once the faucet is attached. We decided to wait because I'll be tearing it up again about this time next year. At that time I plane to replace ALL the piping in the bathroom. Instead of wasting the money (since the water lines are good) we will just do it then.

There it is - the new drain pipe!!

Finally...something went right!!


Here is a better view so you can see the coupling I used. Just the standard compression coupling.

HOWEVER - the whole thing is not going to be put back together and tested until possibly Tuesday.

"W H A T ?!?!?" I hear you ask. Simple reason, but not a simple solution.

Enough of the old tile from the 70's was messed up by doing this repair. On top of this the tile is popping up on it's own, so we've decided to replace it. This will take about two days time. I will need to pop up the old stuff; clean the hardwood floor; and then seal it with primer. That will take a day to do alone and then another day to replace it.

We're not putting down something really fancy either, just something till we re-do the bathroom in a year. Consider it a 'stop-gap' till the bathroom re-do. Ultimately we are going to install the small, hexagon shaped tile that was common in the Victorian & Edwardian periods.

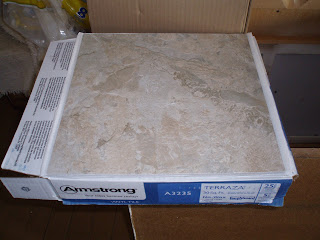
Anyway, here is what were are putting in.

It isn't all that bad looking.

Before I forget, the other reason it will be at least Tuesday before it is finished is that you need to let the tile sit in the room it is going in for 48 hours. So, I can not even start laying it till this time Tuesday.

Besides, if something happens that makes it where we can't do the bathroom when we want to, the floor will look nice. It also goes with the way the bathroom has been painted and decorated. I'll get some pics of that and share with you later.

One last thing...

Let me leave you with this picture.

What you are looking at is the ceiling in the kitchen under the lavatory area.

You can easily see the big stain, but you might have to look to see the one on the left side of the pic. There is also a third stain that's not in this photo. It's about 2' from the stain on the left and has obviously followed a floor/ceiling joist.

I will let these dry for about a week before I treat them and re-prime.

Yet again it falls to the eternal struggle - it's either me, or the house!


Till next time...

Cheers!
Larry

Saturday, February 14, 2009

It all started with...

It all started with the shower head.

Anyone who owns an old house knows about calcium deposits that break off and clog shower heads and faucet aerators.

About once every year, or year and a half, I remove the shower head and aerators and clean them out.

About two weeks ago SWMBO said the shower head was acting funny. Well, time to clean the calcium deposits.

SWMBO had a business trip last Thursday and Friday so I figured then would be a good time to do it. I took the shower head off, cleaned it out and then let it set over night in diluted CLR.

This would allow her to have a nice surprise on Valentine's Day.

After removing the shower head, and before the CLR, I removed the aerator from the faucet in the 2nd floor bathroom. Look what the house gave me as a present!!

How sweet...isn't it just beautiful?

It's the ENTIRE aerator assembly. Plopped right into my hand.


Well now...that answered a question for us. Turns out the copper pipe that connected to the aerator was rotten and from the looks of it it was slowly leaking. We knew we had a leak somewhere, but could never find it.

So now the house has thrown a monkey wrench in my plans for the rest of the week. All I needed to do was replace the faucet. Figured I'd just get an el'cheapo since we were planing on redoing the bathroom about this time next year.

But wait...it gets better!!!

I made the first trip to Lowe's to get the faucet and pick-up SWMBO from the rental car place.

Got home and installed the faucet. Looks great. In fact, looks just like the one that was replaced. I then went to attach the water lines. The end of the copper pipe (hot water) that connects to the faucet crumbles. DANG!!!

It's 8PM and we now need to make a mad dash to Lowe's before they close. We get there and buy a couple of flexible water connectors.

I get home and connect them.

WT?!?!

The male end of the water riser is a nipple connection and the water connectors I bought won't fit!!!

Okay...nervous breakdown...fight the urge to hide under the bed.

It's too late to go to Lowe's now so it has to wait till the morning.

Saturday morning I run to Lowe's (remember, it's about a 20 minute trip one-way each time). I take the old copper line with me so I can make sure the correct type of fittings are purchased. Got them and rushed home.

Here are the parts. Since no one seems to make a 1/2 female to 1/2 male brass coupling I had to get two types of fittings to make it.

Okay, I attach the first one. Guess what...it wouldn't fit!! The 1/2 coupling, while it fit the nipple, would not tighten down at all!! Water went every where!!

Okay, next trip to Lowe's - the 3rd one for this project.

This time it is serious. The hot water Shutoff valve is not shutting as well so there is a slow leak. AND there is now a water stain on the ceiling in the kitchen!! YES - my newly primed kitchen ceiling!!!

&%$%#&)%*%&@^$@(*$

I get to Lowe's and this time I get a specialized coupling that I wanted to avoid from the beginning, along with another specialized nipple. I run home hoping the new fittings will work.

Here they are. They are special nipple couplings as well as 1/2 to 1/2 connectors.

They work!!!!


WOOWHOO!!!

So, I decide to go ahead and install the new drain that came with the faucet.

The old one was so corroded it would not come out, nor would it go back in!!! I was stuck...now what? I grab the sawzall and attach a supper short blade. I cut the messed up part off and the thing came out.

I then cleaned up the opening and prepped it for the new one. I install the new one. Guess what...the tail pipe of the new drain is a hair too long. Not a big deal. I make the adjustment and go to reattach the p-trap and the slip-nut washer is so worn it will not compress enough to the new tail pipe!!!

AAAAAAARRRRRRGGGGGGHHHHH!!!!!!!!

So...I remove the trap part and the slip-nut, replace the washer and go to re-attach the trap to the drain out-let.

The drain out-let fell over...literally...it fell over....

WT?!?!

&%$%#&)%*%&@^$@(*$

AAAAAAARRRRRRGGGGGGHHHHH!!!!!!!!

The stupid thing broke off...under the vanity cabinet floor!!!

So, now I had to get the Multimaster out and cut enough of the vanity bottom out so I could see where it broke off. Go figure...even with the floor.

Mystery #2 solved. Turns out that the drain out-let had been even more rotten the the pipe that snapped off at the aerator. All this time I thought the funky smell was coming from the toilet. I have changed the wax seal on the toilet several times thinking it would solve the problem, but it didn't. So we then chalked it up to the fact that the plumbing up stairs had been leaking for so long it permeated the woodwork. Now we know where the problem was!! It wasn't the toilet at all - it was the lavatory drain!! Since it was hidden under the vanity we couldn't see it at all. There is no telling how long it had been leaking and causing the smell. It also answers the question as to why new stains would show up occasionally on the kitchen ceiling.

Before I show you a picture of it let me show you this one.

This will allow you to see the connection I had to make for the water lines. At this point the floor of the vanity is gone.


Do you see how nasty it is under there?!?!?!

This is so embarrassing and humiliating!!!

The yellow bucket is to catch the dripping water.

In order to see just how bad it was I needed to remove this part of the vanity cabinet which meant that the top had to be removed and the vanity removed.

Take a look at this.

I've thrown this picture in so you can see what the walls of the bathroom use to look like - brown and gold!! Don't forget that the woodwork was painted a cross between hot pink and purple. Man - the 70's were a wild time!!!

Okay, this next picture is not for the squeamish - you are warned!!!

This is the break.

Can you believe how nasty this area is?!

I told you it wasn't for the squeamish.


Here's a close-up.

You can see just how rotten the pipe was. It's a wonder we weren't getting flooded out each time we used the lavatory! There is an instillation stamp on the vanity. We know that it, as well as all the piping, was installed in 1973!!

Time to get the Multimaster out again. I had no choice but to cut out some of the floor so I could see if there was more damage.

Here's the floor with the tile removed.

The original flooring is still there, however, it has been subjected to this slow leak for so long it is heavily warped and spongy.

It was so bad some of it just disintegrated on contact.

FINALLY!!! For once I've had some luck.

All the piping is galvanized and the connections are close together. This means I don't have to remove anymore of the floor at this point.

In this close up you can see the spot where the drain outlet pipe broke off.

The blackish looking stuff at the pipe joints is not a sign of leakage. It's the original pipe dope from the 70's. This might make things difficult for replacing the water pipes and the drain pipe.

Right now the hex nut is soaking up some PB Blaster. I can't get it to budge.

Tomorrow I will bring out the big guns in order to remove this puppy. I will also have to turn off the water to the house so I can remove the water supply lines. As of now we can not find shot-off valves to the 2nd story.

I guess at least one more trip to Lowe's will have to be made tomorrow.

Pray for me....

Here is one more picture to leave you with.

This is just so you can get a better view of the crap found under the floor boards. I even found a large piece of glass that was about 1/4 inch thick. Now why would that be in there?

It's going to be interesting when we do re-do the bathroom. We plan to remove the original floor, since it is ruined for the most part, and replace it. There is no telling what we'll find when we do this.

I'm telling you, it's either me or the house. One of us is not going to survive.

Well, till next time...

Cheers!
Larry

Wednesday, February 11, 2009

Sans Souci

Hello again everyone.

The woodwork stain problem is just about to become a bad memory. Tomorrow, hopefully, it will be finished, as well as those pesky doughnuts.

This post however is more along the lines of tongue-n-cheek.

Remember way back when I rambled on about a house name for the property? Guess what (?!) - we have one.

Before the big reveal, let's do a little backtracking.

All my life I have been somewhat of a person along the lines of a 'Niles Crane' with the exception that I like to play in the dirt and be a bit scruffy. You could say I fall in among the worlds of the Bon vivant, the Hedonist, the Savant, and the Epicure.

On the lighter side I have a wicked, warped, and somewhat twisted sense of humor.

In high school SWMBO and I were considered the 'Sam & Diane' of the town.

We fought like cats-n-dogs but could not be rid of each other. The universe just kept throwing us back together. I had the attitude of Sam and SWMBO had that of Diane, even down to the hair!

Our notorious 'break-ups' were legendary around town as well as among our friends and family. It was so notorious that when we got married we invited 405 people to the wedding and 401 showed up! The joke was that they came to see if we would go through with it. The four that did not show only missed it because they were living in France at the time. The rumor had it that there were even bets as to what would happen.

Anyway, you are probably wondering how this has anything to do with a house name. It does and I'm getting to it.

SWMBO, like myself, has a sense of humor. Not as twisted and warped as mine, but a good one.

This is where it all comes together so pay attention.

Take into account the refinement of Niles and Diane; my twisted sense of humor as well as SWMBO's sense of humor; and our love of good food, good wine & luxurious surroundings. Then throw in a healthy amount of the trials and tribulations of old house ownership and restoration à la "The Money Pit" and you have the reasoning behind the name we have chosen.

What IS the name you ask?

Sans Souci

It is the name a famous palace in Potsdam Germany. If you go here and here you can learn more about it and see some pictures.

The rest of the 'joke' is up to you. Keep in mind all that I have told you as well as the aspect that the name belongs to a world famous palace, and then look up the meaning. Once you know the meaning you will see just how much of a sense of humor we have.

In the words of Walter: "Here lies Walter Fielding. He bought a house, and it killed him."

Well, till next time...

Cheers!
Larry

Beware of the House

So, how do you know when your house is trying to kill you?

I'm not too sure how to answer that, but I think ours is.

Case in point, the following pictures.

Do you know what this is?

This is the house trying to kill me.

Can you figure it out?

Here's another view.

By now you should be able to figure it out.

If you can't figure it now I don't know what to say.

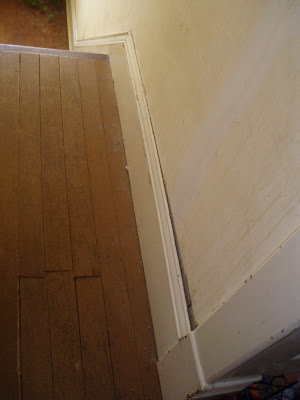
It is the top piece of the mop board at the top of the stairs in the second floor landing.

Now, you might be asking "how is this innocent piece of molding trying to kill you?".

Simple, it jumped out at me and about snagged my pants. That's all I need - another fall down the stairs.

I know it doesn't look like it is out that far, however, I took the picture AFTER I shoved it back in place.

Now don't you think this to be odd? Yesterday, and all the days before it, this piece of molding was flush up against the wall. Now it has popped out. What gives?

I'm starting to worry about this place. Little things like this are starting to appear. My first thought is that the house is settling due to a problem with the foundation. However, there are no cracks, snags, or bulges in the foundation!

The only time I have seen something like this happen is when a board is put under pressure due to shifting, moving or some such. On top of this we have noticed that the hardwood flooring on the second floor also looks 'funny' and some of the stair steps seem to be shifting as well.

The ONLY thing that keeps coming to mind is that the second floor landing and stairs are trying to fall away from the rest of the house!!

I have done everything I can to see if this is the case, but each and every 'check' turns up nothing!

Anyone have an idea of some other way to check this out. I do not want start ripping good plaster off the walls just to see the bones! Besides, we are not at the point to take on a task like this - i.e. ripping out the stairway and landings.

Now what?

Well, till next time...

Cheers!
Larry

Monday, February 9, 2009

Woodwork/Bleach Up-Date

Hello Everyone!

Since the last post several things have happened.

First of, I have caught the 'crud' that's going around. SWMBO has been keeping me doped up for the past few days.

With the exception of a few hours Saturday afternoon I've been in bed for the most part. More about this later.

After a couple more treatments of the Calcium Hypochlorite we got all the stain out we could.

Today, I have spent several hours, gently, sanding the woodwork to get the rest out.

The powder room door jambs and lintel are finished; the basement one isn't.

If you look at the basement door you can still some dark splotches.

My arms are tired and the sniffles have come back, so I've called it quits for the day. The basement doorway will have to wait till tomorrow.


Here's a better view of the powder room door.

The inside parts of the casing and stops have not been sanded yet.


Okay, as mentioned we got out for a few hours Saturday afternoon and I paid for it later that day and Sunday.

Believe it or not I wore out the head on my Makita finish sander so I needed to get a replacement. Luckily there is a tool store in the big city that had one.

While at the tool store I went ahead and picked up some new items for the Multimaster.

I've added a sanding finger to the attachment collection as well as various grits of sandpaper to go with it.


Tomorrow I will try it out, as well as an 'alternate' use for a worn-out blade.

Well, till next time...

Cheers!
Larry

Friday, February 6, 2009

Doughnuts, doughnuts everywher and not a one to eat!

Okay, have any of you ever heard of a 'Doughnut', or 'donut'?

I'm sure you have, but I'm not talking about the eating kind, I'm talking about the wood filler/putty kind.

I HATE THEM!!!

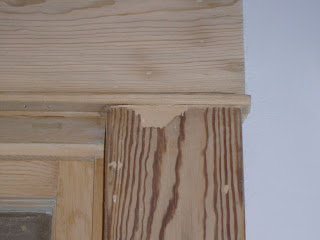
This is what one of the nasty buggers looks like.

They are made by the putty resins seeping into the surrounding woodwork of whatever hole your filling.

It doesn't sound too bad, but it is. If you do not get all the resin out you end up with a 'doughnut' effect when you stain the wood.

Here are a few that showed up during the bleaching process.


It was very disheartening to see these. I thought I had sanded them all out!!

And here are some more.


AAAARRRRRRGGGGHHHHH!!!!!!


So, what to do what to do....

I turned to the great guys over at the In The Workshop forum.

Basically, what they told me is:

try scrubbing it with water and a stiff brush to get it out of the pores of the wood. Not easy.
...if the water doesn't dissolve it, try a little lacquer thinner...and some course steel wool,or a brass "toothbrush"...one last thing is to use some stripper over it...that usually always cuts the filler...

Mr. Neil also gave me an incredibly easy tip to keep this from happening in the future:

A trick to avoid the donut issue is to ,use a piece of masking tape to avoid getting it all around the area...

The worst part about it...I have two rather large areas where I used the filler.

Here...


...and here.

As soon as I learn how to deal with these big spots I will let you know.

I have found out a great deal about Minwax and their products. Let's just say I won't be using them again.

There are two new (to me anyway) product lines that will be used for this project. When they were first suggested to me I knew nothing about them. After some digging I discovered they are some of the brands the pros use. You won't find these at the 'big-box' stores!

Once the products get here, and I've played with them, I'll post what they are and tell you what I think.

Well, that's enough for now; I better get back to the kitchen.

Till next time...

Cheers!
Larry

Wednesday, February 4, 2009

Septic Problem & Woodshop Up-Date

Life has not been revolving just around the woodwork in regard to the house.

As some of you know, we are still having problems with the septic system.

Whenever we do laundry, or take an extra long shower, we have some of the gray water bubble up to the surface right next to the septic tank. We do know the tank is over 50, or 60, years old. A new cement top was added at some time, but from what we can tell the tank is brick with no bottom.

So, we have started the wheels a turnin' with the City to get hooked up to the sewer main. We are one of the few houses in town that's still on a septic system. Yesterday, as well as today, the city maintenance manager came over to talk to me about the situation. By law the City must bring the sewer line to our house. The closest main line is about a block away. So the City will have to install a line from the main to our property line. They will also have to get permission to dig a trench across the schools western parking lot. It is estimated that it'll take 4 days to install the sewer line.

We are not sure how much it's going to cost us, or how long it will take, to put in our portion of the line. We do know it'll be somewhere between 150' to 200'. The hard part is all the trees, shrubs, buried electrical lines, water pipes and a well house. All of these obstacles will have to be dealt with to get our portion of the line to meet up with their portion of the line. What's real bad is that the closest point for the city to get the line to us is right at the edge of the huge cottonwood tree at the north west corner of the property!!

From what I was told today, the City would like to try and have this done before the month is over! We were thinking along the lines of doing it during Spring Break or after school lets out for the summer. We're surprised the school isn't thinking along this line as well. Why would they want a 4' deep trench cutting across their parking lot while school is in session?

I have also taken some time - since the house stinks of bleach, to work on the woodshop.

This is the new floor plan.

Most of what you see is in place. The Benchtop Planer, as well as the Compound Miter saw and Oscillating Spindle Sander are shown on top of their work benches but are in reality stored under them. Also, the red lines on the walls represent my peg boards. Oh, there is also a storage cabinet above the Jointer, but it's not on the plan.

The only part of the woodshop that is not set-up yet is the wood storage area. It will be located in the same place as depicted in the floor plan.

Well, till next time...

Cheers!
Larry

Bleach Saga Continues!

Hello everyone!

As I write this the subtle scent of bleach is wafting the the house.

I spent a good portion of yesterday hunting down the next step in the bleaching process - Calcium Hypochlorite.

Most of you probably know this stuff by the many names it goes by when sold as pool shock. It is commonly sold at places like Lowe's and Wal-Mart. However, it wasn't that easy to track down. Those places only stat to carry it during the late spring and summer. The next place to check was a pool supply store. Eventually an open one was found and some of the chemical was procured. It was an interesting purchase. The dealer kept giving me this 'look' as if he knew I was up to something bad with this stuff. When I explained what I was doing he just continued with this 'look' along with a 'yeah right' thrown in.

Oh well...at least I got the stuff.

Here's the woodwork after using the regular Clorox bleach on it. Figured you might as well see how far it has come in the bleaching process.


This is the section of woodwork I use as my 'Purity Control'.


Here's the nasty stuff.

The brand of Calcium Hypochlorite used is called nu-clo Hit Hard.

Per the instructions for pool use you use 1 pound (the whole little bag) per 6,000 gallons of water.

I probably used close to 1/4 cup for 1/3 gallon!! The on-line instructions for using this stuff on woodwork said to mix the crystals in water until they no longer dissolve. So I'm guessing about 1/4 cup.

From what I understand, this stuff is extremely dangerous to use.

Before I even cut the bag open precautions were taken. The front and back doors were open as well as the windows in the kitchen (thank goodness it was a little warmer than normal). Heavy duty rubber gloves were donned as well as a respirator. I had planned to use goggles as well, but they wouldn't fit with the mask.

BOO!!

Your's truly. Don't I look fabulous?!


This is the stuff mixed.

It was all bubbly and frothing, and even with the respirator the smell was bad.


Once the gunk was applied I left for fresher air.

When I ventured back in this is what I found. The bleach had dried and now it looks like salt deposits. It'll be washed off before I go to bed - that ought to be fun.

Doesn't this look bad?!

I wonder what it will look like tomorrow morning after it's been washed off and the wood has dried?


Well, till next time...

Cheers!
Larry