Hello again everyone!
This past week has been a slow one. A major snag was hit that brought the west side soffit repair to a screeching halt. The snag did not happen here but at the in-law's house - their well pump went out on them. They were without water from last Sunday night till late Friday night. Seeings how they NEEDED their water well more than we needed our soffit the father-n-law spent the whole week working on it.
Even though I offered to help him several times I spent the week doing something that needed to be done as well and it took a lot longer than expected - window prep. That's right, I spent the whole week working on prepping windows to be re-glazed. I still have two full windows and one pane to do and then I can glaze.
I should have spent Saturday glazing the windows but we decided to go to the big city and partake in the annual Historic House Tour.
It was an 'okay' tour. It's interesting to see what other people have done but I found myself scrutinizing details way too much. The best house on the tour was one that is in the destruction phase of a major restoration. We were really surprised that the owner did this. It takes a lot to let people in and see the mess you live in while doing it - we know this personally. Just think of the potential for liability!!! There were open spaces that allowed one to stand on the main floor and see, three stories up, into the attic.
This guy's house is a lot like ours but brick and about 50% larger. His house is the first one we have found with the same interior moulding we have!!! Also, his front room was one large room instead of a foyer. It would be as if we had two of our living rooms connected together. Also, his staircase was an open one and looked like something out of 'Gone With the Wind'. BTW - the house had been heavily divided up to make it usable as a 'safe house' for battered women in the 70s and 80s. The large front room was turned into three rooms and the staircase was even rotated 90 degrees. Part of of his restoration was the removal of the new walls and putting the staircase back in it's original location.
I was able to spend some time with him and swap horror stories and exchange ideas. I'm hoping to get to talk with him again in the near future when he isn't as distracted with people. I know we have to go back and see him at some point though because we have a part he could use. We found the original hot-water heater stand that would have been in this house and he has the original water heater for his house. We thought we'd let him have the stand.
Anyway, like I said earlier, I spent the week working on the windows. Originally we were not going to remove all the glazing but the more we worked around the windows the more we saw it needed to be done. In some cases the glazing fell out with barely a touch. In other cases I though dynamite would be needed. In those instances I used the Fein Multimaster; it has a blade that works great for
removing stubborn glazing. The only windows left to do, other the the north side and the attic windows, are the top two on the west side. Other than these two the rest are ready for glazing. The other pane that has to be done will be addressed in another post.
Lets get back to the soffit.
I left off telling you just how bad it was and that the main board tying the rafter beams together had to be replaced. If you remember some the the ends of these beams were not in the best shape but still sound. Since we need to build up this area, in order to attach guttering, we decided to reinforce the rafter beams in order to handle the extra weight.

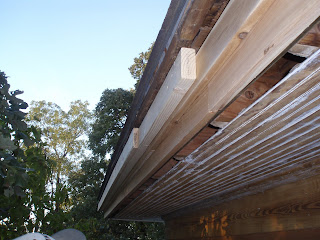
In this shot you can see how we did it.
We cut pieces of 2x6 into 1 foot lengths and tied them into the original rafter beams. The two you see here have not been tied in yet but it shows what it looks like.
While installing the extra pieces we were able to see just how much sag there was to the roof in spots. Some pieces slid in easily while others took a lot of effort.
We used
Sure Drive Composite Deck Screws and they are absolutely wonderful! They self drill and are designed to pull both pieces of lumber together tightly. Even though they are designed for composite decking material they can be used with standard wood as well as treated lumber. The chemicals used in the treated lumber will not eat through these screws like they will the other screws. The hardest part was tying the new pieces in.
The original wood is so hard we had to resort to drilling pilot holes even for these special screws. To give you an idea how hard the wood was we broke three drill bits doing it. The pilot holes helped but the the fact remained that we had to cram an arm, and drill, into a 14" space in order to drive the screw. Along with this the scaffolding wasn't at the right height so we had to drag out a step stool to stand on to make the reach. So, while one of us drilled, the other spotted in case the one drilling slipped. The person who did the drilling had to use a lot of force to drill and was not able to hold on to anything for balance.
This process took almost an entire day.
The next step was installing the new 2x6 tie-in beam. This was a rather large sucker, a 12 feet long piece of treated lumber.
It isn't an easy task to manhandle something that size, and weight, up 20+ feet and we had three to move.
Once we got the first piece in place - I held the board up (while standing on tip-toes) while the father-n-law got a couple of screws in to secure it - we discovered another problem.
This time we were able to see just how uneven the settling along the edge of the roof was where the fascia and shingles met. The sag in the roof pushed the new board down in spots.

This is how we fixed the problem.
We are using a bottle jack and 2x4 to force the roof line back to it's proper location.
Do you see the 4x4 sticking out of the scaffolding platform? We know that the roof, even on the edge, weighs more than a ton due to the downward pressure of the roof spread along the support beams via the rafters. If we would have tried to use the bottle jack, by itself, the weight would have been forced downward, causing the jack to puncture the platform. To counter this we borrowed a 20' 4x4 and dragged it to the platform. This allowed the pressure to be evenly distributed to the metal part of the scaffolding and push the roof line up into place.
It worked, but was slow; after every four feet we would have to climbdown and move the scaffolding and readjust.
This process took another day.

Take a good look at this picture and you can see where the section of tie-in beam is about a 1/4 of an inch to 1/2 an inch lower than the roof beam. The father-n-law is removing the retaining screw he installed at the beginning so that we can adjust it.
Note the jack supported 2x4 to the right.

SWMBO took this picture.
We are now starting the process of straightening the roof line on the second piece of 2x6x12.

This picture SWMBO and I debated whether or not to post due to the difficulty in seeing the intent of the picture. You might have to click on the picture to see it better.
The intent was so you could see all four layers; the main tie-in beam with the beginnings of the new fascia, and built up area, on top.
The main tie-in beam (the three 2x6x12s) run the entire length. The first section of fascia board (made up of 1x6x12 ceder boards) ends just to the right of the lower window. We used a scarf joint on these boards in order to help lock their ends together and give a more finished look. The next section is the top fascia made up of 1x4x10s using scarf joints as well. To help maintain strength and stability the scarf joints of the upper fascia need to be staggered away from those of the lower fascia. Due to the staggering, and length of the upper fascia you can see where it ends just to the left of the lower window. The shortest piece of lumber you can see, the one on top of the others, is the first step in building up the space occupied by the original crown moulding. This must be done so that the guttering has a stable base to be attached to and is located directly under the roof flashing. This board is just a standard 2x4.
In this close up you can see the various layers.
Look close and you will see a dark line running along the roof beams; this is the new tie-in beam. Next you can see the first fascia layer and scarf joint. On top of this is the second layer of fascia.
These two layers of fascia reproduce the original fascia on the house and the original crown moulding would have been placed on top of it.
Next you can clearly see the 2x4 with the final piece of spacing on top of it - a 1x4 piece of ceder. We are not using scarf joints on the two spacing layers; one, they are not needed, and two, they will not be seen.
This top layer is where the guttering will be attached. Note the use of ceder as the outer portion that will come into contact with the guttering. Ceder is extremely strong for it's weight and it's also impervious to rot and insects.
The space that needed to be filled is almost 3" in profile. It might not sound like much but from the ground it makes the soffit/fascia area look massive. in order to disguise this we have decided to add something. More on this will be forth coming in a later post.

And here we have the finished fascia, at least on the west side.
This corner shot lets you see how nicely it all ties together and will allow the guttering to sit where it needs to be. If you look close you will notice that the final piece of spacing board, the 1x4 piece of ceder, has not yet been added to the south section.
You can also see that a length of the bead-board soffit is still missing.
Turns out this entire length of bead-board had to be replaced after all. The bad part is that the replacement pieces that are currently made are either too thin or too thick.
In order to get the 1/2 thickness of the original bead-board we bought 3/4" and cut it down. I also had to cut the tongue off the edge of the bead-board so it would go into place.

On Monday I installed the first piece of replacement bead-board.
I think it turned out great.
The other pieces will have to wait till later because I need help moving the scaffolding. Perhaps SWMBO can help me with that today.
Well, I guess I better go get busy.
Till next time...
Cheers!
Larry


 This is what we found! Sorry the pic is a bit 'fuzzy'; all I had was my cell phone to work with.
 Isn't this summer cover exceptional?!
 As their logo states "When Ordinary primers Are Not Enough".

 This stuff is just like the Peel Bond but is thicker and is an ultra high build filling primer.
 The coverage is exceptional and applies very well. Because of this we have not had to use near the amount of paint we first thought we would need to.

 Here's the drill after the battery finally gave up.
 Here are a couple of the wasp nests we've found.
  See that slash of bright light behind the nails? That's where the hole is - the sun is shining through.
 "Hello there!"
 This is the underside after repair.
 Not too bad of a repair is it?
 From this view it doesn't look too bad, but moisture could still get in and so it needed to be tightened up.
 To make the repairs easier I cut out a half-cove and octagon template on my scroll saw.
 I then cut out about 20 of each on the band saw.
 Here is the lower section of one of those 'puzzlers'.
 This is part of the upper portion.
 And here it is.

 Another puzzle piece. This one was easier but note the size of it compared to those around it.

 Here she is helping her dad install the pieces of fascia that the guttering will be attached to.
 Here they both are working on the east gable; I was still glazing away.
 The white stripe is what you need to notice in this picture. It is the new crown moulding that is under the built-up area the gutter will be attached to. When the gutters are installed they will create a 'double crown' effect.
 This blob of gray is the the second layer in that rotten spot under the kitchen window. The gray stuff is bondo for wood. Once this is sanded down a bit another layer will be added.
 This last one is just a few scraps of old clapboard attached to a board. The intention is for SWMBO to use it in order to make a decision as to what colors will be used on the fishscale.
 And here it is.
 This is how far we got as of 5:45 PM today. It was starting to get dark so the picture isn't that bright - sorry.
 Here's one of the spots where the fishscale needs to be replaced. For some reason the squirrels really loved chewing on this section. Look close and you can even see where they chewed on the wide section of moulding (it's about 6" diagonally down from the paint).
 In this shot you can see how we did it.
 This is how we fixed the problem.
 Take a good look at this picture and you can see where the section of tie-in beam is about a 1/4 of an inch to 1/2 an inch lower than the roof beam. The father-n-law is removing the retaining screw he installed at the beginning so that we can adjust it.
 SWMBO took this picture.
 In this close up you can see the various layers.
 And here we have the finished fascia, at least on the west side.
  On Monday I installed the first piece of replacement bead-board.


