Wednesday, February 27, 2008

Yesterday & Today - Progress

Yesterday and today were not all that bad. I'm still sore from all the yard work Monday, but progress has been made!

I did some more sanding/prepping on the woodwork.

I have found a few more problems with the windows, but those can be dealt with later. I want to get the woodwork done.

With all the striping and sanding, some of the detail of the windowsills are lessening. So, as part of the final prep I'm re-cutting some of the detail so it's sharper. That's what can be seen in the pic.

Here is one of the corner thingies. So far the hardest part of striping all of these are the little groves. Either the scrapers are too big, or the dental pick is too small.

Also in the pic you can see a small gap between it and the mopboard. Not sure why it's there; there's no sign of the wall pulling away or anything like that.


Izzy came in to make sure I was still working.

SWMBO has her trained VERY well!!

These are some of my 'new' favorite tools.

I had never used a detail scrapper, like the one at the top, before.

MAN is it cool!!! Scrapes 90% of any paint on the molding without having to us chemicals. Only draw back is that it's very sharp. I now have 5 cuts on my fingers. Also, this little tool is what's allowing me to re-cut the details.

I can't believe I've never discovered this tool before. I've seen it before, but thought it looked goofy - boy was I wrong!

The other two are old screwdrivers I have ground down to use as miniature scrappers. We'll see how they work.

Look at that!!!!

All those nasty tiles are gone!!! Floor is filthy, but at least the tiles are gone. I hadn't set out to remove them all yet, but for some reason I kept tripping on the ones popping up. So, instead of falling on my face I got rid of the problem.

SWMBO does not know about this yet - hopefully she won't freak.


Just another view.

See the dark line between the window and the mopboard? That's where the top part of the mop board molding goes (yes - it's made up of two parts). I have decided to take the top piece off so I can finish prepping it better.

Okay, now this is the prep area and the scariest section.

We knew there was some damage to the floor here but had no idea it was as bad as it is.

It's hard to describe, but it's as if this part of the floor was pieced together as an after thought.

This is a closer look at it. See that perfect, white, rectangle? Remember it - I'll talk about it in more detail.

Anyway, on the extreme right of the rectangle you can see a swath of floor boards about 6+"s wide. This patch of flooring is about 2' - 3' in length.

Why was the floor done this way?!

This is an extreme close up of THE scariest part.

See all that damage?! Not sure if it's wood rot caused by water or something or if it's termite damage.

When I look at it from underneath (in the basement), there is no sign of damage.

Guess I'll poke at it tomorrow.

Oh well, at least it isn't boring around here!!

Cheers!
Larry~

Another Day Another Mystery…..

Okay, whether good or bad, the old tiles are gone.

Now we have a mystery on or hands.

Remember that pic above I said to remember? Well here it is below, only this time enhanced.

The yellow line outlines a perfect rectangle. It is obviouse that something had sat here at some pont - what?

You will also notice another square outlined in red. There are two boards there that look like either a trapdoor that's been nailed shut or a hole that's been covered. The latter is more than likely what it is. When I look at the spot from underneath (in the basement) there is a rugh hune hole there?

Now here is the second part of the mystery.

Right below the rough-cut hole in the kitchen is a hole in the basement floor. We have never known what this whole was for until an elderly lady (who still lives in town) told us about the basement.

She said that as a little girl she use to play in the basement and they had a washtub set-up that drained into the hole.

Okay, that makes sense.....

Then she told us that during prohibition moonshine was made in the basement (customers came to the side door leading to the basement to buy - that's another story). We later found out that the hole had been enlarged to make it easier to dump the booze, quickly, if necessary.

Here's a look down the hole. It's a good 6' deep and enters into an underground cistern.


The cistern isn't deep, but we have no idea how wide, or long, it is.

So, the Mystery is - what created the rectangular shape in the kitchen and why was it in the middle of the prep area?

Hmmm....any thoughts or ideas?


Cheers!
Larry~

House Name

As most of you know, I'm trying to come up with a suitable name to call the place. Most of the advice I've been give suggests finding a feature about the property or naming it after the owner.

Well, we do not know who, or when, the house was actually built and so far the possible builder are Abner Kerns (he owned the property in 1875) and James Mordy (who we think built the house as we see it now.

Today I reason to look at a topographical map of our little town. When I zoomed in on our house there was the 'feature' staring right at me! Our house is sitting on a low hill, or a 'knoll'. It is about the only one left in town and ours is noticeable (remember the steps leading down to the street?).

Here is part of the topo map. I outlined our 'knoll' in red. That little black square is our place.

Sadly, the only part of the knoll that still exists is the part on our property.

The big black square with the flag is the old school. It too sat on a low hill but it was leveled out to make the new school and parking lot.

Here's a better view.


I have a couple of house names in mind now that I've seen this little hill on the topo map. I'll see what SWMBO has to say about it and then let you all know.

For some reason she doesn't seem to be as enthused as I am about a house name; not sure why. All the really cool houses have names so why shouldn't ours? Besides, we've always been known for marching to the beat of a different drum so something like naming the house is not really out of our comfort zone.

I'll keep you posted.

Cheers!
Larry~

Monday, February 25, 2008

Do Something Everyday.....

"Do something everyday; no matter how small, just DO something."

I read these words yesterday on a house restoration forum. I tried to find it again so I could give credit, but I can't seem to. The topic dealt with trying to stay motivated in regard to working on your house. The discussion talked about depression, frustration, lack of funds, and just about everything else that could keep one from working on the house.

Then some one gave the advice I started this post with. Last night I decided that this will be mantra for working on the house. Believe it or not, I woke up this morning thinking about this and felt motivated.

The problem, if you want to call it that, was the weather. The kitchen woodwork was going to be today’s "something", but the weather was way too nice to be inside. Considering that we had ice, sleet, and snow all weekend the spring like weather demanded that I be outside. So, I changed the goal for today from the kitchen to the yard. I figure that was okay because there is just so much to do on the yard also.

So I spent a few hours cleaning up the limbs that have fallen due to wind, ice, and snow as well as the assorted trash that blows onto the property. Sometimes it's a real pain in the butt to live next to the high school. You would not believe the type of trash we get because of the kids!!

After this (by now I was down to shorts and a t-shirt it was so nice) I decided to some work on the front walk.

The front walk was one of the first projects we did. The walk led to the street, but then stopped. At the end was about a 3' drop.

Since we like Halloween, and it was quickly approaching, we thought this drop needed attention. All those little kiddies needed some way to get to the front porch!

Basically, we cut steps into the dirt, lowered one of the sidewalk slabs and poured the last two steps.

We knew there had to be steps leading down to the street at some time, but there was no evidence. This soon changed. We ended up finding bits of bricks and stone right in the spot we were working. We figured these were the remains of the original steps. If only we could find a photo of what they looked like.

When the house was built the street was a dirt road. It didn't get paved until the 60s. In fact, I'm not sure if I mentioned it before, but our driveway is that last remnant of the old wagon road that led from Wellington to Wichita.

As part of the initial yard clean up I had to cut out all the roses that were along the fence line on either side of the front gate. We soon learned that removing these led to the erosion of the yard from the right side (looking towards the street) of the gate. About the only thing we could come up with to remedy this was to use the pile of stone and build a retaining wall.

This helped to solve the problem for a while, then last year the erosion started up again right above the spot where the stone stopped. So, at some point this spring we will need to expand the stone wall about another 15'.

I had been dreading working on the east side of the steps due to the dirt. I'm not sure what it's called else where, but around here we call it 'sugar sand'. It is dirt with a sandy consistency. What's so bad about it is that when it's dry it can be as hard as cement. When we first started work on the front steps we actually had to use a pickaxe to break it up.

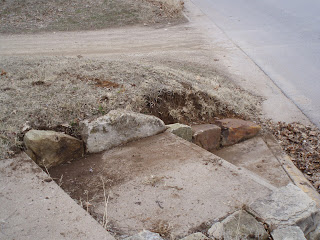
Well, while picking up limbs and litter I noticed how moist the dirt was. So it hit me "work on the front steps"! So here you can see the new stones I added. The part of the dirt wall you can still see will be cut back at a later date and terraced like the retaining wall is.

Do you see the brown shading on the cement? That’s where a lot of dirt had eroded to and had crabgrass growing in it.

I was taken aback when I was cleaning the dirt and crabgrass away. I had just about forgotten that SWMBO and I put our initials in the wet cement when we built the steps back in '99.

I'll have to show it to her when she gets home.

Cheers!
Larry ~

Cement, Bricks, and Crap Oh My!

Believe it or not, once I was finished with the front walk (as far as I was going to go anyway) I decided to round up all the small piles of junk cement, bricks and crap from around the yard. Throughout the late summer and fall I had been making little piles of this stuff with the intention of getting rid of them this spring.

Whenever it rains, or I do some yard work, this stuff comes to light. One of the running jokes in the family is that you can't stick a shovel anywhere in the yard without hitting cement, rocks, or bricks. It is frustrating, but it gives further proof that the yard had been landscaped sometime in the 10s 0r 20s. More on that later.

Instead of waiting till spring to clean these piles up, I decided to just go ahead and do it. So I got the old trailer we use for this type of thing from my father and took care of it. I'm sure I'll pay the price tomorrow with a sore back though. But hey - at least it is done.

Can you believe all this junk?! What amazes me is that this is a very small amount of the same type stuff we remove every year!!

Here's a better view of the bigger pieces.

In case you are wondering, all of this is not going to a landfill. Instead it is going out to my brother's property in the country. He is using this stuff to build a path in one of his fields. So, it will go to good use.

The sad thing about it is that there is a lot more of it in the yard. We still have part of the outbuilding we removed a few years ago as well as an old sidewalk and an old slap we have no idea what it was used for.

Cheers!
Larry ~

Future Projects

Well now, if all the yard-work and the front steps weren't enough, I decided to walk around the house and look at problems I'll be facing this spring.

As most of you know, we are planning on at least getting the house primed and the fence put up this spring and summer. As part of the prep for priming we know we'll have to repair and replace parts of the clapboard and molding.

So I figured, what the hey, why not share this with all of you.

This is a view of the porch molding that needs replacing.

When we bought the house there were a couple of huge cedar trees (around 25+' tall) on either side of the porch steps. Both of the trees were dying and had tons of ivy growing all over them.

At this particular spot the ivy had entered around the molding of the fascia.

This shot is of the fascia on the left-hand side of the attic gable on the east side.

You can barely see where the molding is pulling apart. What doesn't show up too well is the pitting caused by the weather. It won't surprise me at all if we end up having to replace most of the molding around the eaves.

Here is the north east corner of the very top eave.

There is a small gap in the corner. That will have to be fixed.

Look real close at the lower part of the picture. Do you see that dark smudge? We do not know when it happened (it was before we bought the house), but evidently there was a short in the power line and it scorched the eave.

Right smack in the middle of the smudge is a clear spot about the size of a quarter. We have no clue as to why this perfect little circle didn't get scorched.

This picture scares me the most. It shows a section of the molding that has pulled away from the fascia on the west side of the roof.

What scares me is where it's located. It's at the highest point of the house (as far as fascia goes). It's well over 25' straight up!! It's not that I'm afraid of heights, what scares me is GETTING to the spot. You see, I HATE ladders!!

I hate them to the point it's almost a phobia. When I was a kid, about 8 I guess, I fell off a ladder. I was climbing up into a peach tree and the ladder started sliding and then buckled from underneath me. Since then I have never trusted, or liked, ladders. I do not care how big, or small, they are - I HATE THEM!!!!

So, I need to come up with some sort of scaffolding system to work on this side of the house.

Cheers!
Larry ~

Speaking of Future Projects.....

Okay, speaking of spring and future projects, let's talk about the fence.

Remember this picture?

This is the schematic drawing of the fence we plan to put up starting this spring.


The drawing is rendered in the correct proportions and measurements. Hopefully the fence will look like this when it's done!

Anyway, a little over two years ago is when we seriously started looking at different fence designs.

The style we plan to go with was one of the first considered. So, with that in mind, have a look at the following pics.

I built this version of the fence two years ago. We wanted to see how well it would stand up to the elements. It doesn't look all that bad.

I used treated lumber and didn't bother with priming it or putting a clear cover over it.

Here you see the side that would face the house. Originally it was to look just as you see it. However, I found a set of plans for a similar fence and there were rails on both sides of the pickets. It looked really sharp so we decided to add a second set of rails. Other than the addition of the extra rails, the only difference between this prototype and the drawing is the width of the rails. On the prototype all three rails are 3.5". In the final schematic the two top rails are 3" and the bottom one is 4".

BTW - if you look close, you will see the tip of the end picket is broken off. I dropped the danged thing last year and it snapped off where a knot was located. When selecting the wood for the pickets, I will make sure that they are knot free.

Hopefully, this is how the fence will look on both sides.

At this point, the plan is to paint the fence the same color we will use on the body of the house.

Now the next project I hope to get to this summer is purely vain. I have no clue as to why, but everyone around here, and several of you out there, are very fascinated by the three globed gaslight.

Right now, the only way it can be used is by putting candles in it. My father-n-law and I tried to get the thing working our first fall in the house. We really thought we had it fixed and ready to go. With that in mind, we invited some friends and family over to watch us light it.

Sure enough, I lit the mantles and a nice, warm, glow started emanating from all six orifices. Then with out warning, flames started shooting out from every crevice there was!

I made a dive for the emergency shut off valve and killed the gas. Oh well, at least we gave everyone a good laugh!

So now the plan is to completely remove it off the spot, dismantle it and rebuild it. We will have to come up with some clips that'll hold the glass in. Right now a gentle breeze knocks them out of kilter. We will also need to replace at least one of the eagles, but might opt for replacing all three so they look alike.

Hopefully this fall we will have a working gaslight again. Wish us luck!

Cheers!
Larry ~

Sunday, February 24, 2008

Kitchen Colors

As most of you know Annette (SWMBO) and I do not always see eye-to-eye on things, especially color schemes. It should come as no surprise that we have been going round and round about the kitchen colors (yes, we are getting that close).

While we are wanting to recreate the kitchen as close as possible to a kitchen of 1900, we are also wanting it to have an old French / Italian touch.

One thing Annette want's is a deep red color scheme in the kitchen - I don't. I'm not fond of red kitchens. I don't mind it as an accent color, but I just do not like large swaths of it. We think we have found a compromise though. Thanks to the Getty Villa, as well as Bill and Gay at Enon Hall, we may have found the colors. They are not traditional for a 1900 kitchen, but the are rich and give off a French / Italian air.

This first pic comes from Enon Hall.

The left side of the picture shows the original colors that were in one of the rooms there. Their son liked the colors so much he asked that the whole room be restored back to this scheme.


Here is another view of the same room after they repainted it.

It appears that they did a good job finding color matches!

This is a panoramic view of the same.

Bill was kind enough to supply me with the names and numbers of the colors they used. While checking out the web site for the paint manufacturer I found the following picture.

It's not the exact colors used by the folks at Enon Hall, but they're close!


We're still going to look at the colors Bill told us about, but it's interesting that the paint company even likes this type of scheme.

I just hope it looks as nice in our kitchen as it does at Enon Hall and on the web site!

Cheers!

Larry~

Bird's Eye View

Hello everyone!

I really enjoy reading other peoples' house blogs and see what they have done. Most of the time I get new ideas for the Folly as well as tips and tricks on how to do restore and fix things.

Several of these blogs are on some awesome sites that I'd love to mimic, but I'm not that talented when it comes to PCs.

One of the cool ideas I ran across recently comes from the Enon Hall site (you should all follow the link to it and ogle the job they've done). They have a "bird's eye view" of their house. So I’m following Bill and Gay's lead and adding one for our house.

This is a 1996 satellite photo of our place.

You can get one of your house from TerraServer-USA.

Cheers!
Larry

Hidden Treasures

One of the things that never ceases to amaze me is how curious people are about what we have found in the house.

More often than not, if they are not asking about the house being haunted, they are asking "what have you found?".

To be honest, we have found many things. Some neat, some ordinary, some pretty cool and some down right bizarre.

While doing some of our spring cleaning I ran across this thing. Until yesterday it sat on a shelf in a closet with some of the other items we have found.

It is perhaps the most bizarre thing we've ever found in the house. It was found in a wall crevice, in the basement, in the Mason jar you see it in now.

Can you tell what it is?


Perhaps this closer view will help.

Does it?

If you guessed anything but a bird you'd be wrong.

We think it's a little yellow canary.

Bizarre isn't it?! Why would anyone place a dead bird in a glass Mason jar and hide it in a crevice of a wall in the basement?

Cheers!
Larry ~

The Camera Has Arrived!

WOOHOO!!

The new digital camera finally arrived Friday afternoon. As many of you know, SWMBO broke here parent's digital camera (the one we had been using). So, when we bought them a replacement, we purchased one for us also.

The one we went with was an Olympus Stylus 750.

For some reason we never received a shipping transaction number and never heard back from Olympus. Being a little paranoid about buying electronics over the Internet I decided to contact them. Not sure why, but I just couldn't get them to answer any of my e-mails. I couldn't even get them to answer the phone!!

I felt there was no other choice but going through PayPal resolution service.

Turns out there had been a glitch in the order they missed. The camera we ordered was listed as "in stock", but was in fact on back order. Since they knew we weren't happy campers (it had been 10 days since the order was placed) they upgraded us to a 760 without any up-charge.

Here it is!


Looks a lot like the original 750 we ordered, but this puppy has more pixels as well as several other features.

All in all, we are happy with the camera, but a little disappointed in the customer service department with Olympus. It's interesting how fast they can ask for their money, and get it, yet drag their feet to help when there's a problem.

The picture quality isn't too shabby if I do say so myself!

But then again, it could just be the subject matter.


Izzy found a nice place to snuggle up into while we started a preemptive strike on our spring cleaning.

Speaking of spring cleaning...


I pooped out too and SWMBO decided to play with the new camera also.

Unfortunately, this did not last long.

Cheers!
Larry ~

Friday, February 15, 2008

Of Sawdust & Shavings

Ah.... There isn't anything quite like the smell of fresh sawn wood and fresh wood shavings. I love the smell. Today, the whole house is filled with that smell...

I was able to fire up the new table saw today and it was excellent. The cut was as smooth as glass...and the smell...Ah...

I love woodworking. There is nothing quite like it in this world. Being able to take a lump of wood, or in this case a scrap of old wood, and turning it into something nice.

Today, I got to do that.

Believe it or not, I got to use one of my favorite tools - a hand plane.

There might be fancier, and more high tech methods out there for removing wood, but there just isn't anything like a hand plane.

The sound it makes as it slices through the wood....

The smell it creates with each new shaving....

And the feel...it is as smooth as glass. You just can't get that with a sander.

As you might have figured out I'm very pleased with myself today. The large patch in the floor is finished!

Yes - it is done!

HAPPY HAPPY JOY JOY

(yes - I'm doing the happy dance)

It was tricky getting the last two pieces to fit and THE last piece had a surprise I was not anticipating.

Turns out that the door threshold had a very steep, downward slope on the wooden floor side. It was a bit tricky to get that angle right (still not sure how I did it), but after the second attempt - perfection!


Do you see that color?! Isn't it wonderful?!

That is what all of the flooring in the house is like.

I can already see the finished floor in my mind.

Today has been a very good day.

Thursday, February 14, 2008

Sad News.....

Well shucks....

I have just found out some sad news.

Mindy & Teague, the owners of the 'Fixer-Upper' have sold their house!


Fixer-Upper

This is THE house blog that started it all for me. If it were not for their blog, I would have never started the 'Folly' blog.

Mindy & Teague, I will truley miss you. Good luck in your new ventures!

What I gave my Valentine...

Normally, SWMBO and I do not celebrate Valentines Day. For as long as we can remember (going all the way back to the 3rd grade) we have fought like cats and dogs on this day. So, for us, the best way to celebrate it is to just ignore it.

Last year right, before Valentines Day, we had the chance to attend a private gala celebrating the opening of the 'Titanic' exhibition at a local museum. We were treated to recreation of the last dinner on the Titanic as 1st class passengers and then treated to a private showing of the artifacts.

It was a spectacular evening.

Yes - this is me with SWMBO.

Doesn't she look stunning?!

That dress she is wearing had to weigh 10 pounds. It is a full-length ball gown based on one from the turn of the 20th century. It is covered in thousands of tiny, tiny, hand stitched beads.

The pic does not do the dress, or her, justice.

Anyway, for 'grins-n-giggles' a friend took a picture of us in the 'classic' pose that everyone saw on the posters for the movie. This got me to thinking.......

So, for the very first time, in a very, very, long time, I did something special for last year’s Valentines Day.

With the help of a very talented friend in Texas (hey Laura! Thanks!!) I gave my wife the following picture as a Valentine.

I know, it's a bit 'cheesy', but what can I say, I'm a softy when it comes right to it AND an old romantic.

This year, I decided to do something else for the big day. I figure that last year went off so well (you know - without the dog & cat fight) I'd do something again this year.


TA-DAH!!!!!

The floor at the back door to the utility porch is in!!


I know, I know, it isn't completely in, but it's better than it has been in several years.


SWMBO has been wanting me to get this fixed for quite sometime so I figured, 'what the hey' it is Valentines Day so I ought to do something special.

**Note to all you house restoration people out there**

You know your really into restoring your house (or is it that your just that desperate) when something like flooring installation is considered a 'gift'.


As you can see, it isn't completely finished.


I have two more pieces to cut; the end-cap next to the threshold, and a small piece up by the water pipes.

I didn't get these last two pieces done due to lack of proper planning.

It was the first chance I had to use my new table saw - only problem was - I had yet to assemble it!

How hard could it be to put together a table saw...

Almost six hours later the saw is finished.... Don't ask why it took so long. Let’s just say Percy might have had a hand in it.

By the time it was finished I was tired, and the cold front started to blow in (dropped almost 20 degrees in an hour).

Oh well...it will be finished tomorrow.

Oh yeah...before I forget. Do you see the paint can in the picture? That's our security system. Since the door trim isn't installed yet (tomorrow hopefully) we have to have some way to keep the door closed!

Here's one last parting shot. You can see where the missing piece goes as well as the original threshold.

Also, those light colored splotches on the wood flooring - there pieces of cardboard that someone glued down on to them. No worry though, it comes off very easily.

We definitely lucked out when we found a cache of original flooring in the attic!

BTW - how do you like the pics? The first of the two cameras we purchased arrived this AM (another reason I've done this post). The one that arrived is the one to replace the in-law's camera that got broken. Hopefully ours will be in tomorrow.

Well...I'll let you all go for now. Hope your Valentines Day was a good one!