Showing posts with label stain. Show all posts

Monday, October 12, 2009

"I'm ready for my closeup Mr Demille"

Old woodwork and old Houses are a lot like good wine and great women - they get better as they age.

However, there are times that blemishes appear and must be taken care of. Am I right ladies(?) - you know what I mean.

Also, as women know, the right application of make-up and candle light can cover a lot of problems.

This post is proof positive that smoke-n-mirrors can take care of many flaws - especially in the world of home restoration.

One of the biggest problems that face woodworkers, and home restorationists, around the world are the little blemishes that show up after wood-stain is applied.

These blemishes can be caused by many things - wood characteristics, stripping chemicals, previous paints and stains, and wood fillers to name a few.

One of the biggest of blemishes is the 'doughnut' that can appear around an area where wood filler is used. There are chemicals in these fillers that make the absorption of the stain less than perfect.

I was not immune to this. In fact, one of the things that took the longest time in preparation was eliminating them. For the most part I'd say I was pretty successful at doing this, but there were a few spots that just didn't seem to want to go away.

In order to make these spots less obvious there are various tricks one can use. This is one of them.

Sorry about the picture being so bleached out, but you can see the 'doughnuts'.

I must have used about every trick I know on these spots, and several others, but they just did not go away. Once the stain was applied they were magnified.

Turning to one of my bag of tricks I thought I would try a little trompe l'oeil and see what would happen.


These colors are the basic ones I used.

Now, if this had been an extremely fine piece of furniture, or something that would come under a lot of scrutiny, I would have used different paints, brushes and methods. However, since this is something that is noticed, but not scrutinized, I chose simple hobby paints and brushes.

Also, keep in mind, the spots are noticeable from just about anywhere if not fixed. All you are wanting to do is trick the eye into not noticing the spots. Since these areas, in our case anyway, are not at eye level in our case, as much care as normal is not necessary. Keep this in mind as you look at the rest of the pictures.

Now here is the finished result.

Note that it isn't perfect - it's not intended to be. The intent is to camouflage and fool the eye.

Even though the spots are still visible at this close range they are a bit harder to detect.

Here they are at about 3' away.

Now they are getting even harder to see.


This shot is at about 4' away and at eye level.

The spots are just about impossible to see.


And here is the view from the center of the kitchen.

Can you see the spots, or any other blemishes?


Here is another sample of the spots 'before' from above the stove.

Again, for some reason this picture is bleached out too - sorry.


And now 'after'.

You can still see some of the spots and blemishes, but once the woodwork is buffed, and top coated, they should be virtually invisible.

However - that's a BIG however, the buffing and the top coat could take a turn for the worse and make the smoke-n-mirrors worse. Hopefully it will turn out as planned.

We will know by tomorrow.

Well, I'd better get back to work.

Till next time...

Cheers!
Larry

Wednesday, September 23, 2009

Teaser

Today is teaser day for you all.

I have been busy but for the most part doing stuff that just isn't blog worthy. You know piddly little things that add up but seem too whoppy on their own.

However, I thought I would toss a couple picture out there. These are the lower sashes to the four windows that form the corner by the sink.

These are the ones that face the utility.

The digital camera has picked up some blotchiness that I can't see when looking at it. The stain has not been knocked down yet nor has the top coat been applied.


Here are the sashes that over look the west lawn.

These turned out real well if I do say so myself.


I have a bad feeling that SWMBO won't like them. She will probably think they are too dark.

Well, that's all you get tonight; so...

Till next time...

Cheers!
Larry

Tuesday, August 25, 2009

Duct Tape and Up-Dates

Is there anything Duct Tape can't do?

A few days ago SWMBO noticed the screen in the bathroom storm window had popped out. Turns out the cats would lay in the window they'd push on the screen. Eventually it just popped out. Since this is on the second story, and the patio is below it, SWMBO was worried that one of the cats might fall out while stretching during a nap.

Today I fixed it. The little, round, rubber gasket was still in place, but about 8" needed to be pushed back in. Once finished I noticed that about 1.5" of this gasket was missing on each side of the corner.

I was not able to find the spare roll of the gasket I keep on hand and then it hit me...

Duct Tape!!

I got a small length of the gray stuff and rolled it into a cigarette shape.

Using the handy little tool used to put the gasket in place allowed the Duct tape to go in easily.

I don't think it looks bad, do you?

On the house front, I think tomorrow will be my last day dealing with the drywall mud. All that's left to do is sand and then fill those little spots that seem to show up.

Here's a hint...use a flash light to to find the imperfections. It's easy to do!

Turn off any bright lighting in the work area - before you begin sanding. If you're using a hand-held light, just hold the bulb against the drywall and glide it along the walls. If you’re using the flashlight, just “skip” the light “across” the surface that you’re inspecting. You’ll be “amazed” at how well you can see the defects when you look – BEFORE YOU SAND. The defects will literally “jump-out” at you.


I've known about doing this for years, but I took the above quote from this site.

The corner where the lavatory will go.


One of the back corners.


And the closet.


Now remember, I told you that from now on no more large, panoramic, type pictures of the kitchen will be shown. However, as promised, some pictures will be up-loaded to give you an idea of how it's going.

Up for viewing is the first look at the stain on some of the woodwork.

It took quite an effort to get some halfway decent pictures. It never ceases to amaze me how much a digital camera can bleach things out and pic up what the naked eye can't seem to see. Bellow are the only pictures that turned out 'okay'.

Well, what do you think?

I think it looks rich. My mother, and SWMBO's mother, have given their seals of approval. I was really worried that SWMBO would think it was too dark. Turns out she likes it!!!

Close-up of the same spot.


The end cap that faces west.

We are also going to test the shellac on this spot.


And another close-up.

Yes, there is a little hole there at the base. The previous owner's had a telephone cable coming through it, but no phone hooked up.

At this point you can start seeing some of the flaws. Just keep this thought in the back of your mind while looking at this picture, and future ones.

Sitting too close to the stage at the ballet ruins the illusion.

Well, till next time...

Cheers!
Larry ~

Thursday, February 26, 2009

Finally - An Up-Date!!

MAN!! It feels like forever since I last posted anything.

A lot has been happening here. The plumbing is fixed in the upstairs bath; the stain samples have arrived and Spring has sprung - just to name a few.

Where I last left you the upstairs bathroom plumbing was being worked on. Let's start there.

As stated the plumbing is now fixed and working quit well. We were also preparing to lay some of the self sticking vinyl tiles. We changed our minds on the tile - go figure.

This is what we found under the old tile.


You can see the floor better in this photo.

The hardwood floor is sound with the exception of that directly underneath the tub and chase as well as the section I had to cut out. The wood under the toilet is not the original wood so it would need to be replaced with tongue and groove. This can be done when the floor under the tub is replaced.

Since the wood floor is in good condition I cleaned it up and have decided to wait on making a final decision before we decide on what to do with it. We kind of like the wood in there. It is definitely warmer than the tile was!

Speaking of missing flooring and the chase; following is a picture of what it looks like inside the pluming area.

Isn't this nasty?!

It is so cramped that the ONLY way to work on it is by removing the toilet. If you look towards the top right of the photo you will see a black thing with a yellow top. This is THE FIRST repair I ever made on the house.

If you remember from the beginning of our house ordeal, the plumbing had a massive breakdown. This is where it happened. The black thing is a rubber pipe reducer with a plug cap on top. The whole thing is covering the drum trap that the tub drain connects to.

Since we did not have a tub at our little house, only a shower, it was a special treat to take a long, hot, tub soak. Well, on the first day of ownership that's what we did.

Long story short, when the drain was opened we started hearing what sounded like rain. I ran down the stairs and it was raining in the kitchen!! Turns out the drum trap failed and the water was filling the space between floors. When I pried open the small hatch (about 1.5' x 2') I saw what you see in the photo - only filled with water and with a fountain gushing out of the drum trap. By the time I got the drain closed most of the water had drained out. Now all we could do was was try to bail out the crawl space and let the rest go where it wanted.

Now, if you look to the extreme lower left you will see the only piece of original molding left in the bathroom that we're aware of. Trying to match the woodwork in the bathroom is going to be a bugger.

Anyway, since we are talking about the bathroom, let me share a few pics of what we have done as a 'quick fix' till we gut the thing and rebuild it.

Remember the nasty brown and gold paneling? Here is better view of it.

Ugly ugly!! I have confirmed that the remains of the plaster under these walls is now a pile of rubble behind the paneling.


Here's the floor once it's been cleaned up as best we can. It will need to be sanded to get rid of the stains caused by the tar paper under the tile. We are hoping it isn't this bad in the kitchen. So far our test strips in the kitchen haven't been like this.


Looking into the bathroom. You can tell it's small.


Here is a better view of the same general spot as in the above picture. You can see the 'other' paneling they used as well. At least the brick motif gave us something we could work with.

We kind of did a safari/desert oasis them. We were able to use a few items we brought back from Egypt as well as items purchased, and scavenged, from the B&B we spent our honeymoon in.

The little stool came from the B&B. You can also see the original piece of Victorian cane furniture we got for next to nothing at an auction.


This is one of my favorite pictures of the bathroom for several reasons.

First off you can see the color differences in the walls and those in the tub area. The paint in the tub area was covered with several layers of poly so that the shower could be used. We thought about doing all the was like this, to get the richness of color, but it was just to 'plastic' looking.

Next you can see the little 'cubbyholes' built around the plumbing chase. We use these for towel storage and such. This is part of what will go 'bye-bye' once we gut the thing.

This pic also allows you to see the hatch opening I have to work with in regard to the tub pluming. Look right under the last cubby and above the TP. See that crack? I did that so you could see the top of the hatch. Notice how little room there is between the hatch opening and the toilet. At the risk of sounding really stupid, I can tell you I've gotten myself stuck more than once in this spot!

Here is the lav vanity. We can't wait to get rid of this as well as the mirror and swag lamps.

I did remove the matching one, sans lav, that was on the other wall (where the little stool and cane shelf piece is located). We wanted to see how it would feel with more room. We are still getting use to this. All the drawers in that vanity were SWMBO's.

I've thrown this next picture in just for fun.

See the two map plaques (There's another one in the 7th photo)? Those also came from the B&B. Remember when I said we "purchased & scavenged" items from the B&B. These plaques are part of what were scavenged.

Here's a little back history about it. We stayed at a B&B called the 'Max Paul'. It wasn't one house, but several cottages that were built around 1910 - 1920. Each building was then converted into 2 to 3 suites. We stayed in one called 'The Safari Suite'. It was AWESOME!!!

Nine years later the city/county decided the main road that was close to this area had to be widened significantly. On top of the land needed for the extra road it's self, they wanted about 100' on either side as a shoulder and for future work. So, two city blocks, on each side of the original highway, were condemned for several miles. The Max Paul sat in the path.

The owners of the Max Paul had a silent auction for everything in all the suits. We lucked out and got several items from our suite. We didn't get any of the larger pieces of furniture in it because SWMBO fell in love with all the tapestry in the 'Tapestry Suite' so we decided to toss all the money we could at it. basically, we got most of everything we wanted form our suite other than a painting, as well as ALL the tapestry.

About two months later demolition began. So, a friend of mine and I snuck into the demo site around 12:30 in the morning on a moonless night. We scavenged everything we could from our suite. We came away with about 60% of the wall paper - yep, you heard that right!! it came off in perfect strips. We also found the map plaques we have hanging on the walls. We even took the capstone brick from the fireplace in the room.

Anyway, I just thought I'd share this with you. I did not tell SWMBO what I did. Instead, I hid it all and gave it to here as part of her gifts that next Christmas.

Let's switch gears. As stated, the stain sample arrived the other day.
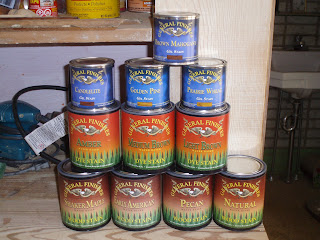
Here they are!!

They were generously donated by a company called General Finishes.

After several consultations with Charles Neil, in regard to what type of tone/finish we were looking for, we received the following colors to play with.

Gel Stain: Golden Pine; Prairie Wheat; Candlelite & Brown Mahogany.

Dyes: Amber; Light Brown & Medium Brown.

Water Based Stains: Pecan; Shaker Maple; Early American & Natural.

Right now I will only be testing them on some scrap pieces. However, there is probably going to be several things that need to be done first as we talked about in an earlier post.

Stay tuned for further up-dats on these products.

Well let me leave you with the following picture.

Yup...Spring has sprung!!

These Crocus flowers actually started blooming a few days ago, but yesterday was when they looked their best. The Daffodils will be blooming any time now.

Well, I guess I've taken a long enough break to write this post. I'd better get back to work!

Till next time...

Cheers,
Larry ~

Sunday, February 1, 2009

Quick Up-Date on the Bleach

Hello Again everyone!

Thought I'd get in a quick post about the wood bleaching.

We were planning on applying bleach to all the stained wood today around 3 in the afternoon. However, SWMBO wasn't feeling too good (I think she's getting the 'crud' that's going around here) so I decided to do just a small patch instead. I really wanted to see what would happen but I didn't want to fill the house with bleach smell if she isn't feeling well.

After apply the bleach (about an 1/8 of a cup), and rubbing it in, I left it alone. I was a bit depressed because nothing happened!!

About two hours later SWMBO and I went out for a bit and before we left I checked it again.

This time there HAD been a change!!

WOOWHOO!!!

Take a look.

The bleach did take a lot of the stain out!


Tomorrow I'll saturate the rest with bleach and give it a chance to work. I'll also wait and see what Mr. Neil has me do next.

Well, till next time...

Cheers!
Larry

Saturday, January 31, 2009

Stain Update

Hello Everyone.

Well...the stain is way too dark. We don't like it.

What we can't figure out is how come it looks so good in pictures but so horrible, and dark, in real life.

So...what to do - what to do... We turn back time, in a way.

We have started the process of removing the stain. Yup, you read that right - removing the stain. It is not an easy process and one I have never done before, but a knight in shining armor has come to our aid.

I wish I could go into more detail about this knight, but until I have permission to divulge his info we must keep it to ourselves. However, the method can be discussed.

As stated earlier, the stain turned out WAY too dark. At first I was stymied as to what happened - the recipe for the stain was followed to the letter. Turns out that the problem was with the wood it's self.

Let's backtrack. The stripping process started over two years ago. What this means means is that the wood has been exposed to the dry climate for quite a while and therefor the wood is completely dry. Since it is completely dry the stain soaked in faster, way faster, than normal.

Typically you apply stain and let it set for a bit then wipe it off. You then repeat until you get the desired shade you want. In our case, the moment the stain touched the wood it soaked in like water on sand. There was no time delay other than a few seconds.

I'm kicking myself because I didn't stop when this was first noticed. I figured I was being paranoid or something.

So, we are left with two options, the hard way, and the harder way. We can either try to remove the stain or we can replace the woodwork.

You might think that replacing the woodwork would be the easier of the two options, but is in fact the harder. It would entail the removal of matching wood from two of the upstairs closets. The hard part would be removing it without damaging the woodwork OR the original plaster. Then the stained wood would have to be removed without damaging it OR that plaster. So, this option has the potential of destroying plaster in several spots as well as original woodwork.

The other option is removing the stain.

The process is straightforward and sounds easy - just time consuming, messy and potentially hazardous. Following is a condensed version of the process as our knight explained it to us.


"Minwax is linseed oil and pigments,and the wood has absorbed way to much. Start by wiping it down with some mineral spirits keeping it as wet as possible, let it soak a bit then wipe it dry , then do it again, until you pull enough stain out to lighten. If you do not see a dramatic difference pretty fast, then use some lacquer thinner. Both solvents are very flammable, be sure to let the mineral spirits rags dry spread out, out side, they also are very flammable and subject to spontaneous combustion, also wear a good respirator. What you want to do is draw as much of the stain out as possible, the lacquer thinner will also help dry it down , when you feel you have removed as much of the stain as you can, let it dry, at least overnight. What I mainly want is to get as much of the oil out as we can, the mineral spirits and lacquer thinner will do that. If we can get the oil out, then we can bleach it to kill the stain color, but that’s a last resort."

There is more to the info, but this is enough to give you an idea.

We spent today wetting and wiping the woodwork with mineral spirits and then switched to lacquer thinner. We were amazed at just how much stain came out.

The pictures that follow do give an idea of how much we got out, but it still looks dark. This is another one of those times where the reality looks a lot different than the pictures.

You can see some of the lightening of the jambs, under the lintel.

Do you see how pale it is looking?

If I'm understanding my research properly, the spirits and thinner are pulling out the oils used in the stain along with some of the pigment.

The oil needs to be removed so that the bleach will kill the stain that's left over.

I wasn't able to get a good picture, but there are some spots where the woodwork is basically back to it's pre-stain condition. The spots are so small I just couldn't get the pictures to take.

If you look real close you'll see SWMBO in the picture!

You should also be able to see that the wood filler has had virtually all the stain removed. So now those spots are sticking out like a sore thumb.

While we are on the subject... I will probably remove all the wood filler. Yes, I know I was praising it, but I found out some more info in regard to this. As I learn more about this I'll post it.

This is about the best picture that shows some of those spots that are back to 'normal' wood. Look along the left edge of the jamb and you can see the spots.


Just another pic trying to show how the stain has lightened.


And another one.


This picture is a photo shopped one so that two of the pictures could be side-by-side and you could see a difference.


The picture of the doorway on the left was taken right after the stain was applied. The one on the right is after we used the mineral spirits and lacquer thinner. Hopefully you can see the difference.

In reality the stain now has a light grayish hue to it and is lighter. I'm assuming this means the oil is out of the wood as much as possible and all that's left is the stain color.

It will be interesting to see what happens once the bleach is used.

Now, there is a two part A/B bleach that has been suggested I use by a few I've spoken to. However, when i did some research on this stuff, and contacted one of the main manufacturers, I was told that the two part bleach is used to remove the natural tannin color of the wood - not to remove stain thats been added.

I am wanting to talk to our knight about this a bit more. I'm not sure why some people have suggested I use this, but the manufacturer says not too. When I find out I'll let you all know.

Here is one last picture to share with you.

This is one of THE few spots in the house where you can see the original stain.

It's in the master bedroom closet. It is a bit dark but I figure that's due to natural aging. All the woodwork in the other closets have been painted. Why this section remained untouched we have no idea. We really like the warmth and richness of this stain.

Well, till next time...

Cheers!
Larry

Thursday, January 29, 2009

First Look at the Stain

As promised...I said I wouldn't post again until there were photos of stain to show.

So, without further ado here it is.

Right now all that has been stained are these two door ways.

Have any of you ever heard the old adage "never sit too close at the ballet - it ruins the illusion"? Well, this is a good case in point.

For some strange reason the photos of the stain look better than the stain in person!

I've only applied one coat and it looks darker than the sample we based our decision on. Not sure why this is, it's the same recipe and the same wood. Also, the first coat has not been sanded down with steel wool yet. This might lighten it. If you remember, the sample has two coats and a top coat of amber shellac. You can go here to read about it if you like.

There are a few problems and before I proceed I'm going to try and work out a fix. I'm not going to tell you where they're located, but there are some obvious bad spots. I might show you a close-up of the worst problem spots if I can figure out how to fix them first.

Here's another picture.

Is it just me or does it look darker than the first? In the first picture I didn't zoom in, the second one I did. Perhaps this makes it look darker.

One weird thing though... About an hour or two after taken these pictures I went and took another look. The stain actually looks like it has 'mellowed'. The only thing I can figure is that it was dark outside and the lights were on. Who knows what shade the stain will be in the morning!!

It has been pointed out by a friend, as well as by SWMBO, that the stark white walls might be making it look darker. Perhaps, once the paint it up, it will be a completely different shade!!

On a side note. I finally put words to why I 'think' I've been dragging my feet on this staining project. SWMBO's uncle stopped by today and when I was talking to him about it I told him I was dragging my feet because I was afraid of how it would turn out. As long as it isn't done there is always hope that it will turn out great. Once it is done though, the truth will be staring you in the face.

Well, till next time...

Cheers!
Larry

Tuesday, December 9, 2008

Cat in the Woodstain and a Cleaning Rag...

Okay - have you ever had one of those days where you just wanted to toss a match in the door and walk away?

Well, yesterday was one of those days for me.

It was my first full day back from our trip to Missouri. I had a ton of e-mails to deal with and a much neglected house to clean. I also wanted to get prepped for working on that wainscoating.

So I go about my day doing some cleaning and such. At one point I decided to go ahead and clean the part of the basement I have finished out (I ought to get some pictures of it and post them - perhaps tomorrow).

As part of the cleaning I decided to take the stains I knew wouldn't be used and store them in the storage area of the basement.

Before I continue I guess I should tell you that we have a cat door, w/porch, for the kitties. It is located in the garden level window in the finished part of the basement. You can see Chloe sitting next to it in the picture below.

Anyway, to make a long story short you could say I was the unwitting participant in a 'Series of Unfortunate Events'. It all culminated in me tripping over myself, and a cat, resulting in a quart sized can of Red Oak stain exploding at the bottom of the steps.

I was so flabbergasted, and miffed, that taking pictures never even entered my mind. If someone would have been there and suggested this they would have ended up with the camera someplace 'special'.

Well, now that a day has passed and I can look back on the ordeal I can laugh and cry AND take a few pics. Unfortunately the mess, for the most part, has been cleaned up, but you can still see the signs.

Here you can see down the steps of the basement.

To the right you can see a door that leads outside. I was standing at this door's landing when it happened.

Shalimar jumped through the pet door and onto the landing right when I was taking the step. I lost my footing and while trying to right myself I lost one of the cans.

The can hit the corner area right under the light switch and popped open upside down (from what I can tell).

SWMBO had a carved, wooden rabbit sitting in the corner and the litter box was next to it. Yes - we keep an auxiliary cat box in this area during the cold months.

Any who...you can see the 'splash' if you look - especially on the box we keep the litter box in.

Do you see the stains in the corner areas on the wall? There are also some on the wall down by the lower edge of the box. Luckily we still have paint and I can touch it up.

If you look hard you can see the shadow caused by the stain on the wooden areas.

The main spill area was on the bottom landing, but you can see splash marks on the stairs as well.

It took a roll and a half of paper towels to clean and I had little time to do it in - you know - before the stain really sets in.

Unfortunately it is noticeable enough that I will need to do something. Fortunately, the stain color looks good and I can do the whole thing.

It could have been worse. As you can see to the extreme left we have Berber carpet. Not a drop landed on it - even while i was cleaning up the mess.

Okay, now for more of the story...

Remember the cat that help do this? Well, don't ask me how, but she got the stain all over her! I thought she had jetted either up the stairs or back out the window. Unfortunately, several hours later, SWMBO found Shalimar and saw she was covered!!

Needless to say, I had to give her a bath - TWICE!! Do you have any idea how hard it is to bath a freaked out cat?! I have a few more scratches on me from this task as payment.

Luckily Shalimar is fine - but there is a slight smell of stain about her. We are playing it safe by pushing fluids and keeping an eye on her.

The pathetic thing is that Shalimar is now VERY clingy towards me. In fact, she is trying to be so close (so she can sleep) she is trying to bed down on the laptop keyboard while I type!

Today went better.....

One last little bit. In case you noticed, the stairwell, leading down to the basement, isn't completely finished. I have as yet to put the trim up. I'll need to do some work on the stairs and see no sense in ripping out what I have put up.

BTW - did you like the post title? Read it again but think about the tune 'Cat in the Cradle'.

Well, till next time...

Cheers!
Larry ~

Wednesday, November 26, 2008

The die has been cast...

Guess what?!

The die has been cast...

The decision has been made...

We have a winner!!!

We have a stain!!

Here is your first look.

Can you guess which one we are going to go with?

If you chose the second color from the left you would be correct.


Here's the kicker - the two colors on the left side of the board are the same stain!

Now for the rest of the story.

As you all know I have been banging my head on a rock working with different stains trying to come up with something that would work. Remember the tests I did and how bad some of them were?

Well, about a week ago I ran across the My Old House Journal site. While reading through the web site I ran across a guy named Ken who has a web page called the Old House. Now, if you got to the Wood Restoration page you will find a great write up on how he does his woodwork and his woodwork looks like ours!!

Once you read through that (which I recommend) then go to this page to see the finished woodwork. As you can see, Ken is one talented guy.

Thanks to him we have our stain. I thought "what the hey" so I decided to give his recipe a shot. In case you don't go to his site here is the recipe: "The final combination was a mixture of three Minwax stains (2 parts red mahogany, 2pts colonial maple, 3pts natural) to give it an aged wood tone it would have had from aging orange shellac".

I did a step he doesn't do and altered another step(I'll discuss these later), but used the recipe as written.

This picture just shows the sample up against the plumbing chase.

Now, back to the two colors from the same stain - I know you want to know why this happened - don't you. The reason is simple. Remember this post? The washcoat I talked about here caused the difference in color. In fact, the lighter color, the one on the left, is the one that has the washcoat under it. The darker of the two is the special recipe on bare wood without a wascoat. The washcoat was the step I added that wasn't on Ken's page.

Also, I applied two coats of the stain.

This last picture is just an eye-candy shot.

It's at an angle to avoid flash from the camera.


I thought it would be nice to show you all what it looks like with some color behind it. The wall color is about the same we plan to use in the kitchen, but the flash has washed it out.

Oh...that step of Ken's I altered (?)...it has to do with the topcoat. Ken applied 4 coats of oil based Benjamin Moore Sanding Sealer, I applied four coats of 50/50 amber shellac & denatured alcohol. This is just personal taste though. Once the staining process gets underway in earnest I might do another test board and use the topcoat he did - just to see what it will look like. I used the amber shellac this time because I've used it in the past and like the glow it gives.

Also, I have not buffed the topcoat to knock the shine down. I'm not sure if I will do this or not. we'll see how we like it once it's all stained before we do this.

One last thing.... The lighter of the two colors (the one on the extreme left) we like also so we are thinking of using it for the floors and the counter tops.

Well, till next time...

Cheers!
Larry ~

Friday, November 21, 2008

Bubble Bubble Toil & Trouble

Okay - admit it...there's a mad scientist in all of us. Some of us just embrace that side more often than most.

This week has been one of those times when I have embraced the cackling maniac inside.

While doing the finish sanding on the kitchen woodwork I've been doing a lot of thinking about washcoats and stains. So, I decided to go to the pros I talk to on the internet as well as cracking open a few books.

So, between all the sanding I've been doing a lot of research as well.

I know it would more than likely benefit us in the long run to precondition the woodwork, but I wasn't happy with the test results when I tried it with the pre-made conditioners. Well, after several e-mails to knowledgeable people it was suggested I make my own wood conditioner.

The recipe I decided on (the one that was recommended the most) is a simple one. You take some Zinsser SealCoat and thin it with denatured alcohol.

Here is a the reduction guide:

Desired cut Mix in a separate container
3-lb. to 2-lb. 2 parts alcohol + 5 parts shellac
3-lb. to 1-lb. 3 parts alcohol + 2 parts shellac
2-lb. to 1-lb. 1 part alcohol + 1 part shellac

I went with the 50/50 mix.

Here are the ingredients.

The Masson jar holds the results.

Kind of looks like yak pee don't it?


On Wednesday I removed a piece of the mop board from inside the pantry closet. After sanding it, and prepping it, I applied the washcoat to two different spots.

Now before you sit there and question my madness let me explain.

I have been given a 'secret' recipe for stain that will theoretically make the woodwork look as though it has aged gracefully with a coat of orange shellac. I have seen photos of this recipe being used on woodwork like ours and it turned out great! We'll see what happens - that's what the test board/control sample is for.

Anyway, back to the control sample.

I have only placed the wash on two areas of the board. The reason I did this is so that I can test my two stain samples (there are two variations to the secret recipe) with and without a wash coat.

This will also help determine how many coats of stain I'll need. However, per the gent who gave me the recipe, he only applied one coat of stain (without a washcoat) and then applied four very thin layers of top coat.

Take a look at this.

You are seeing a closeup of the washcoat by itself.

Too bad we aren't wanting this color - it looks great!

I also noticed that this homemade washcoat has a different hue, and feel, compared to the commercial washcoats available. It'll be interesting to see what happens tomorrow when I mix the recipes and test them.

On another related area....

I got a couple new toys to help in this endeavor.

The first is a set of scraper blades that interchange with each other.

Kind of reminds me of a pimped out shaving razor!

This little thing has done wonders when scraping little spots and weird shapes.


This last one is so simple, so basic, it's one of those tools that make you say 'cool'.

All it is is a razor scraper for windows. It's a very sleek, almost retro, design that fits comfortably in the hand.

Yeah, I know I could have just used a plain ol' razor blade but I like my gadgets and toys!


Well, till next time...

Cheers!
Larry