Showing posts with label exterior colors. Show all posts

Wednesday, November 10, 2010

House Paint Teaser II

Yes, I know it's mean, but here's another teaser.


Till next time...

Cheers!
Larry

Tuesday, November 2, 2010

House Paint Teaser

Thought I'd toss out a teaser.

Here's your first look at the actual paints decided on for the house.


Have fun figuring out where each of those colors will be used!!

BTW - two of the colors don't look the way they should. The white colored one (center paddle) is actually a cream color; the gray looking one (3rd paddle from the right) is actually a light tanish green - they both look better on the house!

Till next time...

Cheers!
Larry

Sunday, October 24, 2010

Lots and Lots Done

WOW - it's been so busy around here I haven't even wanted to think about posting! All I've wanted to do is sleep - especially with the 10+ hour days we're putting in.

The following pictures, and tasks, were done between the 13th and 17th of October.

That being said, let's jump right in.

Here are a couple of the wasp nests we've found.

These two were not active but we've had a lot of wasps buzzing around; not sure where they are coming from though.

Also, while working on the fascia of the east gable we found a hole in the roof. It couldn't have been in a worst spot - right above a 25' drop. We had to cantilever the scaffolding out to work on it.

See that slash of bright light behind the nails? That's where the hole is - the sun is shining through.

In order to work on it we had to remove a bit more of the original fascia than we wanted to. All that's left is the flashing and shingles.

"Hello there!"

Yours truly's finger.

The hole is about 4 to 5 inches long and about 2 inches wide.

This was not a fun hole to repair. Sorry there are no pictures of the repair process but I was more concerned with safety than pictures at the time!

This is the underside after repair.

We inserted new wood under the hole and a metal cap from the top. Under the new piece of wood we installed the pieces that the gutter will be attached to. Then we used a generous amount of caulk to finish it off.

Not too bad of a repair is it?


We then found another issue to deal with - the top south east corner of the fascia was separating.

From this view it doesn't look too bad, but moisture could still get in and so it needed to be tightened up.


Don't you just love this scaffolding?

I let the father-n-law stand on top of that tiny platform in order tighten the corner. I spotted him (just in case) and made sure the contraption didn't collapse under him.


Once this problem was tackled I decided to go ahead and make the replacement fishscale for the east gable while he cut away the remains of the nails that had held in the bad moulding.

On to the fishscale.

From what I've learned there were seven basic styles of fishscale manufactured when our house was built. All the builder had to do was chose what they wanted and order it.

In our case the builders chose half-cove and octagon for the gables.

To our knowledge we are the only house in town with this combination. All the other houses have either round, octagon, half-cove and triangle and only use one style with no mix or matching. However, there is one other house that uses square and triangle fishscale on the house. Instead of in the gables though this house uses it as siding!

To make the repairs easier I cut out a half-cove and octagon template on my scroll saw.

This is the half-cove template.

I then cut out about 20 of each on the band saw.

For the most part it was fairly easy to replace the bad, and missing, fishscale; but sometimes I'd run into a real puzzler.

Here is the lower section of one of those 'puzzlers'.


First thing needing to be done was replace the under portion of shingle that covered the flashing. It also added a base to attach part of the upper portion to.

This is part of the upper portion.


This is another part of the upper portion (you can see the piece from the previous picture directly below it).

While installing it I hit something rather hard and it bent the nail. I just hammered it down since it was secure and would be covered anyway.

Next up was building the actual puzzle piece.

And here it is.

I would like to have installed it as a single piece but it just wasn't possible.


The upper arch area had to be removed and then reattached.


This is the same corner as the one in the last picture of the previous post - only repaired. The puzzle piece is in the middle.

All that needs to be done is the caulking of the divot in the puzzle piece.

You can see eight pieces of replacement fishscale in this corner. What you don't see are the many, little pieces of shingle it took to build it up for the finish fishscale.

Another puzzle piece. This one was easier but note the size of it compared to those around it.

75% of the fishscale were the same in general size but the other 25%, such as this one, were irregular and appear to have been used as bridging pieces.

The one you see here is a duplicate based on the remains of the original. I will talk about this process in a later post.

It took most of the day to replace the fishscale that could be reached without adding a second level to the scaffolding. When finished the workday was over.

We decided that the following day I would devote to glazing windows and SWMBO (since she would have the day off) would get to work with her father.

The next two pictures are of me glazing away at about 20 some-odd feet.


Since turnabout's fair play I decided to take a few pics of SWMBO working.

Here she is helping her dad install the pieces of fascia that the guttering will be attached to.


She was so pleased with herself at this point - she actually used the cordless drill to attach a piece of the fascia.

It might not sound like a big deal but trust me, it was! Do you have any idea how hard it is to screw something into 100+ year old wood?! Also, the screws we needed to use were not small ones; take a look to the left of her father's hand - that's part of a 3.5" screw.

I will be doing a special post on what it took to deal with this old wood soon.

Here they both are working on the east gable; I was still glazing away.

At this point there is still only one level of scaffolding up there.

Before I leave you let me share a few more pics showing some of the small projects being worked on or finished during this time period.

The white stripe is what you need to notice in this picture. It is the new crown moulding that is under the built-up area the gutter will be attached to. When the gutters are installed they will create a 'double crown' effect.

This blob of gray is the the second layer in that rotten spot under the kitchen window. The gray stuff is bondo for wood. Once this is sanded down a bit another layer will be added.

Note that the exterior window casing above it is missing. It was in such bad shape I've decided to replace it.

This last one is just a few scraps of old clapboard attached to a board. The intention is for SWMBO to use it in order to make a decision as to what colors will be used on the fishscale.

As to this project - lets not go there... The colors have been decided upon but it was a very painful process. At least this mock-up did what it was to do. Perhaps I will share pics of it being used in a later post.

While we're on the topic of fishscale colors...

To give you an idea how far we have come since my last post, and how much I need to fill you all in on, the east gable is basically painted and finished. All we lack in order to call that part 'complete' is about 3 more hours of paint touch-up.

Well, it's late and I'm tired so I'll go ahead and close this post.

Till next time...

Cheers!
Larry

Wednesday, June 16, 2010

Jambo!!

Jambo from the Heart of Africa!!

That's right - from the Heart of Africa.

The past several days have been incredibly busy for SWMBO and I. From a quick trip to Africa to a couple of family reunions, to finding our house colors in south east Kansas.

Where shall we begin - Africa?

Africa it is....

And here we are - the train depot.

Actually it's a train depot that's been converted into a Museum. Not just a museum, but the #1 museum in Kansas! It is also one of THE best safari museums in the world.

Okay - so I'm cheating; we didn't really go to Africa but the museum was so good it's as if we could have been there.

The museum is the Martin and Osa Johnson Safari Museum in Chanute Kansas.

If you are ever in the Chanute KS area you NEED to make time to see this place.

Their collection of ceremonial African masks is perhaps one of the best in the nation and I have seen a few so trust me on this one.

And here is Martin and Osa Johnson themselves.

Cool picture isn't it?

I would love to have a similar one of SWMBO and I taken - with Grover in the background of course.

This is one of a pair of Giraffes that are in the foyer of the museum. They are carved from wood.


This lion skin rug is made from the pelt of one of the lions Osa actually killed.

Part of her job was to protect her husband from the animals while he took photos or filmed (this was before telephoto lenses). She was a crack shot and would have to take down an occasional animal that charged them.

These are headdresses from one of the East African tribes.

To give an idea of just how big these are, that's SWMBO standing next to them for scale.

Another interesting thing is how they were kept upright on the head. There is a mouth piece in the part that covers the face. The wearer clamps down on this with his teeth to keep it upright.

These are some Maasai (Masai) shields and weapons.

I've always been fascinated with the Maasai people as well as the Zulu.

As a kid I use to pretend I was on safari in the lands of the Maasai and Zulu, to name just a couple tribes. Usually I was looking for Dr. Livingstone.

Here's another shot of some Maasai items. I really wish this picture had turned out better so you could see the funny looking oval thing.


This is what that oval thing is - a traditional Maasai warriors feathered headdress.

I was fortunate enough to snag an authentic Maasai ceremonial spear before we left. That puppy will look nice on the wall! Now if I could only get a shield to go with it.

After our time 'in Africa' we headed to SWMBO's ancestral stomping grounds - Iola Kansas.

We went for a couple of family reunions. Had one on Saturday and another one on Sunday.

Even though the reunions were fun the main event was the house we found!!

The house was found by accident and is almost identical to our place. There are some differences, but there's enough similarity that our houses could be related.

Best part - WE LOVED THE COLORS!!!!

So, after driving around the block three times we decided to stop and talk to the owner. He was out in his yard each time we drove past; I was beginning to get the idea he thought we were stalking him.

While talking, he gave us permission to snap a few pictures. Below are just a few.

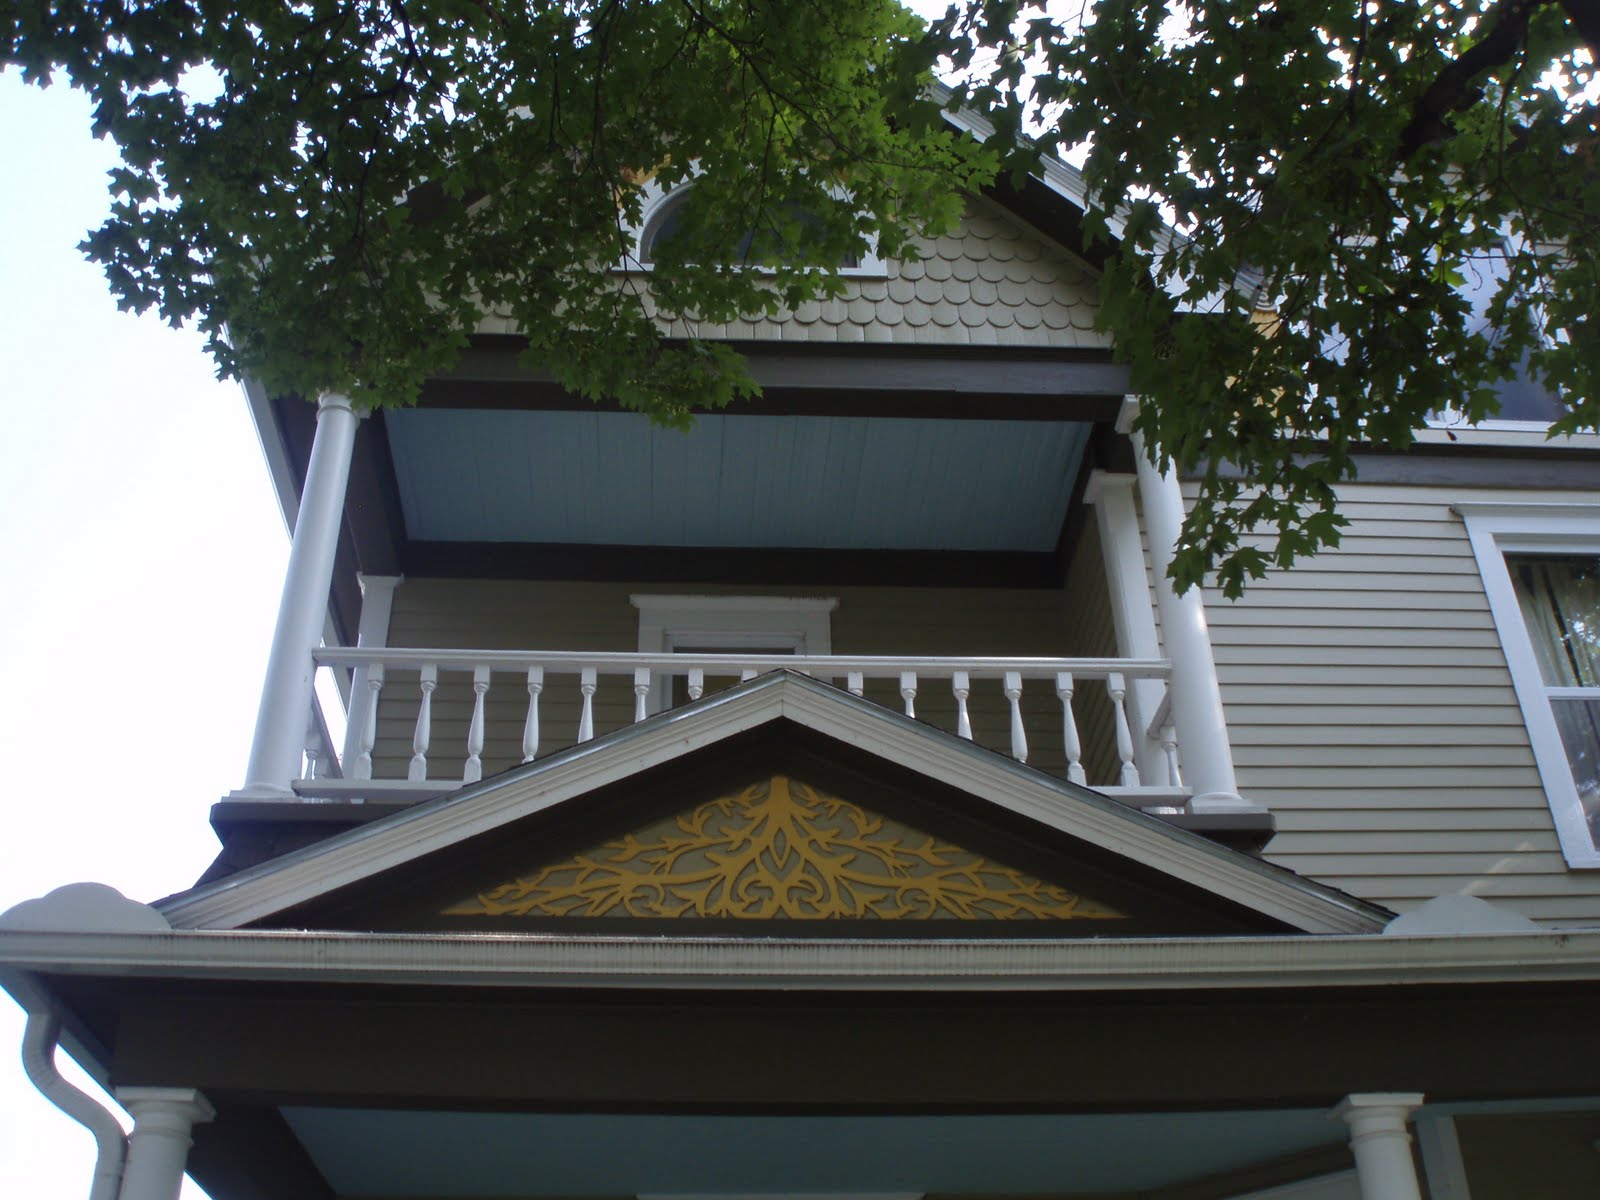
If you wrapped the porch on around, and removed the second floor bay, this would be our house.


What do you think of the colors?

They look more tan in the photos, but they are actually more green.

The owners painted the house three years ago, however, they still had the paint names and color numbers. Talk about luck. It's as if we were meant to see this house.

A view of the front. There is a bay like ours.

Note the balcony as well as roof pediment - cool eh?

Did you notice the porch, and balcony ceilings? They're sky blue.

We would like to have a pediment above our front door some day and are actually planning a similar balcony for the back porch.

A closer view of the colors.

As you can see, several of the windows are different than ours but most are the same.

A better view of the balcony and pediment.

Don't you just like that blue?!


Now take a close look at this picture - the fish scale specifically.

This is the first house we have found with the exact same style, and pattern, of fish scale that ours has. The only difference is that the fish scale ends at the top of the window.

I'm sure there are other houses out there with the same style and pattern but we have not seen one in person yet.

When we told the relatives about the house some of them, those who have seen our place, wanted to drive by and see the colors too. They all agreed that the colors would look great on our house.

Okay - let's get back to our house.

After our short time away I got busy scraping again - when the rain and heat would let me that is. BTW - yesterday was the first official day of our first heat wave of the season here in Kansas.

The east side...


The south side...


And a panoramic view.

You've heard of 'Painted Ladies'? Well, ours is a 'Naked Lady'.


For the fun of it, here are a couple pictures showing my vantage points.

This one is from the south side looking south east.

Not a lot of space between the back end of the platform and the roof edge, about three feet; and it's steep.

It's so steep that I had to wedge the shop vac in some cable to make sure it didn't roll over the edge while moving the platforms. It did anyway. Luckily the thing hit the grass and not the side walk.

Today it tried doing it again but this time it was on the platform and I stopped it in time.

Sandra - this next view is for you!!

This is how close I had to get to the edge to scrape.

I don't mind heights, but I would prefer some sort of railing when this close to the edge.

Tomorrow I'm going to set up some extra safety devices. The next step in scraping will require ladders on those platforms. You know how I hat ladders, and at that height to boot! I'll keep you informed on what measures we take.

Here's a better view of the original colors. Too bad a color photo doesn't exist of the house before being painted white.

It's kind of hard to see, but if you look at the bottom edges of some of the fish scale you can see the original color - deep emerald green.

The color doesn't come out as well as seeing it in person, but it's there.

I will leave you with this final picture.

Can you tell what it is?

Take a close look.

Any idea?

No?

It's a bullet.


That's right - a bullet!!

It's about the size of a 9mm round. I found it embedded on the east side near the northern most window. This window is in the room the previous owner used as a study. We now use it as our library. Makes one wonder if someone was out to get the guy.

Anyway, that's about it for now.

Till next time...

Cheers!
Larry ~

Friday, February 8, 2008

House Colors

Well, the time of year is quickly approaching for us to paint the house. We have lived in this monster for 7+ years now and have yet to paint it - as anyone who has seen it will tell you - IT NEEDS IT!!!

The reason it's not painted isn't because we are lazy (for the most part) but because we just can't make up our minds what colors to go with.

House colors are very important. They make the first impression of your property. Therefore, the colors need to reflect the owner's taste but more importantly the time period and style of the house.

Our problem is that we'll pick a color scheme and then the next day see another one we like and change our minds. Usually I end up feeling like this:


The good new is that we THINK we have settled on at least two color schemes.

The first one is called the "Greys" and the other the "Tans & Buffs". The T&B colors are the ones we've been thinking about using for the longest time. However, for some reason we are being drawn to the greys. Perhaps grey tones would work better since the house is in the Neo-Classical style and grey tones are used heavily in this type of architecture.

Anyway, here are some samples.

This is the Flaval House in Oregon. It has got to be my favorite (and oldest) choice of colors.

It's hard to tell from the pic, but there are seven colors on this house. The primary ones are buff (body); faun (trim) and old gold (trim highlights).


This pic I found on the Internet, the colors are similar to those of the Flaval House.


This one takes some explaining. It is a section of the Getty Villa in Malibu CA. This museum is based on The Villa of the Papyri in the ancient Roman city of Herculaneum. In 79 A.D. the volcano Vesuvius buried this city as well as Pompeii. The Villa of the Papyri is a private house northwest of the township and sits half way up the slope of the volcano.

The Getty Villa is an awesome site - one I hope to visit at some point. There are many Internet sites for it as well as an official site. Below is a link to Flickr showing several wonderful pics of the place.

The Getty Villa

Next we have the 'greys'. They are not as warm as the 'tans & buffs', but the colors are stately, classic and evoke grandeur.

I tend to like the cooler, light greys. This one is highlighted with white and black.

This color scheme is our favorite in the grey group. It actually has highlights of gold, merlot and sage along with the white trim.

This last house is a bit dark but we think the colors make a bold statement. It also has merlot highlights, but also some in dark grey.

As you can tell, there are so many choices out there!!

If you are interested, I have included links to my Flickr sets showing these houses in more detail as well as a few others we've liked.

The ‘Greys’

The 'Tans & Buffs'

This last pic is perhaps the main color scheme we like in "the Greys".

It is more than likely THE color scheme we'll go with.

If YOU have a color scheme you think would look good on our house - PLEASE - let us know