Wednesday, February 11, 2009

Beware of the House

So, how do you know when your house is trying to kill you?

I'm not too sure how to answer that, but I think ours is.

Case in point, the following pictures.

Do you know what this is?

This is the house trying to kill me.

Can you figure it out?

Here's another view.

By now you should be able to figure it out.
If you can't figure it now I don't know what to say.

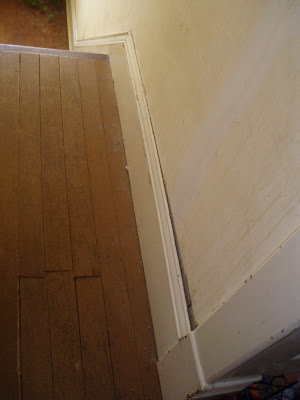
It is the top piece of the mop board at the top of the stairs in the second floor landing.

Now, you might be asking "how is this innocent piece of molding trying to kill you?".

Simple, it jumped out at me and about snagged my pants. That's all I need - another fall down the stairs.

I know it doesn't look like it is out that far, however, I took the picture AFTER I shoved it back in place.

Now don't you think this to be odd? Yesterday, and all the days before it, this piece of molding was flush up against the wall. Now it has popped out. What gives?

I'm starting to worry about this place. Little things like this are starting to appear. My first thought is that the house is settling due to a problem with the foundation. However, there are no cracks, snags, or bulges in the foundation!

The only time I have seen something like this happen is when a board is put under pressure due to shifting, moving or some such. On top of this we have noticed that the hardwood flooring on the second floor also looks 'funny' and some of the stair steps seem to be shifting as well.

The ONLY thing that keeps coming to mind is that the second floor landing and stairs are trying to fall away from the rest of the house!!

I have done everything I can to see if this is the case, but each and every 'check' turns up nothing!

Anyone have an idea of some other way to check this out. I do not want start ripping good plaster off the walls just to see the bones! Besides, we are not at the point to take on a task like this - i.e. ripping out the stairway and landings.

Now what?

Well, till next time...

Cheers!
Larry

Monday, February 9, 2009

Woodwork/Bleach Up-Date

Hello Everyone!

Since the last post several things have happened.

First of, I have caught the 'crud' that's going around. SWMBO has been keeping me doped up for the past few days.

With the exception of a few hours Saturday afternoon I've been in bed for the most part. More about this later.

After a couple more treatments of the Calcium Hypochlorite we got all the stain out we could.

Today, I have spent several hours, gently, sanding the woodwork to get the rest out.

The powder room door jambs and lintel are finished; the basement one isn't.

If you look at the basement door you can still some dark splotches.

My arms are tired and the sniffles have come back, so I've called it quits for the day. The basement doorway will have to wait till tomorrow.


Here's a better view of the powder room door.

The inside parts of the casing and stops have not been sanded yet.


Okay, as mentioned we got out for a few hours Saturday afternoon and I paid for it later that day and Sunday.

Believe it or not I wore out the head on my Makita finish sander so I needed to get a replacement. Luckily there is a tool store in the big city that had one.

While at the tool store I went ahead and picked up some new items for the Multimaster.

I've added a sanding finger to the attachment collection as well as various grits of sandpaper to go with it.


Tomorrow I will try it out, as well as an 'alternate' use for a worn-out blade.

Well, till next time...

Cheers!
Larry

Friday, February 6, 2009

Doughnuts, doughnuts everywher and not a one to eat!

Okay, have any of you ever heard of a 'Doughnut', or 'donut'?

I'm sure you have, but I'm not talking about the eating kind, I'm talking about the wood filler/putty kind.

I HATE THEM!!!

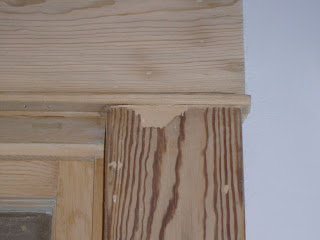
This is what one of the nasty buggers looks like.

They are made by the putty resins seeping into the surrounding woodwork of whatever hole your filling.

It doesn't sound too bad, but it is. If you do not get all the resin out you end up with a 'doughnut' effect when you stain the wood.

Here are a few that showed up during the bleaching process.


It was very disheartening to see these. I thought I had sanded them all out!!

And here are some more.


AAAARRRRRRGGGGHHHHH!!!!!!


So, what to do what to do....

I turned to the great guys over at the In The Workshop forum.

Basically, what they told me is:

try scrubbing it with water and a stiff brush to get it out of the pores of the wood. Not easy.
...if the water doesn't dissolve it, try a little lacquer thinner...and some course steel wool,or a brass "toothbrush"...one last thing is to use some stripper over it...that usually always cuts the filler...

Mr. Neil also gave me an incredibly easy tip to keep this from happening in the future:

A trick to avoid the donut issue is to ,use a piece of masking tape to avoid getting it all around the area...

The worst part about it...I have two rather large areas where I used the filler.

Here...


...and here.

As soon as I learn how to deal with these big spots I will let you know.

I have found out a great deal about Minwax and their products. Let's just say I won't be using them again.

There are two new (to me anyway) product lines that will be used for this project. When they were first suggested to me I knew nothing about them. After some digging I discovered they are some of the brands the pros use. You won't find these at the 'big-box' stores!

Once the products get here, and I've played with them, I'll post what they are and tell you what I think.

Well, that's enough for now; I better get back to the kitchen.

Till next time...

Cheers!
Larry

Wednesday, February 4, 2009

Septic Problem & Woodshop Up-Date

Life has not been revolving just around the woodwork in regard to the house.

As some of you know, we are still having problems with the septic system.

Whenever we do laundry, or take an extra long shower, we have some of the gray water bubble up to the surface right next to the septic tank. We do know the tank is over 50, or 60, years old. A new cement top was added at some time, but from what we can tell the tank is brick with no bottom.

So, we have started the wheels a turnin' with the City to get hooked up to the sewer main. We are one of the few houses in town that's still on a septic system. Yesterday, as well as today, the city maintenance manager came over to talk to me about the situation. By law the City must bring the sewer line to our house. The closest main line is about a block away. So the City will have to install a line from the main to our property line. They will also have to get permission to dig a trench across the schools western parking lot. It is estimated that it'll take 4 days to install the sewer line.

We are not sure how much it's going to cost us, or how long it will take, to put in our portion of the line. We do know it'll be somewhere between 150' to 200'. The hard part is all the trees, shrubs, buried electrical lines, water pipes and a well house. All of these obstacles will have to be dealt with to get our portion of the line to meet up with their portion of the line. What's real bad is that the closest point for the city to get the line to us is right at the edge of the huge cottonwood tree at the north west corner of the property!!

From what I was told today, the City would like to try and have this done before the month is over! We were thinking along the lines of doing it during Spring Break or after school lets out for the summer. We're surprised the school isn't thinking along this line as well. Why would they want a 4' deep trench cutting across their parking lot while school is in session?

I have also taken some time - since the house stinks of bleach, to work on the woodshop.

This is the new floor plan.

Most of what you see is in place. The Benchtop Planer, as well as the Compound Miter saw and Oscillating Spindle Sander are shown on top of their work benches but are in reality stored under them. Also, the red lines on the walls represent my peg boards. Oh, there is also a storage cabinet above the Jointer, but it's not on the plan.

The only part of the woodshop that is not set-up yet is the wood storage area. It will be located in the same place as depicted in the floor plan.

Well, till next time...

Cheers!
Larry

Bleach Saga Continues!

Hello everyone!

As I write this the subtle scent of bleach is wafting the the house.

I spent a good portion of yesterday hunting down the next step in the bleaching process - Calcium Hypochlorite.

Most of you probably know this stuff by the many names it goes by when sold as pool shock. It is commonly sold at places like Lowe's and Wal-Mart. However, it wasn't that easy to track down. Those places only stat to carry it during the late spring and summer. The next place to check was a pool supply store. Eventually an open one was found and some of the chemical was procured. It was an interesting purchase. The dealer kept giving me this 'look' as if he knew I was up to something bad with this stuff. When I explained what I was doing he just continued with this 'look' along with a 'yeah right' thrown in.

Oh well...at least I got the stuff.

Here's the woodwork after using the regular Clorox bleach on it. Figured you might as well see how far it has come in the bleaching process.


This is the section of woodwork I use as my 'Purity Control'.


Here's the nasty stuff.

The brand of Calcium Hypochlorite used is called nu-clo Hit Hard.

Per the instructions for pool use you use 1 pound (the whole little bag) per 6,000 gallons of water.

I probably used close to 1/4 cup for 1/3 gallon!! The on-line instructions for using this stuff on woodwork said to mix the crystals in water until they no longer dissolve. So I'm guessing about 1/4 cup.

From what I understand, this stuff is extremely dangerous to use.

Before I even cut the bag open precautions were taken. The front and back doors were open as well as the windows in the kitchen (thank goodness it was a little warmer than normal). Heavy duty rubber gloves were donned as well as a respirator. I had planned to use goggles as well, but they wouldn't fit with the mask.

BOO!!

Your's truly. Don't I look fabulous?!


This is the stuff mixed.

It was all bubbly and frothing, and even with the respirator the smell was bad.


Once the gunk was applied I left for fresher air.

When I ventured back in this is what I found. The bleach had dried and now it looks like salt deposits. It'll be washed off before I go to bed - that ought to be fun.

Doesn't this look bad?!

I wonder what it will look like tomorrow morning after it's been washed off and the wood has dried?


Well, till next time...

Cheers!
Larry

Sunday, February 1, 2009

Quick Up-Date on the Bleach

Hello Again everyone!

Thought I'd get in a quick post about the wood bleaching.

We were planning on applying bleach to all the stained wood today around 3 in the afternoon. However, SWMBO wasn't feeling too good (I think she's getting the 'crud' that's going around here) so I decided to do just a small patch instead. I really wanted to see what would happen but I didn't want to fill the house with bleach smell if she isn't feeling well.

After apply the bleach (about an 1/8 of a cup), and rubbing it in, I left it alone. I was a bit depressed because nothing happened!!

About two hours later SWMBO and I went out for a bit and before we left I checked it again.

This time there HAD been a change!!

WOOWHOO!!!

Take a look.

The bleach did take a lot of the stain out!


Tomorrow I'll saturate the rest with bleach and give it a chance to work. I'll also wait and see what Mr. Neil has me do next.

Well, till next time...

Cheers!
Larry

Charles Neil

Hello Everyone!!

I received permission this morning to give the name of the guy who has come to our rescue - Charles Neil.

You have got to go check out his web site.


This guy is a rock star in the world of woodworking! Google his name and you will see what I mean. He does has a line of 'how-to' videos as well as books. Even the The Wood Whisperer is a fan of his!

Here is what they said about him on January 1, 2007:

"Charles Neil is a well-published award-winning furniture maker literally making antiques on a daily basis. Fortunately for us, he enjoys sharing his knowledge. Charles has numerous video clips available on his site, as well as DVD’s, classes, and a forum. You can spend a good day or two just catching up, so you’ve been warned."

SWMBO and I are deeply, profoundly , grateful that he is willing to help us fix this problem.

Here is a snippet from one of the e-mails he has sent me.

"I know you want this done, but lets get it right, and something not only you will be satisfied with, but that will endure, and any one who sees it, it’s a "WOW", instead of "oh that’s nice....".

I am looking forward to learning all I can from him.

Till next time...

Cheers!
Larry