Yes - we're still here and still scraping.
We've been so busy with the house, and other 'little' interruptions, that I just haven't gotten around to updating.
If you remember from my last post we were hit by a freak storm. Well, we were hit by another freak storm the following week as well. this time we had tornadoes dropping down all around us! We even had something called a 'gustnado' form less than a block from the house and travel down town! During the whole ordeal I stood in the middle of the field next to us and watched it happen. It is quit an awesome experience to watch forming tornadoes cross overhead!!! Fortunately we had no damage at all.
Anyway, let's get to the house.
When I left you last we had a hole in the living room ceiling and were almost done with the west side of the hose so let me fill you in with what's happened.
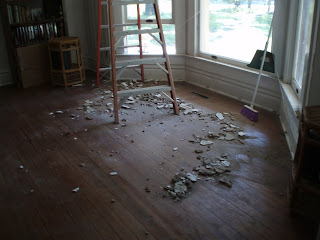
As expected a bigger chunk of the ceiling did fall. All I had to do was touch it and it came down.
 As I said before, at least the living room hasn't had any restoration work done on it yet.
And here is the newly expanded hole.
By this point I've already removed all the loose plaster as well as some lath. I've removed the lath so I could gain access to the porch ceiling in order to find the source of the leak.
These next few pictures are a look into the 'innards' of the porch. I have a feeling I'm the first person in over a hundred years to see this so I thought I'd share.
Remember the separation point (gap) where the porch is pulling away from the house?
 This is what it looks like from inside the porch ceiling (it's the greenish colored slash in the center).
Here's the underside looking east.
Can you believe how new the wood looks?
On the left side of the picture you can see the bottom tips of the house sheeting. Better than the chip-board they use today don't you thing?
 Looking south.
There is about a foot and a half drop to the actual porch ceiling.
The next picture is a rather hard one to wrap the brain around and place it into perspective.
 This is the spot where we assume the water was coming in.
If you were to poke your head up into the hole in the ceiling, and look south, this spot would be right above your right shoulder about 2 feet to the west.
I tried to get a photo that showed the light streaming in from the crack but it just wouldn't take. Trust me though, there was a crack, about 1/16 of an inch by 4 inches)where the single board butted up against the two boards.
Now keep this spot in mind - especially the small rift between the two sheeting boards on the right side side - it will be important again in a bit.
In order to find the hole on the roof-side of the porch I needed to shove something up in it that I could see when on the roof. My first attempt was a stiff wire but when I went out onto the roof to find it there was no sign of the wire.
I knew the whole had to be located along the bottom portion of where the windows directly above met the porch roof but like I said, there was no sign of the wire.
So I decided to use something a bit heavier - some of the window glazing trim I used on the lead glass window.
 This piece of trim did the trick.
 Here you can see it sticking out of the ceiling.

And here's the crack I found with it.
It was hiding behind broken piece of clapboard and flashing.
I thought that the crack was under the window, turns out it was on the west side of it.
 A better view.
The molding is is the bright piece of wood that the sunlight is hitting. The real thin item is the flashing that goes behind the clapboard.
 And there it is.
You can even see some of the actual crack to the left of where the piece of moulding pops through. You can also see part of the wire I used previously.
 After removing the the piece of moulding, and wire, I cleaned out the area behind the flashing and replaced the clapboards.
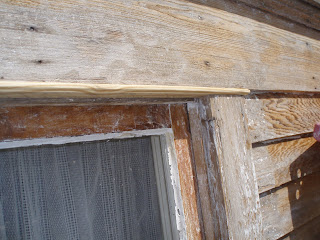
Once that was finished I decided to replace the piece of rotted trip above the windows in the little bed room.
 There wasn't much holding it in so it popped out easily.
What you see here is the best section of the trim!

Here's the replacement piece in place.
It might look like there is a 'wave' like curl in it but that's an optical illusion. In reality it's the grain of the wood.
It only took about 30 minutes to cut, trim, rout and install this piece of trim. Once it is caulked it should help keep the water out during the next rain storm.
Speaking of rainstorms...we had another one last Friday! This is three storms in row that hit on either a Thursday or Friday.
Anyway, we still had a slight leak in the living room ceiling.
Remember that small rift between the two sheeting boards? Turns out rain water was being channeled through it from another location along with the crack right next to it. We are not sure where the leak originated this time. It originally started as a single drop about once every 15 to 20 seconds and lasted for about n hour or two. Then, all of a sudden the leak stopped and it was raining even harder out side.
So, it has now been decided NOT to repair the hole in the ceiling just yet. We are going to cover it with paneling instead. This will allow us to take a look, after the house is sealed and painted, at the problem area when it rains. By doing this we will be able to determine if the leak is indeed fixed due to painting and caulking. Once we are sure we will then repair the ceiling.
 While working on all of these little problems we did manage to work on the soffits and eaves on the south side. While doing so we found more of the original green paint.
 This is the last picture for this post. Thought you would like to see that the west side IS done!! It is now ready for priming and paint!
Oh wait...not quite. There is a bit of a problem we've ran into. More on that later.
Till next time...
Cheers!
Larry


5 comments:
Glad to hear that progress is ongoing, even with the latest storms. Though maybe the storms were helpful, in letting you track and test the leaks and their fixes.
Well done on the west side. God willing everything will be tight and shipshape before the first snow flies.
Thanks for the comment on my latest post. Have you had any luck using a belt sander on a floor? That's next on my sanding agenda, after the upper stairs are shellacked.
My heart goes out to the both of you...
Question... did either one of you have a complete meltdown?
Your home will be so beautiful when its done.
LOL - believe it or not, neither one of us had a melt down.
Thanks Kate -
it will be a while before we touch the floors. we are going to do all the floors at the same time so it could be another two years before we get to them.
I give you both an award for not completely losing it.
Post a Comment