Showing posts with label woodshop. Show all posts

Wednesday, February 4, 2009

Septic Problem & Woodshop Up-Date

Life has not been revolving just around the woodwork in regard to the house.

As some of you know, we are still having problems with the septic system.

Whenever we do laundry, or take an extra long shower, we have some of the gray water bubble up to the surface right next to the septic tank. We do know the tank is over 50, or 60, years old. A new cement top was added at some time, but from what we can tell the tank is brick with no bottom.

So, we have started the wheels a turnin' with the City to get hooked up to the sewer main. We are one of the few houses in town that's still on a septic system. Yesterday, as well as today, the city maintenance manager came over to talk to me about the situation. By law the City must bring the sewer line to our house. The closest main line is about a block away. So the City will have to install a line from the main to our property line. They will also have to get permission to dig a trench across the schools western parking lot. It is estimated that it'll take 4 days to install the sewer line.

We are not sure how much it's going to cost us, or how long it will take, to put in our portion of the line. We do know it'll be somewhere between 150' to 200'. The hard part is all the trees, shrubs, buried electrical lines, water pipes and a well house. All of these obstacles will have to be dealt with to get our portion of the line to meet up with their portion of the line. What's real bad is that the closest point for the city to get the line to us is right at the edge of the huge cottonwood tree at the north west corner of the property!!

From what I was told today, the City would like to try and have this done before the month is over! We were thinking along the lines of doing it during Spring Break or after school lets out for the summer. We're surprised the school isn't thinking along this line as well. Why would they want a 4' deep trench cutting across their parking lot while school is in session?

I have also taken some time - since the house stinks of bleach, to work on the woodshop.

This is the new floor plan.

Most of what you see is in place. The Benchtop Planer, as well as the Compound Miter saw and Oscillating Spindle Sander are shown on top of their work benches but are in reality stored under them. Also, the red lines on the walls represent my peg boards. Oh, there is also a storage cabinet above the Jointer, but it's not on the plan.

The only part of the woodshop that is not set-up yet is the wood storage area. It will be located in the same place as depicted in the floor plan.

Well, till next time...

Cheers!
Larry

Tuesday, October 14, 2008

Decisions, Decisions & Woodshop Update

Okay, as you can all tell I haven't exactly been as busy as I should be in regard to the house. I have been working on it, but just not as much as I should. I think burn-out has been trying to set in and it didn't help that allergies hit bad this year.

Anyway, I have done some work on the kitchen, attic, and woodshop, just not a lot of stuff that makes for interesting reading.

In fact, today I spent the biggest part of the day applying a special wood putty/filler to all the tiny holes in the woodwork. Now the molding looks like it has a bad case of acne - not exactly the stuff of stellar posts.

So, I decided to involve you all in my nightmare. For the past several weeks I have been trying to decide on what type of stain to use - if in fact we do use stain!

I'm not good at making these kinds of decisions for some reason, at least not in regard to my own stuff. Funny, I was trained by the military to make decisions, in a split second, that could mean life or death to a team member, but I can't decide on a stain color!!

Well, it has now been dwindled down to 7 possibilities (out of almost 25). I have added some pics of them here.

Before you look at them let me point out a few details. The pieces of wood used in he sample came from that piece of back door trim that could not be salvaged. I did not sand the samples, or clean them up, as much as I have the stuff in the kitchen. Also, the wood is pine and was not sealed. Each sample has also had two coats applied but no topcoat. So, you will see plenty of blemishes. I just hope and pray the finished product is way better than these samples.

Enough of the excuses, on to the pics.

This first picture took a LOT of work to get. Since the stains all have shine to them the glare from the flash was bad. So, I ended up putting the samples on the woodshop floor and getting the pics. For some reason this helped.

I wish the pictures were more 'true' in color. This is a beautiful, deep, color in person, but not the best in pictures.


This stain is 'Brazilian Rosewood'. It is extremely rich in color and depth. I really like it, but am afraid it might be too dark.

The following couple of pics are of the same sample just in different locations and lighting.

This one was on top of the washer.


The next one was on top of the ledge of the built-in cabinet.

As you can see, none of them look the same color!!!


AAARRRGGGHHH!!!!!!!!

Those first three pics were just so you could get an idea of how hard of a time I'm having with this. I mean, the stain chosen here will be the one used through out the house! We've got to get it right.

The next several samples are of the other choices.

This one is 'Aged Oak' - I think.


The following is 'Early American'.

This is one of my favorite stains, but it doesn't look the same shade it has when I've used it on other pine items.


The last three are smaller samples. I was running out of board!

These sample are so similar that they almost look the same, and one of them looks nothing like the sample pic on the can!


The colors are 'Pecan', 'Old Maple' and 'Walnut'.

Now this last pic needs to be explained. This is a grouping of samples using two pieces of the old wood and one scrap left over from the plumbing chase.

The staine is 'Red Oak' and was our 1st choice from day one. However, for some reason it looks a little too 'red' and fake.

The main thing that needs to be pointed out with these is that one of the samples had been pre-treated with wood conditioner.

This conditioner is suppose to keep blotchiness to a minimum with soft wood - such as pine. To be honest, if I didn't know which piece was pre-treated I wouldn't be able to tell the difference. Can you?

One other thing of note - the wood filler is more noticeable in the picture than in real life.

Now - as you might have guessed, the color differences have been driving me nuts and the stains are not looking the way they normally do. About the only thing I can figure is that the original stain on the wood might have somehow leached into the wood an is causing the colors to be 'off'. Another aspect that might be causing this could possibly be the airplane paint applied later. Perhaps the lead somehow reacted with the original stain and added something to the wood that stripping and sanding just can't get rid of.

All-in-all, I just hope the finished results look better than the samples.

As the title indicates, I have also been working on the wood shop.

My friend Bill (the one getting me into woodworking) gave me a metal work table and it, along with some additional tool aquisitions, forced me to re-think the shop layout.

Sorry for the quality but this pic was scanned in. For sme reason I didn't save it to the PC!!

As you can see, I now how three work tables. The one we found in the shed is now along the south wall and the metal one is on the north wall.

Under the window is the metal table.

The top is filled with hand tools.

I had no idea I had that many hand tools!

I'm sorting through them and weeding some out.

I was hoping to go get the bricks for the wood burner today but when I got to the place they are stored the ground was just too wet to get the Land Rover to them.

The new wooden work table is now on the east wall and it is also covered with miscellaneous tools to be gone through.

You can also see the new location of the original table and the table saw.

The book shelf is now in this corner. I hope to use this as storage for nails, screws, and such.


And again, as the next picture will show, I still have a lot of junk that needs to go 'bye-bye'.

If you look close, next to the piece of peg board, you can see the doors for the built-in cabinet. I have as yet to finish stripping them.

At some point, a dust collection system should be going in this corner.

In the last pic you can see the table saw and original work table.

If you look to the corner, under the pile of stuff, you can barely see the jointer I got from Bill.

Now, on the floor in front of the work table you can see a pile of wooden 2x2s. These are being ripped for use in the attic. These are what the ridged foam insulation will be attached to.

Well...I guess I've board you all with my restoration ramblings for now. Tomorrow I hope to finish the final wood filling and sanding. Now Friday, that should be an interesting day. That’s the day I’ve scheduled to take out the built-in cabinet!!

So, till next time....

Cheers!
Larry ~

Tuesday, June 24, 2008

Toys Toys Toys

As most of you know SWMBO and I have been busy the past couple of months doing all sorts of stuff.

Some of what we’ve been doing is hitting various auctions and going to eastern Kansas to visit SWMBO’s family.

As part of these expeditions we have been able to pick up some new toys. I thought you’d find some of them of interest.

First up are some more power tools for the woodshop.

Finally got a little, 5-speed, ½” chuck, bench top drill press.

I’ve never heard of the ‘Collins Quality Tool’ brand, but this is a sweet little bugger - works great.

All that really needs done is cleaning and some surface rust removal in some areas. For the price I got it for it can’t be beat and I can’t go wrong.

At the same auction I managed to get this Craftsman 12” Band Saw - Sander.

Like the drill press this only needs to be cleaned up and have some surface rust taken care of (mainly on the legs). Like the drill press, the price was too good to let it go.

They guy who previously owned these tools was a woodworker as well. From what I can tell he had to hang-up his apron over 10 years ago due to illness. Since his illness the tools have just been sitting in his woodshop gathering dust. The family decided to have the auction because the guy is now needing to go into a care facility.

Makes me wonder what will happen to all my junk when I’m no longer around.

The only bad thing about this band saw are the spiders that came with it. I knew there were some webs/nests under it, and I thought I got them. Guess I didn’t. When I went into the woodshop yesterday there were dozens of spider webs going all over from the saw. We sprayed for spiders, and other bugs, about a month ago in the shop. I might have to do some more spraying.

While back in south eastern Kansas I managed to pick up a couple new vintage hand tools.

The hand drill came from the wife’s second cousin (he has an absolutely spectacular woodshop utilizing primarily vintage antique hand tools) , the Bailey #3 came from a junk shop.

The Brace isn’t exactly an old one, maybe 40 years, but it came form the wife’s second cousin as well.

The awesome, razor sharp, spoke shave was an auction find my friend Bill got for me.

The next two items I picked up just the other day and intend to hang them in the shop.

This is a two man tree saw.

What's really neat about it is that it's about 1" taller than me!


Once cleaned up it should look nice hanging from the rafters.

Here is a HUGE, one man, Keen Kutter saw. The extra handle can be moved to the other end of the blade.


This one is 4-½’. I think what one gent at the auction said about it sums it up best - “I’d hate to cross the guy big enough to use it”.

Llike the other one it will hang from the rafters of the shop too.

This is a better view of the two handles and the Keen Kutter button.


Now these last few pics are of THE prize from the auction the saw came from.

We have wanted a matched set of metal twin beds for one of beds rooms. When we found these we knew we had to have them.

They do have a ‘Simmons’ label on them, but we can not find a date. They are metal, and the foot boards has a brass piece. They also came with both sets of rails.

What we liked the best about them is that they look like something that would have been on the Titanic.

One of the head boards...

One of the foot boards...

Head board finial detail.

Foot board brass 'do-hickey' detail.

The other one has a small dent, about the size of a dime on it.


Once cleaned up they should look great. I’m going to have to do some digging and see what color they should be. I think they were originally black as there is no sign of any other color.

All-n-all, not bad for $10 each!

Well, till next time....

Cheers!
Larry

Wednesday, June 11, 2008

Almost Done!

Hello everyone -

Well, we have had a respite from storms for the past couple of days; however, another set are moving in. There is a tornado on the ground about an hour and a half from us (the the north west) right now.

Our brush pile is now a bit bigger than SWMBO’s car. I will try to burn some of it next week when we dry out.

I’m also watching a tree that seems to want to pull it’s self out of the ground. It is one of our big trees so I need to figure out how to stave off the inevitable. I’ll try to get some pics of it tomorrow. There are fissures in the ground around the roots and the dirt around it is now a mound.

Anywho…the woodshop is coming along nicely, but slowly. The electrical system is going to have to wait and I will have to go with my temporary set up. We are needing to go with a larger electrical cable and as you know copper is very pricey now. What started out as a $300 - $400 project quickly climbed to almost $1K!

I’m also having a hard time figuring out exactly where I want to put some of my stuff.

I did take some time today to get pics for you though. Here they are (click to enlarge).

This is a view of the east wall. As you can see there is now a desk (to the right); a work table; and a wall cabinet.

To the left, in the corner, you can see a stack of wooden boxes. These are old, military storage boxes waiting for restoration. When finished they will be used as storage in the attic.

For those of you monitoring the 'boo-boo' meter you will be happy to see that there is a first aid box on top of the desk (to the right).

If you look close enough you will also be able to see assorted tools hanging from the roof joists. They are there until the next wave of peg board gets installed.

I wanted to show you all a close up of the work table. It's kind of ugly, and it needs a new top, but the interesting thing is that we found it here in the little red shed. We have no idea how old it is, but it is nicely built and it fits my height perfectly.
This is the north east corner. You can see those wooden boxes a bit better now (yes, I have a 'thing' for wooden boxes).

The table saw is here at the moment, but will not be staying. I'm going to build a table for it, with casters, so that it can be moved around. At this point, I plan to place another work table here.

This corner is the other spot where peg board is going to go.

A general view of the north wall.

The wood burning stove is in the basic location it will end up in, but will be a little further out into the room. We plan on putting fire resistant fiber board behind the stove with corrugated metal (you can see some behind it) fastened to it. This should help to reflect the heat out. The stove is also going to set on a raised, cement paver dais.

Do you see the galvanized tub next to the stove? That's an auction find and will be used to hold fire wood.

I meant to show this view first.

I think this will be the spot that my clamps will be stored. Got to have clamps...lots and lots of clamps!


Here’s the south wall.

Right now I've just put a bunch of my tools up there so I can get an idea just how many I need to deal with. There are more in the house and still a few more in the garage. You can NEVER have too many tools you know!!

Also in the picture is my compound miter saw. See the table that it's on? It is not staying. The legs are going to be salvaged and used for a project - a four poster doggie bed. I thought about restoring it as a table, but these are so common and the top of this one is real bad; not to mention it's missing an end.

This is the south west corner.

I have gotten the wall cabinet hung (the other is on the east wall) and will probably store paints and stains in it.

Underneath is a rolling cart (to be replaced) holding my table top planner. I will probably house this here. Next to it is a little book shelf holding my hand planes - more on that in a bit.

The west wall.

Here is where I will store a lot of the wood that'll be used. The rest will be stored above and in a shed yet to be built.

I’m still toying with various ideas on how to store the wood, and scraps, in an easy and tidy way. So far I have about three strong ideas.

This is the front runner for my wood storage idea.

It is a design featured in an old issue of 'Woodworkers Journal' magazine.

It's kind of big, but will hold a lot of lumber and won't be too difficult to deal with. It is on casters so that will make it easier to load, and unload, sheet goods.

I am going to tweak the plan a bit. Instead of having horizontal shelving on both sides; the side that will face the wall will have a panel saw built into it. For those of you wondering, a panel saw set up allows you to cut large, 4'x8' sheets (or bigger) of plywood in a faster, safer, manner.

Let's get back to that book shelf of hand planes....

I don't know why, but I really like hand planes. There is just something poetic about them. In fact, there is something poetic about all the old hand tools for that matter.

Anyway, as you can tell, my collection is still growing. There are a few more I’d like to get for my collection so the hunt is one. I also have a handful that need restoring. SWMBO is trying to convince me to restore some and sell them on eBay. There is a strong market for them. We saw one go, several weeks ago, that sold for over $1K (it was extremely rare and old). So, it just goes to show, one man's junk is another man's treasure.

So, if any of you have any old hand planes you want to part with let me know. Perhaps we can come to deal with each other.

Speaking of tools, some new 'toys' have made their way to the shop.

First up is this handy little palm router. It's the Bosch Colt™ Variable-Speed Palm Router. An extremely handy tool to have when it comes to free form routing!


Next up is not really a new toy, but one I forgot I had until I started moving all the tools around!

It's the Wagner Paint Eater. We bought it over a year ago to help remove the paint off the sides of the house. It is supposedly a great tool for this. I should be able to start playing with it at the end of next month.


Same tool, different view.

It's hard to explain, but, unlike an angle grinder, the business end of the puppy 'floats' on the wood and follows the contours of the wood. Supposedly it will not eat into the wood unless you force it.


We will see - I'll keep you posted.

The last tool I'll share with you is my awesome auction find!

It's a cordless, 12 volt, Craftsman drill. It's called the 'Professional Redi Drill'. I have not really found out much information of this drill (the product number has been worn away) except that it was the first of it's kind. There is an interesting story behind it, but I'll tell it to you in a minute.

Like I said, I got this at a local auction for $7 bucks. It came with a case, charger and two batteries. Except for one of the batteries, everything works great! My father, and father-n-law, suggested that I replace the bushings; so I guess I'll do that at some point. I'll also replace the faulty battery. Considering that the thing originally sold for over $200 I don't think bushings, and one battery, are too much of a hit for a $7 item.

Now for the interesting part.

When this tool was first introduced to the editors of all the major woodworking type magazines the Craftsman guys were about laughed out of the room.

If you look at the photo you will see a tiny yellow handle along with some yellow 'innards'. That is the dial, and housing, for a flat head screw driver bit; a philips head screw driver bit; and the two most come drill bits. What you do is adjust the handle up towards the top of the drill and push the button. The bit you chose is loaded and 'Bob's your uncle'!

You see, the inventors figured that if you had the four most common bits built in it would save time, and hassles, look for, and attaching the bit you want. When the skeptics started playing with it they were amazed. One of them even said "Why didn't we think of this before?"!

So, I tried it out - it's absolutely wonderful! It did save time and effort when it came to switching out bits. On the plus side, you do not have to use the bits provided, you can use any bit you want. As long as the bit is the same length, and no bigger than the tubes, you can even replace the ones provided with the ones you use the most. Now how cool is that?!

One last thing and then I'll leave you alone.

Do you remember my friend Bill? The one getting me into the woodworking business?

Well, he bought a huge Craftsman table saw at an auction. This thing is professional grade and weighs over 100 pounds. It is an old one but that doesn't matter; quality tools last forever.

Unfortunately it turns out that this thing is a three phase 220 volt motor. He went to plug it in so we could see how well it ran (the previous owner said it worked) and found out that it was a weird plug. So, we couldn't test it out.

Anyway, he gave the saw to me and said to do what ever I wanted with it. In order to move the sucker easier, I took it apart last Sunday; figured I could move it piece by piece.

What I found made me thankful bill wasn't able to plug it in! Turns out the switch had basically exploded in it's housing and the wires were touching the metal sides. If Bill would have plugged it in he probably would have electrocuted himself!!

So, in order to get this thing to work I will need to replace the switch - no biggie. However, the electrical requirement, and motor size, is a bit over kill for me. So I’ve decided to try another possibility.

See those two metal pieces? Those are the top pieces of the table saw. The one on the left is cast iron; the one on the right is actually two pieces bolted together and are made of cast aluminum.

Unless you plunk down $600 or more (unless you find a good used one) you won't get these tops anymore. The current ones, like what’s on my table saw now, are cast aluminum for the main part and press metal for the wings.

What I'm going to try and do is exchange my table top for the one off of Bill's auction one. I've been told that they are not interchangeable but I have a plan and a brother that knows how to weld! I figure that if the bolt holes do not line up I could build a buffer piece that would allow them to line up. As long as there is clearance for both sets of bolts there should be no problem.

What do I have to loose? I'll keep you posted.

Well, it's getting late and I'm getting tired.

So, till next time....

Cheers!
Larry ~

Wednesday, June 4, 2008

Tornados

Hello everyone,

Well, this is going to be a short post - no pics even.

Just to let you all know, we are still alive and well. Things are going slowly now with the shop. I'm having to reorganize the garage at the same time and shuffle stuff around. The good news is that all the woodworking tools are now in the new woodshop.

Bad news....if y'all have been watching the news lately, my part of the world has been coming under attack by horrendous thunderstorms and straight line wind, not to mention close calls with tornados.

I have spent most of my days cleaning tree branches & limbs, and various other debris out of the yard as well as help a few others who have had trees come down.

I am a weather spotter for the city, as well as CERT trained, and have just received the following bulletin from our city's police chief:


The National Weather Service warns of a possible tornado outbreak in the Great Plains tomorrow with conditions similar to a deadly day in 1974 when 39 tornadoes touched down.

Computer forecasting models resemble those on June 8, 1974, when more than three dozen tornadoes touched down in the southern Plains and killed 22 people, including six in Emporia .

NWS meteorologist Robb Lawson said, "this event warrants more advance warning."

The National Oceanic and Atmospheric Administration's Storm Prediction Center has been warning for days of the outbreak.

Mike Smith is CEO of WeatherData, a subsidiary of AccuWeather. He said some forecasters are predicting the tornadoes could hit a corridor stretching from northern Oklahoma to central Iowa . That area would include much of Kansas and northwest Missouri .

Smith said, "If you take April dynamics and June thermodynamics, you have a potentially disastrous combination."


In all my years of living in Kansas I have yet to see a warning come out this early for this type of storm. Come to think of it, I can't remember every having a year as full of tornados, high winds, and hail like we have had this year. It is being called "the Perfect Storm" for tornado season.

I don't know what it worse, going through it or waiting for it to happen.

Hopefully I will be able to post by this time Friday to let you all know what has happened.

Till next time...

Cheers!
Larry ~

Thursday, May 29, 2008

Let There be Windows!

WOOWHOO!!!

All three windows are in!!!

Tomorrow I will finish them out and trim the outside. Hopefully they will like nice when done.

I'm really itching to get this shop finished to the point I can work in it. I know my friend Bill is. He just got a large order for restored furniture and I know he is going to need the help and I have orders coming in as well.

This is the first window that went in. Now it has hinges and a handle.

Right now I have it held open with wire, but that will change after a bit.

It helps a lot with air flow and today was the first day it wasn't stifling in the shop.


Also, you can see one of the two new shop lights my father-in-law gave me. The other one is in front of window number two.

Window number two - same setup as the first one.

You can just barely see the second light also.


BTW - did you notice the trees right outside the windows!

This next one was the biggie...I have never cut a whole in a wall before and it was an interesting task.

So now, for the first time, one can see out from this side.


You've got to love the view!

I think this is going to be a great view while working on projects. My main work table will be in front of this window.

Oh yeah...the blue thing is a load of lumber and glass covered by a tarp. I've been slowly watching it sink with all the rain we've had.


Speaking of rain - there are tornado warnings here in Kansas tonight already.

And last but not least, here is the window in place!

We are not sure where this window came from. it was one of them that we found in the shed when we bought the house. I do know that I found a fancy sash lock dated 1873 on it.


Well, that's it for now. Can't wait to see what all I get done tomorrow. It really helps when you have some kick ass CDs to listen to while working.

Till next time....

Cheers!
Larry ~

Tuesday, May 27, 2008

Woodshop Update

Hello again everyone!

Well, the storms are over...for now. We are to get hit again tonight though.

It has been storming off-n-on here now for about a week. Not just rain, but thunder boomers, straight-line winds, hail and the occasional tornado.

During this time I have been working away on the little red shed taking one step forward and two steps back. Yesterday, SWMBO and I spent most of the day working on the shed. She finished the insulation (the pink stuff for the top caps) and started prep work for the next window to be done.

I finished building the top caps and finished out the first of three windows. The finish trim and hinges are all that's left on it.

The weather was bad during most of the day so I didn't start on the second window.

Here's your first view of the completed southwest corner!

You can barely see it, on the left side of the pic, but the first piece of shop equipment got moved in last Friday! My dad and I moved the table saw in on Friday afternoon.

Do you see the white thing sticking up in the middle of the pic? That is a wall cabinet that will be hung on the south side of the corner.

The west wall.

This will be the primary storage area for lumber and cut-off stock. On the right side of the pic is another cabinet that will be hung on the wall - just not sure if it will be the north, or west wall yet.

For those of you who might ask - the black painted board with the silver tubes on it is part of a Halloween prop. It goes with an organ we use on the front porch. This, as well as several other items still in the shed, will be stored in the garage, or new storage shed, soon. We wanted to start moving this stuff to the garage this past week-end, but all the rain put a stop to it.

Southeast view of the interior.

I'm still storing some items here, but they will be gone by the end of the week (I have a time-line I'm dealing with and I need to be somewhat finished by next week-end).

Do you see how dark it is through the doorway? It is about 3:30 PM and the storm was kicking into high gear.

This is the northeast corner.

The fan is sitting where the second window will go. On the east wall you can see where the third, and largest, window will go. If the rain will let up those two windows will go in tomorrow.

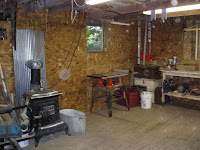
North wall and more junk to be moved.

The wood burner is about in the spot it will end up in just not as close to the wall. Cement board and flagstone will also be installed to help keep the stove from burning the place down!

Do you see the two white trunks in front of the wood burner? Those are vintage tool chests SWMBO got me from our friend Bill. The top one even came with some cool antique tools!

These are going to be refinished and put in the attic.

This is the first of three windows to go in.

It is part of one of the windows from the first house we owned. It will be nice having these in the shed.

We were a little nervous about this window. The storm hit, hard, shortly after we put it in and we were afraid it would be blown out. Luckily it held - that's a good sign.


Okay, this is one of the cabinets that came out of the house in the 50's.

We're not sure if it is part of the original cabinets or part of the 20's remodel.

Do you see the dark area at the top? That's where the top part of the original sink was attached.

The master plan was to refinish this cabinet and reinstall it in the house but it won't fit unless we take out the fridge. So we figured we would install it in the woodshop and use it as a template for the new kitchen cabinets.

However, this cabinet is so big it doesn't fit well in here either!! So, now we ar thinking about moving it to the garage. We'll see what happens with it.

Here's a close up of the cabinet side panel. We like it and hate the thought that it may end up in storage somewhere.


Well, the sun has decided to show it's self so I guess I better go out and assess the damage from the storm and get busy.

Till next time...

Cheers!
Larry ~