Thursday, May 29, 2008

Let There be Windows!

WOOWHOO!!!

All three windows are in!!!

Tomorrow I will finish them out and trim the outside. Hopefully they will like nice when done.

I'm really itching to get this shop finished to the point I can work in it. I know my friend Bill is. He just got a large order for restored furniture and I know he is going to need the help and I have orders coming in as well.

This is the first window that went in. Now it has hinges and a handle.

Right now I have it held open with wire, but that will change after a bit.

It helps a lot with air flow and today was the first day it wasn't stifling in the shop.


Also, you can see one of the two new shop lights my father-in-law gave me. The other one is in front of window number two.

Window number two - same setup as the first one.

You can just barely see the second light also.


BTW - did you notice the trees right outside the windows!

This next one was the biggie...I have never cut a whole in a wall before and it was an interesting task.

So now, for the first time, one can see out from this side.


You've got to love the view!

I think this is going to be a great view while working on projects. My main work table will be in front of this window.

Oh yeah...the blue thing is a load of lumber and glass covered by a tarp. I've been slowly watching it sink with all the rain we've had.


Speaking of rain - there are tornado warnings here in Kansas tonight already.

And last but not least, here is the window in place!

We are not sure where this window came from. it was one of them that we found in the shed when we bought the house. I do know that I found a fancy sash lock dated 1873 on it.


Well, that's it for now. Can't wait to see what all I get done tomorrow. It really helps when you have some kick ass CDs to listen to while working.

Till next time....

Cheers!
Larry ~

Tuesday, May 27, 2008

Woodshop Update

Hello again everyone!

Well, the storms are over...for now. We are to get hit again tonight though.

It has been storming off-n-on here now for about a week. Not just rain, but thunder boomers, straight-line winds, hail and the occasional tornado.

During this time I have been working away on the little red shed taking one step forward and two steps back. Yesterday, SWMBO and I spent most of the day working on the shed. She finished the insulation (the pink stuff for the top caps) and started prep work for the next window to be done.

I finished building the top caps and finished out the first of three windows. The finish trim and hinges are all that's left on it.

The weather was bad during most of the day so I didn't start on the second window.

Here's your first view of the completed southwest corner!

You can barely see it, on the left side of the pic, but the first piece of shop equipment got moved in last Friday! My dad and I moved the table saw in on Friday afternoon.

Do you see the white thing sticking up in the middle of the pic? That is a wall cabinet that will be hung on the south side of the corner.

The west wall.

This will be the primary storage area for lumber and cut-off stock. On the right side of the pic is another cabinet that will be hung on the wall - just not sure if it will be the north, or west wall yet.

For those of you who might ask - the black painted board with the silver tubes on it is part of a Halloween prop. It goes with an organ we use on the front porch. This, as well as several other items still in the shed, will be stored in the garage, or new storage shed, soon. We wanted to start moving this stuff to the garage this past week-end, but all the rain put a stop to it.

Southeast view of the interior.

I'm still storing some items here, but they will be gone by the end of the week (I have a time-line I'm dealing with and I need to be somewhat finished by next week-end).

Do you see how dark it is through the doorway? It is about 3:30 PM and the storm was kicking into high gear.

This is the northeast corner.

The fan is sitting where the second window will go. On the east wall you can see where the third, and largest, window will go. If the rain will let up those two windows will go in tomorrow.

North wall and more junk to be moved.

The wood burner is about in the spot it will end up in just not as close to the wall. Cement board and flagstone will also be installed to help keep the stove from burning the place down!

Do you see the two white trunks in front of the wood burner? Those are vintage tool chests SWMBO got me from our friend Bill. The top one even came with some cool antique tools!

These are going to be refinished and put in the attic.

This is the first of three windows to go in.

It is part of one of the windows from the first house we owned. It will be nice having these in the shed.

We were a little nervous about this window. The storm hit, hard, shortly after we put it in and we were afraid it would be blown out. Luckily it held - that's a good sign.


Okay, this is one of the cabinets that came out of the house in the 50's.

We're not sure if it is part of the original cabinets or part of the 20's remodel.

Do you see the dark area at the top? That's where the top part of the original sink was attached.

The master plan was to refinish this cabinet and reinstall it in the house but it won't fit unless we take out the fridge. So we figured we would install it in the woodshop and use it as a template for the new kitchen cabinets.

However, this cabinet is so big it doesn't fit well in here either!! So, now we ar thinking about moving it to the garage. We'll see what happens with it.

Here's a close up of the cabinet side panel. We like it and hate the thought that it may end up in storage somewhere.


Well, the sun has decided to show it's self so I guess I better go out and assess the damage from the storm and get busy.

Till next time...

Cheers!
Larry ~

Wednesday, May 21, 2008

Just call me "Tool Man"

Well, today didn't go as well as I had hoped, but progress was made!

The floor did get replaced (sorry, no pics, will snap one tomorrow) but it was an ordeal. I cut the 4'x8' wafer board flooring plumb and true yet I forgot a MAJOR component of the equation - the shed it's self. The shed is not plumb and true, it is more cock-eyed than anything. So I had to make several adjustments and now the floor looks more like an experiment gone bad.

Anyway, I got to use several power tools today (grunt-grunt beating chest) so that was a plus.

Let me just tell you about my newest favorite power tool. I know I've mentioned it before, but it must be mentioned again - the 'Fein Multimaster‘.

If you are restoring a home; remodeling one; or just like piddling around the house fixing things - you need one of these!

The only caveats I have towards it are the prices of the attachments - especially the blades. However, there are web sites that tell you how to make your own blades, or you could do like I do and visit Al over at ’Multiblades‘.

He has a rather good range of blades to choose from and some great tips. I highly recommend his products.

Here you can see one of the main reasons I wanted this bad boy.

I know it is kind of hard to see in the picture, however the Multimaster was able to cut out the rotten parts flush with the new wood without cutting into the good wood.

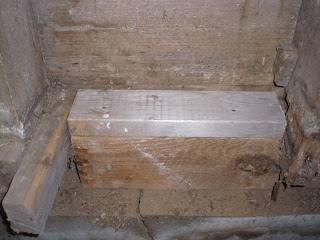
Perhaps I should have set a level on top of the new piece of wood (needed to bring the old and new up to the original level), but it IS level.

Do you have any idea how hard this would have been if the Multimaster wasn't around?

On to other problems.....

I am needing to add extra studs to the corners in order to get a nice, even spot for the wafer board to be attached.

You'd figure this would be easy - but NOOOOOOOOO!!!!

I recycled the studs from the center wall for this application. Do you have any idea how hard it is to nail, or screw, something into 100+ year old wood?!

As you can see, I did not get far with the nails or the screws. In fact, I used a hammer drill and it still didn't work.

The pic shows how far I could drive those in before they would go no further.

So, out comes the drill for rather large pilot holes and then the use of the hammer drill again. This time it worked.

Finally, the first course of wafer board was all the way around!


That means the ENTIRE bottom half of all the walls are installed!!

WOOHOO!!!

Here's a view of the north wall.

Is it just me, or is the stove beginning to look like some weird alien?

Okay, at this point you might be asking "why have you only gone half way up the wall?". That's easy to answer...insulation.

If you remember, my father-n-law got us a bunch of that pink insulation and we used it in the attic. I used some of the left over from the attic for this project. Unfortunately there was only enough, barely, to do about half the shed.

So, I priced the same pink stuff. Do you have any idea how much this stuff costs?! For a 22" x 96" roll you pay between $30 and $33. In order to insulate three sections (spaces between the studs), plus a little extra, we'd have to pay almost $100!! To do the rest of the shed it would be well over $1000!!!!

So, I hit the books, and the internet, and looked at the options. Here's what I came up with.

Blow-in insulation!

Yup...that's right, blow-in insulation.

At first I was turned off to this, mainly due to settling, but the more I read the better it sounded for this application.

First of all, the settling rate is a lot better than it use to be.

Second, it is all natural from clean, recycled paper and has not Phormaldehyde in it.

Third, it doesn't make me itch like the pink stuff.

Fourth, and here's the clincher, it only costs about $8 per bag!

It will take a total of 8 bags and give me an 'R' value of about 32. Now I wish I would have used it on the other half!

I will also be making it so that the top 1' of the wafer board can be removed so that the settling can be checked.

Now, the down side was "how to install it". I had read in the past that you could install it by hand, but it was easier with a blower. Well, the hand installation would have to be the way to go. Even though I could borrow the blower from the place I bought the insulation I would be on a waiting list for over a month!

Installing this stuff by hand is not a big deal. All you have to do is fluff it up and put it into the cavity.

I did this by putting some of the insulation in a large plastic tub and then fluffing it with a crab fork. This worked, but there just seemed that there had to be a better way.

Then it hit me!! The blower was not much different than a leaf vacuum!!!

So, I borrowed my father's hand-held Black & Decker leaf vacuum/mulcher and decided to "play".

Here's the set-up.

One large plastic tub; one leaf vacuum; and one bag of insulation.

That's it.


Presto-changeo you have this!

All that I needed to do was empty the bag into the cavities. Now how cool is that?!


So, even though there is no picture of it, the ENTIRE bottom half of the wall is now insulated!!!

Double WOOHOO!!!!

Tomorrow I should be able to finish the top half of the wall - that is as long as nothing happens to prevent it.

Anyway, it's getting late so I'd better sign off for now.

Till next time...

Cheers!
Larry ~

Tuesday, May 20, 2008

Woodshop - Quick Up-date

Hey everyone, thought I'd post a couple of quick pics from today's efforts.

Doesn't seem like much, but it took a long time to do this.

Here's the big hole I made today. Tomorrow I will get the new floor installed.

I'm not replacing it will tongue-n-groove but with standard OSB floor boards.


The master plan is to cover the entire inside perimeter in 1/2 OSB to add strength for the power tools and benches. So, once this is done it won't even be noticeable.

This is the repair to the sill.

Only the top inch was rotted, so all I did was shore it up with another piece of lumber.

Tomorrow I will add a top cap to make up the thickness.

Hopefully tomorrow will go better than today. I ruined another saw blade due to those hidden, $%#@^%$&, nails! I can't believe they used such large nails for this application. At least it was a circular saw blade and not another Multimaster blade.

Oh well...talk to you all later!

Cheers!
Larry ~

Oh Bother.....

Hello again everyone.

The woodshop is coming along. There are good days and bad days with it, but it could be a lot worse. We'll get to that in a bit.

But first, here are a couple of pics I promised about that funky cabinet we found in the shed.

It's a nice little cabinet made of hard wood with wainscoting.

The right side vertical board has been chewed on by squirrels so it would need to be replaced.

The part that's most interesting is the base hopper/bin.

As you can see the hopper/bin is angled downward, has a divider in the center with the lid.

We're not sure what the cabinet was originally used for but the under side of the lid has one bin listed as 'Epson Salts' and the other as 'Sulpher'.

Right now I'm not sure if I will restore this to sell, or use it in the shop. It might even make an interesting potting cabinet. Peat moss and such could be placed in the bins.

Here's a shot of the almost completed east wall.

The new window opening has been framed and that THAT was a real pain!!

I just about ruined a Multimaster blade on this little project. There were so many nails that it became ridiculous. In about two, 3' long sections (where siding and such was nailed to studs) there were about 75 nails and they were not little ones either.

This is the first sign of termite damage in the building. It isn't too bad and was easily fixed.


However, it was just a foretaste of what was to come.

This is the other side of the shed after cleaning it up and getting ready for the wafer board.


The dark stains are from water, so, I will need to be replacing the siding fairly soon.

Now, this is where the funny REALY begins.

While cleaning the floor so that we could start installing the wafer board I found another little section that had termite damage.

But that little spot would be just the beginning.....

In the northwest corner of the room there were lots of boards nailed down on the floor. So, Lee (my best friend who came down and helped us) and I decided to pry up these boards and see just how bad the termite damage was.

Turns out these boards were not hiding termite damage but rat holes!!

See how big these are - and there are several more. You can also see one of the boards covering up a bigger rat hole.

"Holy Rat Hole Batman!"

This is Lee, and yours truly, looking at the section of holes under the board in the above picture (yup, SWMBO decided to play with the camera).

It was at this point that we discover old oat husks. So, now we know that oats were stored at some point in the shed. This would also explain why there are so many rat holes!

Lee decided to go ahead and pry off all the boards so that we can get a feel for just how bad it was.

Once it was discover just how bad it was, the decision was made to get out the heavy artillery and start removing that section of the floor.

As Lee hunted for more rat holes, I got the sawzall out and took out my frustration on the floor.

After a large section was cut out, Lee started pulling up the old nails and we could take a better look.


Turns out the sill board here has been eaten away by rats and termites. So, before I can put some replacement flooring down I will need to fix this - yet another project!

Yes, this is my best side.....

I just had to take a look at what was under there.


We have had noticed indications that skunks, opossums, and foxes have lived under the shed so I was expected to either come face-to-face with one, or at least see evidence of habitation.

There was nothing there. No signs of anything! however, I could not see all the way across the crawlspace, so there might still yet be something there.

The biggest disappointment was the lack of treasure.... You'd think there could have at least been on old tin can filled with $20 gold pieces!

Blast it all...

On the bright side, we did find out that there is an additional, cement, retaining wall running the entire length of the shed helping to support it down the center. That was a big deal, still is in some cases even today, back then.

Well, I need to get back out there and continue prepping the area for the new floor.

I'll make sure to get some pics.

Till later....

Cheers!
Larry ~

Wednesday, May 14, 2008

Woodshop 101

Hello everyone!

I can't believe how long it's been since I last posted. May is usually super busy for us so I haven’t been able to work on the house as much as I'd like.

So far I've just been piddling in the house and doing yard work and watching for tornados.

One project I have been working on is in the new woodshop. I’m to the point that I need the shop to finish out some of the projects in the kitchen.

It took about a week just to sort through stuff in it and get rid of things. I also took the time to do some organizing of the junk. Unfortunately, I'm still having to work around a lot of it. A lot of the stuff in the shed will be placed in a storage building yet to be built..... ** ANOTHER project!

Enough of this...on to the pictures!

Here it is - the 'little red shed'. We have often wondered how old this building is, but have never know. However, while working on it, several clues came to light letting us know how old he is.

This is the west side.

As you can see, the siding is in need of a lot of TLC.


It's closed right now, but there is a small opening/doorway in the apex of the roof. There is one just like it on the east side.

Here's the east side.

You can see the other opening in the apex.

The tree is a large Walnut. I have had so many people say I should remove this tree so that I can place a double door on this end or perhaps a wood storage lean-to.

Personally I just don't see the sense in taking out a large, beautiful tree just to make room for a door or storage. Perhaps I will regret it one day when it blows over onto the shed. This has already happened with another tree a few years ago.

The shed is divided into two separate sections by a wall with no door connecting them. No one seems to know why this was done, but we've had several speculations.

Here is some of the junk on the west side.

Most of it is restoration materials and recycled materials from other old houses.

You can barely see the double arched glass door hiding behind all the junk. This was one of the original doors from our first house. The new owners of that house didn't like and took it out. I scavenged it off their trash heap.

Just more of the same, only this time on the east side.


This is the dividing wall from the west side.

As mentioned, we are not sure why it was built. There has to be a purpose though and the wall does not go all the way to the top.

If any of you have thoughts about this drop me a line.

The east side of the wall.

See all the pink stuff? That's some of the left over insulation from the attic. It'll be used to insulate the walls here.


Here's the ceiling apex.

The inside height is about 14'.

I'll insulate the vertical section just like the wall, but I'm undecided about leaving the opening usable, or just for looks on the outside. I've only needed to open it once and that was to remove a tree trunk the previous owners stored in the rafters!

Here's a general view of the interior ceiling looking to the west.

The plan is to make a loft out of the west end for storage of wood and project items such as chairs.


We are also going to insulate the ceiling, but plan to use the foil stuff that looks like bubble wrap. You just staple it to the ceiling. I figure the shininess of it will help with lighting as well.

Okay, remember how I mentioned 'clues' as to the age of the shed?


Well here is the first one.

The floor boards are the exact same kind as the hardwood floors in the house.

The rest of the 'clues' will start falling into place as soon as the wall comes down.

Voilà!!

The wall is gone. I imagine this is the first time the two halves have seen each other since the wall was built.


Another 'clue' to the age could be seen once the wall was gone.

Do you see the flooring?

Do you notice anything about it?


Okay, here are the clues:

1) The type of flooring;

2) The wall; &

3) something about the flooring.

Based on this we think the shed was built as soon as the house was finished using the leftover building materials. So we believe the shed is as old as the house.

Here's why we think this.

1) The type of flooring (the flooring is the exact type that's in the house);

2) The wall (the wall was built using the exact same solid wood sheeting that's on the exterior walls of the house. It is even tongue and grove!); &

3) something about the flooring (the flooring, for the most part, runs the entire length of the shed, just like it does in the house).

To me, these all point to usage of left over material. Even the siding is the same as the house, but in much worse condition.

What do you all think?

Well, I forgot to get a 'before' pic of the wall with the insulation added, but here is the first wall to be finished out!

The wafer board sheeting comes courteous of my friend Bill. he is the one that helped talk me into going into the woodworking business and building this little shop.

This is the east wall cleaned up and ready for finishing out.


I could not bring myself to get a 'before' pic. It was bad - real bad....

Same wall different view.

I'm debating whether or not to put a window on this wall. Space will be at a premium but I do like the natural light.

To the extreme left of the pic you can see a shelf unit (cream colored). We have no idea where this thing came from, but it is old and was in the shed when we bought it.

I'll get more pics of it later and post them.

Here is the latest addition to all the junk.

Once again, Bill has helped me out. This is an old, cast iron stove that he took out of his shop. I'm going to use it as an auxiliary heat source and it emits great atmosphere!

Can't you just see some old geezer sitting next to it whittling something?


The sucker is heavy and was a pain in the butt to move.

No one told me it was in two pieces when I moved it. Imagine my surprise when I went to move it and the body came off the legs!

The best part is that it's a double burner. Just remove the chrome top and there are two burners on the top. So, during the cold months I could have a pot of tea or coffee brewing while I'm out here.

I have a lot to do to it before I can fire it up; such as a chimney and protection for the floor and walls. That will have to wait till later though.


Well, I need to leave you now - I need to get my lazy butt outside and do some work.

Let me just leave you with this final picture.

Hey, I told you what I found in the east wall was bad!


Till next time!

Cheers ~
Larry