Friday, December 28, 2007

Playing in the White Stuff

The animals, especially the two youngest ones, BooBoo (15 months) and Izzy (17 months), have definitely enjoyed the snow.

These two love the snow more than most kids and chase each other in it constantly.

Izzy looking for BooBoo.

BooBoo stalking Izzy.

What a look!

BooBoo is one strange cat. He loves to roll around on the ground, like most animals, but what sets him apart is that he will walk up to you, fall over and start rolling.

I tried to get a pic of him doing this but it didn't turn out. The best I could do was of him in one of the divots he created by rolling around in the snow.

Once again he is off looking for Izzy...

... and Izzy watching out for him.

Here's sabu. He's a little grumpy today for some reason...

...and he is not at all amused at Izzy and BooBoo's game.

For the most part, this is what the cats tend to do all day - NOTHING!

Here we have Brutus. He has decided that the built-in cabinet is his. Don't know what's going to happen once it's put back together.

As for our two female cats, I have yet to see them today.

Winter Wonderland

Hello from snow covered & freezing Kansas everyone!!

I hope your all staying warm.

A couple of friends asked me if I would snap some pics of the house covered in snow; so, since we had a snowfall last night, today was a perfect day!

This has been our third snowfall in a month! Last night we were told to expect 7"s but we lucked out and only got about 2 or 3. Normally we don't have this much snow this soon. Most of the time we get dumped on in late January through early March. Now we are wondering what this Winter has in store for us. To top it all off, we do not have access to our wood burning stove! If you remember, the living room and dining room are crammed full of the stuff from the kitchen as well as stuff for a garage sale. I am going to take a few days and clean out the living room so we can use it if we have to.

Well...on to the pics.

Here are my two 'restoration' projects side-by-side. Don't they look good together?

In this shot, pay particular attention to our roof. Notice how nice and even the snow is? We have been told that this indicates low heat loss. Each time I see this site I'm thankful for all the insulation we installed in the attic!

West yard looking north.

Southwest looking northeast.

Same view.

West side again.

The little red bard.

This is where my woodshop is going to go. More on that later.

Northeast yard looking northwest.

Back of the house.

Close up of the utility porch. We have plans for this also. For those interested, we believe that this porch replaced the original back in the 50s.

The previous owners used this porch as a quasi-greenhouse.

One last thing. See the lamppost on the lower left side of the pic? That is a gaslight. There are three of these in the yard not counting the main one up front. At some point, two of them were converted to electricity.

View looking northwest.

The little red ban and our fire-pit.

This Spring we will start the process of restoring this little barn. Insulation, windows and power are going to be added as well a wood burning stove.

Another western view of the back yard.

The view looking southwest.

If you look closely you can see one of the gaslights that were converted to electricity and to the right of that is the well-house

Before I forget. See the tree just to the left of the well house? Almost in the middle of the picture? That is our honey tree. We found out last Spring that we now have a hive of wild honeybees living in this tree.

In the Spring we are wanting to plant some 'bee friendly' plants and try to get them to stay.

Okay, I just HAD to throw in this last picture of the house.

We really love the new window in the attic and still can't get over how much light it lets in.

It sure beats the piece of paneling that covered the opening all those years!

Tuesday, December 25, 2007

Christmas in the Attic

Merry Christmas!!


I hope that all of you have a very merry Christmas and a happy New Year!


This year found us with a house torn up and no way to decorate; or even a spot to place a tree!

Since Christmas has always been a big, special time for us we have always decorated in a huge way - all traditional of course. So this year we have both been bummed out a bit since we couldn't decorate. Basically, it has been hard to get into the spirit of things.

So, I spent all Thursday the 20th hunting down the decorations and setting up a small, 3' feather tree in the attic. I thought this would be a nice surprise for Annette. Actually, the hardest part was keeping the cats from helping me AND keeping it a secret until Christmas Eve!

Needless to say, Annette loved the tree.

I hope all of you have been able to celebrate the season in a special way and have remembered the reason for the season.

Saturday, December 1, 2007

Windows - the Original Way

One of the things we love about our money pit is the amount, and size, of the windows. Every window is original, untouched but for a couple of items.

While working on the main set of windows in the kitchen, we found out that all the window weights were still there. With the exception of one that was still attached, thee others had simply broken off and fallen into the wall. So, that means the ones I'm finding in the yard do not belong to these windows.

Anyway, once the weights were discovered, Annette insisted that they be restored back to the way they were. Besides, it was getting old using a piece of old curtain rod to hold the window up.

BTW - it should be pointed out that the left window could not be opened at all, years of grime and paint. The right window could be opened with difficulty.

So let's begin....

We started the process of restoring the windows (before we knew the weights were in the wall) by removing the stop beads running along the sides. Then the stripping and sanding began. It was during this process that the weight pockets were discovered, but we were not sure due to a piece of tin weather striping that had been installed during the mid to late 20s.

Well, while doing the finish sanding I kept catching, and tearing, the sandpaper on this tin weather striping. So, I decided to remove it, but was afraid I would ruin the striping in the process. Turns out I worried for no reason. Instead of a dozen or so tiny tacks holding the striping in (like the stripping in the doors) there were on two tacks; one at the top and one at the bottom. Once those were removed, and with a lot of jiggling, the tin striping came loose and I could slide it out.

It was then that the pocket piece (the little wooden door that covers the weight pocket) came to light. It was then decided - "in for a penny, in for a pound" - the weights would be fixed. Besides, we had several in the yard so it would really be much of an effort. However, when the pocket piece was removed, to my surprise, the weights were still there!

Once found, we needed to make the decision on how to reattach them, so it was off to my restoration library for some window weight research. After this it was decided to use solid brass sash chain, also known as plumber's chain, to reattach them.

What you see here is the weight pocket on the right side of the right window.

This is a pic of the interior of the middle sill separating the two windows.

There is about 3" of dirt and crud at the bottom.

Do you see the two cylinder objects at the top of the pic? Turns out those are the weights for the top window sashes!!! We didn't even know they could be opened!!

To the left of the pic you can see the backside of the opposite pocket piece.

What we have here are the parts needed to fix the weights.

There are two weights (12 pounds each - one per each side of the window), two pocket pieces; and the new brass chains.

Above all of this is one of the original cotton sash cords that had broken off.

The chains are then attached via a screw.

The next move was to replace the window and prop it up as high as it would go so that the other end of the chain, after threading through the pulley, could be attached to the weight.

Hey - see that long, thin grey piece above the chain? That is part of the tin weather stripping. It has a date stamp of 1925 on it.

The weight is then attached and the chain secured with a cotter pin (makes it easier to work on in the future if we need to).

The weight is then reinserted into the wall.

The pocket piece is then reattached.

And there you have it, a working window weight!


Here is a close-up of the pulley. All for of these were in excellent working condition. All that needed to be done was cleaning off the old grime and paint.

The windows work so well now that you can easily open them with one hand; whereas before it took both hands, a shoulder, and a lot of grunting to get one open.

This was such an easy operation that we've decided to do it to all the other windows that have a weight system.

On a side note...the windows above the sink and stove do not have a weight system. Instead, they have a spring like system that uses a thin piano wire as the cord. We are quit happy with the results and can't wait to see how the brass will look against the stain!

Thursday, November 29, 2007

Attic Update - We Have A Floor!!!

I have been trying to get some pics of the new attic floor for some time and finally did it today.

The floor has been installed for over a month now, but will not get it's carpeting until the whole thing is finished.

About two weeks ago we allowed friends and family to finally come up and see the place for the first time. Our nieces and nephews thought that this was "the coolest" room in the house. Not bad coming from a bunch of rug-rats ranging from 4 to 13!!

My best friend's wife thinks we should turn this into our master bedroom - NO WAY!!!

While taking the pics it dawned on me that I've never really gotten a good pic of the stairwell, so here it is.

As you can see, there are still lots of tools and spare flooring lying about. At the top of the pic you can see a section that has no floor yet. It has been left this way so that we can have easy access to the main electrical wiring junctions for the attic. Once the wiring is installed it will be covered over with a hatch.

All along the two sides will be low bookshelves that will act not only as book storage, but also as seating.

This is perhaps my favorite spot up here. During my 'down' time I will sometimes come up here and read, work on my lap-top (like I'm doing now) or just visualize the space once completed.

Notice the chair? That should give you some idea of scale. The back of the chair is 3’ tall.

We found this chair in the house after we took possession and couldn’t believe it got missed during the auction.

For some reason no one likes this chair - but I do. Annette even wanted us to burn it or throw it out. I'm not about to do that!! The chair’s got character and is extremely comfortable. All it needs is new upholstery (I have an Egyptian army blanket over it now) and it will be as good as new.

Here is the spot I will use for gaming / modeling storage.

If you look close you'll see some of the floorboards are not screwed down yet. I've done this so it will be easier to work on the electrical and gas. Once that's done it will be screwed down.

The boards you see, in various piles, are the beginnings of the shelving and knee wall that will go around the edge.

More of the same spot.

See the big black cable? That will be snaking down to the basement within the next few weeks.

The flooring material to the left of the pic is more of the stuff I'm going to build the knee walls out of.

This is the big, bright, open area that we are not sure what we're going to do with.

The wife would like me to build a hanging chaise lounge (think hammock only stiffer). She likes the idea of lounging on it while reading.

Another view of the same.

To the right of the pic you can see the chimney stack - I have big plans for that thing!!

To the left you can see some of the roof framing. Actually it is around the other window like this one also (see the pic with the chair).

Since these need to be left intact, we are going to utilize them by making shelves in them.

I never can seem to get a good picture of this spot, but this is where the brunt of my books will be going.

Since there is no window in this area, I figure the books will be safe from sun light and any damage that could be caused if a window breaks out during a storm or some such.

Here's a somewhat better view.

It will look better once the bookcases are built and some lighting installed. Just wait till you see the tacky thing I'm sticking in the corner!!

The Day of Shattered Glass

Yesterday was a bummer of a day. Before getting to work on the kitchen I thought I'd better install the temporary window in the attic. The weather forecast said that it would start getting colder within the next few days and I figured now was as good a time as any.

We are installing a temporary window because the replacement one will need to be special ordered AND we will have to remove part of the outside window casing to put it in. Because of this we thought it would be better to install the custom window at the same time we paint the house.

Anyway, while I was up in the attic I figured I'd better check the other windows to make sure they were tight and had no wind coming in. I also decided to clean the windows to get some pics of the view from each one (I'll post those latter).

Well, the west-facing window was so dirty I just took it out to clean it. While doing this I noticed just how bad the glass was. There were a couple of cracks and it was so dirty the glass had become discolored. So I cleaned it as best I could, took the pic (Figured the pic would be better without the dirty window) and reinstalled it. While putting it back in, and reattaching the stays, I thought to myself "next Spring I will need to replace the glass".

As I walked away the dang thing just fell out! Glass went every where and the cats ran for cover.

So, I now had two open window wells in the attic and it was 3 in the afternoon. The lumberyard closed at 4 so I had to hurry.

To shorten the story up a bit, I had the new glass installed by 6:30 and the temp window installed an hour latter.

Oh well...on to the pics!

This is the north-facing window well.

To our knowledge there has never been a window here; the previous owners had a large fan instead.

Do you see that piece of paneling covering the hole? That is a sample of the paneling they used in both bathrooms when they remodeled them around '73. Ugly isn't it? In case you can't tell, it's a bronze metallic on a gold background.

There's the opening, sans paneling.

I'll show you the view later.

BTW - this is where my painting table is going to go.

Window installed!!!

All that needs done now is the trim pieces put up. I hope to get that done this weekend.

SWMBO, as well as myself, were amazed at just how much light this window added!!!

Oh!! The horror!!

Can you believe it landed like that and stayed balanced?!

New glass installed....

New window installed!

Done....for now anyway....

Views From the Top

Okay, a few weeks ago a friend asked me if I would take some pics from the windows in the attic so that they could see the 'views'. So, here they are, plus a little extra.

Northern view from the new window.

This is what I will be looking at while painting.

During the Spring and Summer you not see past the closest set of branches.

If you look to the left of the pic you will see the 'Home' side bleachers of the school football field.

The light grey swatch of ground, between the house and field, is an extra, gravel, parking area for field.

You can also see the garage.

Looking south.

The view isn't the best - that's the high school parking lot.

You should be able to tell by now that our house is an island in the land owned by the school system.

On the bright side, at the beginning of the school year, if I look towards the right of the school, I have a GREAT view of the cheerleaders practicing!!

I know...I know...dirty old man.

This is the view to the east looking from my chair.

The reddish building in the distance is the local Methodist church. The empty lot between them and us is theirs. Believe it or not, all of this, including the church and the football field, use to be the yard of this house!

There is also a good view of our driveway. It is the only piece of the wagon road going from Wellington (south) to Wichita (north) that has not been paved or destroyed.

BTW - our property goes about 10 - 15 feet into the empty lot.

This is looking west from the window that broke.

The light grey area is the main parking lot for the football field and is gravel. This was also part of the house's original yard.

Funny story about this parking lot, and the other one to the north. When we bought the house those were sold to us as well as the house!!

We, as well as our agent, knew that the property had been given to the school a few days before the auction, but the auction house didn't!!

These next few pictures are taken from the roof of the house. While waiting for the glass to be cut for the window, I decided to crawl out on the roof and snap a few.

The view looking northwest.

That's more of the parking lot. Our property ends where the gravel begins.

The northwest section of the back yard.

The little red barn is where I hope to one day have a woodworking shop.

The greyish square, with the green squiggles on top, is our well house.

You can also see bits-n-pieces of the various sidewalks that were in the back. The one leading towards the red barn goes between the two trees, turns to the left, and heads to where the out-house had been.

A better view.

We don't know why the driveway stops where it does, but we assume the previous owners had intended to make a circular drive.

You also have a better view of the 'Home' side bleachers.

I figured that while I was up here I might as well get a better pic of our fire pit. It's the grey smudge just about in the center of the pic.

The view looking straight down.

If you look real close (a better view is in the 1st pic) under the garage window, you will see a sample of the fence we will be putting up this coming Spring and Summer.

Looking to the northeast part of the backyard.

If you look hard enough you can see the outline of the herb garden. We will probably move it at a latter date.

Extreme northeastern corner of the backyard.

From this view I am about 8 feet from the very top of the house and the wind is beginning to pick up.

Still looking north.

Another view looking due east.

I'm about as close as I can get to the very top without getting blown off the roof!

Here's a view to the south-east, over looking the house of our neighbors who are just as nuts as we are for old houses and antiques (a polite way of saying 'junk').

At this point I'm at the very top of the house (you can see the roof at the bottom of the pic).

The wind was so bad I had to lay down and hold the camera above my head to get the pic. Not sure why it came out so dark.

In this pic you can see the only other structures in the area taller than our house - the grain elevator and the water tower (the water tower is that little nub on the top left end of the grain elevator).


The wind was getting so bad I felt I needed to get inside before being blown off. Next time I will get some pics of the southwestern view from the roof!

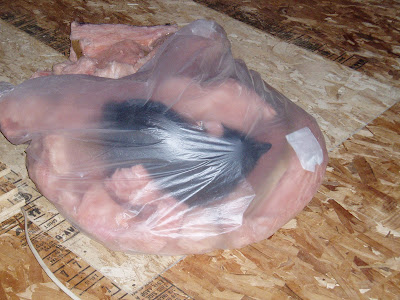
When I got back inside the attic, this is what I found.

The wife's tailless cat had crawled inside the plastic bag holding extra insulation pieces and fallen asleep.

I poked him to make sure he was alive...he was not amused!!