Showing posts with label cabinets. Show all posts

Tuesday, June 8, 2010

un Petit Projet

Hello Everyone!

We kind of took a break from house scraping for the past few days. The weather has not been our friend. It's been either too hot and muggy (mid 90s are high for Kansas this time of year) or too wet.

Even though the scraping was neglected we did finish un petit projet so we could say we got something done.

Do you remember this little cabinet, the one that was partially completed?

We decided to finish it.


Even though it was hot outside it wasn't too bad in the shade and there was a breeze once in while.

Besides, we didn't want to get all the sanding dust in the house!

So there it lies - in all it's pieces.

The sanding didn't take all that long - maybe 4 hours. What took the most time was the staining and finishing.

It was so hot, and kind of steamy, that it took a lot longer for the stain to dry. After this came the tinted shellac. Another problem we had was that one of the big drawers, and the top, did not handle the shellac well and they had to be re-done.

Once the shellac was dry one coat of polyurethane was applied. Since the cabinet is going to be in the kitchen we thought the extra protection of the poly would be a good idea. The bad part is that it took almost 3 times the amount of time to dry.

Once dried I lightly sanded the top and prepped it for the last coat of poly. This coat had to sit for 24 hours; so, as of 6PM our time I was able to attach the top.

And here is the finished project.

Not too bad...

There are some spots where we were not able to get some stains out as well as 'something else' we can't identify. All-n-all though it looks good.

While working on the cabinet outside we did have a visitor.

Mr. Toad.

SWMBO said we should have stuck a fist next to Mr. Toad because the picture doesn't do him justice. This guy is almost as wide as a soft ball.

Not sure where he lives, but it's somewhere around the back patio.

Well, till next time...

Cheers!
Larry ~

Monday, November 12, 2007

Kitchen Update

Well, here is a quick up-date on how the kitchen is coming along. It can basically be summed up in a short little joke that I've adapted for the occasion. Are you ready? Here it is.

A student is sitting in a Creative Writing class. The instructor comes in and tells the class they are to write a story containing the following three element: religion; sex; and mystery. However, it had to be as short ass possible.

The next day this student came back and handed in the assignment. On the following day, the instructor returned and handed back all the papers. To the student's delight they found out their paper was the only one to receive an "A". The teachers note said "Very creative".

The short story was entitled "Our House Restoration". Here it is in it's entirety:

"Oh my lord, what have we done?! We're screwed." The End.

Anyway, here are some pics.
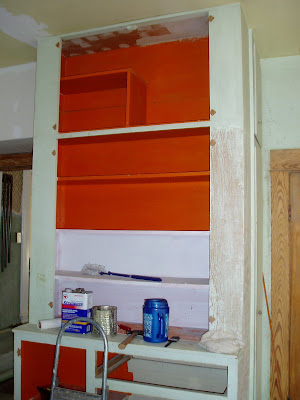

We have started the restoring the built-in cabinet so that it will kind of 'look' like it belongs in the house.

It was built in a somewhat haphazard way with lots of imperfections. I'm hoping to use what you see here as the 'bones' of a nice cabinet.

Don't you just love that orange?!?! Come on admit it - you love it!!!

Matches the floor you know.

Another fine view of the cabinet.

I really should have removed the cardboard box sitting on the floor (in the cabinet, behind the paint cans). The floor in this spot is completely untouched, original, and is nice looking.

Sorry for the darkness of the pic. I was trying to get the whole thing in so you could see the stripped molding.

Here are the vertical pieces of molding for the above window. Isn't the marbling nice.

We were told that the original builder brought in French Heart Pine to be used throughout the house. From what I've been able to find out, French heart Pine is created by the way the wood is cut in order to get this effect. When stained with the appropriate color it will mimic the more expensive woods like cherry and maple.

Try as I might, I can not find any of this wood anywhere. Every lumber dealer I've spoken to has said I will need to buy maple, oak or such just to match it. So, I opted to repair the termite damage.
This was not fun.

BTW - the longer piece of molding goes to the back door. The termite repair is coming along and once finished I will get some pics.

This is better, now you can see part of the stripped wood work her.

Didn't 'SWMBO' do a good job?

The back door is getting ready to receive it's second coating of stripping chemical.

Stinky and yucky, but worth it.

Do you recognize the chimney chase?

All that needs to be done on it is the mudding. I'm waiting till all the stripping and sanding of the woodwork is done before I mud this.

I figure that once the stripping is done I can mud this and plaster the wall while at it.

Same view different angle.

You can also see the first stages of patching the plaster. It took almost a week to prep the plaster before it could be patched.

Another view of the wall with most of the damage.

The hole in the floor (where the pipes go into the basement) has been repaired with the exception of one little hole (grey spot next to the triangular patch). This will need to be patched from bellow.

The next step here will be to replace the wood flooring.

We lucked out here. Turns out that some of the same flooring used in the house was also used on the original porch. When the porch was torn down (sometime in the 30s) and replaced with cement, the owners at the time placed the wood in the attic to set stuff on.


Just another view of the sewer and water pipes.

Do you see how there is a square section of flooring missing around the pipes? No, it is not that way because I'm too lazy to cut flooring to fit. I've had left this space for two reasons.

#1 A high voltage power cable (the one that powers the upper floors) will go through it;

#2 If for some reason there is a water line break in the piping above, the water will follow the pipes and go through this hole into the basement. I'd much rather have the water there than in the back entry.

Before you scratch your head and think "Hmmm...power lines and potential water - in the same spot...." Got it covered. The power line is encased in an extra layer of rubber and will have a drip catch on it.

Okay, do you see the spot of plaster between the two water pipes? That will be going 'bye-bye'. I will run the power cable through this spot.

It isn't all that noticeable in the pic, but you can see both ceilings if you look close enough. The original ceiling is the one the pipes are going through. The other ceiling is the one that looks finished and forms the square cut-out. There's about a 1-1/4 inch gap between the two.

While working on this, and the other water damage. I found out that about half the second ceiling had broken loose and was just barely hanging on. So, I ended up having to reattach that part of the ceiling.
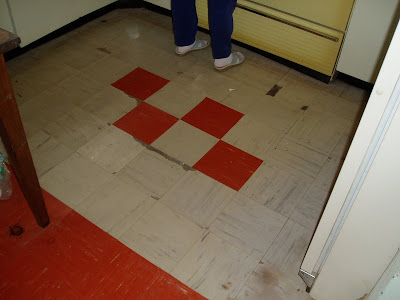
Here's another view of the floor. This part is in the prep area.

Don't you just hate to see it go?

Saturday, November 10, 2007

Kitchen Details

Following are several shoots of various details in the kitchen.

This is part of the 'egg-n-dart' crown molding that can be found above every-single-window-and-door of the house.

At first we thought that the kitchen only had this above the door leading into the foyer. However, once we started striping the wood work we found the evidence that shows it was above all the doors and windows in the kitchen as well. Unfortunately we have not found the extra pieces.

The pic here is the paint in the process of bubbling up from the chemical stripper.

Progress is being made with the stripper.

Now all we need to do is finish it off with a dental pick and it will be ready for staining.

What is frustrating is that we can not find this exact pattern. We find molding that is close, but not quite. So now we need to decide on whether or not to replace the molding with something similar or just not put any of it up except for the piece we have.

This is one of the pair of brass wall sconces. We have no idea when they were installed, but they match all the chandeliers in the rest of the house. From what we have been told, they were installed in the 50s.

We are kind of torn between these a original lighting. Everyone loves these lights and the matching chandeliers; and for most these are the only lights they remember in the house. You should see them at night from the street!!

On the other hand we would like to replace the light fixtures with the type we know where in the house when it was built - the dual gas / electric kind.

What to do, what to do......

They are stunning when turned on at night.

This is one of a pair of blown glass lights from the 20s, or 30s, we got for $25 dollars at a yard sale.

They don't go with the house either but are better than what WAS up there. The light in the eating area had been a lantern type light that looked like it came off a covered wagon (the kind that was popular in the 50s). The one that was in the prep area was the typical, ceiling hugging 'cake' type fixture. What was most bizarre about the two were not only their dissimilarities but the fact that they were only about 10' from each other.

Again, we are not sure what we will do with them; everyone seems to love them.

Another view.

Here is the right hand end cap of one of the original cupboards that had been in the kitchen when it was built.

The shear size indicates that it might have been located along the wall that the sconces are on now.

Close up of the top.

One of the first things people ask when they visit is "where is all the stuff that was in the kitchen?".

Well, the simple answer is "just about everywhere"!

So here are a couple pics that are rather embarrassing. Both are of all the junk from the kitchen that we have tossed in the dinning room.

Another wonderful view of our 'junk'.

They wife will probably kill me for posting these!! LOL


General Views of the 'Work in Progress'

Here are two views of the built in cabinet. We're not sure when it was added, but it sits where the original wood cook stove stood.


Here is the large picture windows that look over the west lawn. We believe that this is the type of windows that were in the northwest corner where the other windows are now.

We noticed that the wood used in the smaller windows is different, and newer, than the larger windows. We also found parts of window trim for bigger windows in the out buildings. At some point these replaced the larger windows so that the cabinets could be put in.


This picture is interesting in that it shows one door about 90% striped and one 50% striped. Both were painted the same green as the window trim. BTW - we believe that the paint used on the walls and trim is surplus aircraft paint or auto paint. It is some of the worst paint I've ever had to strip.

In case you are wondering, the left hand door leads to the half bath and the other leads to the basement. I will post pics of these a little later.

This is 'Rudolf'. He is hanging on a wall that we're not 100% sure is original to the house. The wall encases the other side of the prep area.

Also, if you look up, to the right of Rudolf's nose, and through his antlers, you can see some of the damage on the wall and ceiling.

Here you can see the door that leads into the foyer. Above that is the chimney chase.

Here is a better view of the chimney chase. Originally the house had a pair of matching pot-bellied stoves; one in the dinning room and one in the living room.

This chase connects the chimney from both into the main chimney that the built in cabinet surrounds.

This is the back door that leads out onto the utility porch. To the right you can see the door way that leads into the dinning room.

The master plan is to one day expand the kitchen out onto the utility porch and then extend the porch out.

To the left of the door you can barely make out the end cap of one of the original cabinets there were in the kitchen.

If you look in the corner between the two doors you will see a square type column. This is the pluming chase that leads to the second floor. Originally the plumbing would have been left exposed so that visitors could see that the house had indoor plumbing.

Water damage caused by leaking water pipes in the upstairs bathroom. This is the main area of damage, but there is a lot all over the area above the back door.

More water damage from the upstairs bath. It caused some of the finish plaster to flake off.

These last two pictures give you an idea of what the floor looks like.

Ugly ain't it?!?!

This is Izzy, she is the local code inspector.

Kitchen Cabinets

Well, here are some pics of the cabinets 'during' the process. For some reason I did not think to get any 'before' pics, sorry.

As you can see, the prep area of the kitchen is very tiny, more like a galley kitchen. The way the kitchen was, and still is, laid out it isn't conducive to modern cabinets and appliances. So, the space is divided into two sections, the prep area and an eating area.


Here are the cabinets on the northwestern wall before the doors were added. You can also so the ugly paint on the walls and trim as well as the parts we have started to strip.

You can also see the stove that came with the house. It's not the best color, but we love the size!!

As for the windows themselves, I will go into more detail about them later.


Here is a view of the northeastern cabinets. In this pic you can really see just how small the prep area is, the fridge is right on the edge of the area.

Also, you can see the top of the wall cabinets. There is about three feet of space between the top of the cabinets and the ceiling. The new cabinets will take advantage of this height.


Here is a shot with the freshly painted doors put back on.

The little half wall next to the sink is the dividing line between the two areas.


Another view of the freshly painted doors and drawers.

You can also see the space above the cabinets better.

The Kitchen - It Started So Innocently

Well, this post has been a long time coming….. We have actually been working on the kitchen for quite some time. Unfortunately, such things, as life, do get in the way.

Anyway, as I said, it started so innocently. The original kitchen cabinets in our house where removed some time ago. Not sure when it happened, but we have found clues to the fact that our kitchen has gone through three incarnations. The first, of course, is when the house was built. We have in fact found bits and pieces of the original house scattered here and there about the buildings on the property. The second incarnation took place sometime in the late 20s. We have been able to determine this through a wall cabinet we found in he basemen. He style, and color scheme point to the late 20s. The last incarnation is in our kitchen right now. During the late 50s the kitchen was redone using white metal cabinets, as well as the instillation of hideous, warm grey and orange linoleum tile. At the same time, a large, built-in cabinet was installed where the original wooden stove had stood. The inside of this cabinet had even been painted the same color of Orange as the tile floor. We are not sure if the paint color scheme was applied at this time, or perhaps in the 70s. We have found evidence that the wood work had been painted a dark cream color and a light taupe. The taupe was probably done in the 20s and the cream in the 50s. At some point the woodwork was repainted an interesting color of mint green. At the same time, the walls, as well as the built in cabinet, were painted a pastel mint green.

When we first bought the house we painted the metal cabinets in an attempt to ‘spruce’ them up. We even used an appropriate paint. Unfortunately, this paint attracted dirt and stains and we just could not keep them clean. So we decided enough was enough and stripped the cabinets to bare metal and repainted them with an almond colored appliance paint. We were hoping this would tide us over until we were really ready to completely redo the kitchen back to a somewhat original state.

Ah…but this was not to be. Once the work on the cabinets began we started picking at the ‘little’ things in the kitchen. Then, one thing just started to lead to another. The next the we knew we were starting the kitchen rehabilitation. With this in mind, I should tell you that this is just phase one of the kitchen rehab. The major work will be done, but we are hoping to replace the cabinets with custom made ones based on the remains found of the originals. These were more ‘furniture like’ with solid wood tops (yes, we have part of the original counter top and it is solid wood and over one inch thick). At this time we also plan to install a tin ceiling and period correct lights – more on this later.

One last piece of macabre info before moving on to the pictures. The kitchen is where the wife of the previous owner died while making toast in the morning. Now – on to the pics!!!!