Wednesday, November 26, 2008

Happy Turkey Day!!

May all the blessings of the day be with you and yours!

We do have a lot to be thankful for.


Hopefully you have all been good and the Great Turkey paid a visit to you last night and left droppings of gifts for you!

Well, till next time...

Cheers!
Larry ~

The die has been cast...

Guess what?!

The die has been cast...

The decision has been made...

We have a winner!!!

We have a stain!!

Here is your first look.

Can you guess which one we are going to go with?

If you chose the second color from the left you would be correct.


Here's the kicker - the two colors on the left side of the board are the same stain!

Now for the rest of the story.

As you all know I have been banging my head on a rock working with different stains trying to come up with something that would work. Remember the tests I did and how bad some of them were?

Well, about a week ago I ran across the My Old House Journal site. While reading through the web site I ran across a guy named Ken who has a web page called the Old House. Now, if you got to the Wood Restoration page you will find a great write up on how he does his woodwork and his woodwork looks like ours!!

Once you read through that (which I recommend) then go to this page to see the finished woodwork. As you can see, Ken is one talented guy.

Thanks to him we have our stain. I thought "what the hey" so I decided to give his recipe a shot. In case you don't go to his site here is the recipe: "The final combination was a mixture of three Minwax stains (2 parts red mahogany, 2pts colonial maple, 3pts natural) to give it an aged wood tone it would have had from aging orange shellac".

I did a step he doesn't do and altered another step(I'll discuss these later), but used the recipe as written.

This picture just shows the sample up against the plumbing chase.

Now, back to the two colors from the same stain - I know you want to know why this happened - don't you. The reason is simple. Remember this post? The washcoat I talked about here caused the difference in color. In fact, the lighter color, the one on the left, is the one that has the washcoat under it. The darker of the two is the special recipe on bare wood without a wascoat. The washcoat was the step I added that wasn't on Ken's page.

Also, I applied two coats of the stain.

This last picture is just an eye-candy shot.

It's at an angle to avoid flash from the camera.


I thought it would be nice to show you all what it looks like with some color behind it. The wall color is about the same we plan to use in the kitchen, but the flash has washed it out.

Oh...that step of Ken's I altered (?)...it has to do with the topcoat. Ken applied 4 coats of oil based Benjamin Moore Sanding Sealer, I applied four coats of 50/50 amber shellac & denatured alcohol. This is just personal taste though. Once the staining process gets underway in earnest I might do another test board and use the topcoat he did - just to see what it will look like. I used the amber shellac this time because I've used it in the past and like the glow it gives.

Also, I have not buffed the topcoat to knock the shine down. I'm not sure if I will do this or not. we'll see how we like it once it's all stained before we do this.

One last thing.... The lighter of the two colors (the one on the extreme left) we like also so we are thinking of using it for the floors and the counter tops.

Well, till next time...

Cheers!
Larry ~

Sunday, November 23, 2008

Downright Dirty Shame

Hey everyone -

Just another quick post that is not related to OUR house but does involve another old house.

An on-line friend in Illinois and I were talking about Victorian cottages. I told here about one in our area that is on blocks ready to move. Unfortunately it has been sitting like this for almost two years.

I told her I would get some pictures of it for her; might as well share them with all of you as well.

Some of you might remember that we had chain of tornadic storms pass by last June. The one I got pictures of went right over this cottage. It's a miracle it wasn't blown off the blocks.

Cute little thing.

It's sitting about 20 feet from where it had been built.


Also, the porch posts and railings use to be attached.

Here's what's left of the posts and rails.


You have no idea how hard it was not to toss them in the back of the car!

I really like these little windows.

There are four of them on the front approach and 2 - IIRC - on the back.


I was hoping this picture would have turned out better.

This side poarch post is hanging by one strand of bailing wire.


Unfortunately the front door is open (no, I didn't go in).

From the looks of it the wind blew it open.

It's a real shame...the picture doesn't do it justice. This house was move-in ready when it was first put on blocks.

Everything is in excellent shape - well, at least everything I could see.


If you look real close you can see a crack to the right of the window. Right under this spot is one of the iron I-beams. I imagine that the crack has been caused by either settling (the house is noticeably drooping) or winds causing it to bounce.

Do you see that door?!?! It absolutely glows!! It still has a sheen on it and is in perfect condition.

I wanted to move the boards that were in the way, but like I said, I didn't go inside.


Doesn't this just tear at you?

It's a downright dirty shame that this beautiful woodwork will probably be allowed to sit there and rot or get destroyed.

HOWEVER...I have a plan.

I have no idea who owns the property, or the house, but the name and number of the moving company is on one of the I-beams. I'm going to contact them and see what I can find out. Who knows...maybe I could purchase salvage rights!

Well, till next time....

Cheers!
Larry ~

2:40 in the Freakin' Morning

Okay - last night I didn't get much sleep. We had an unexpected visitor show up at 2:40 in the Freakin' Morning!!

This is who showed up.

A Great Horned Owl, the Bubo virginianus

Measurements:
Length:  20 - 24 inches
Wingspread:  53 - 56 inches
Weight:  3.1 - 3.6 pounds

Can you believe how big these suckers get?!


It all started with a loud, screeching "HOOT" that sounded like it came from inside the bedroom. We both shot up from the noise. I hate being started from sleep.

It was pandemonium in the bedroom. All the cats got as close as they could to the north facing window in the room. Even the dog was perched on the corner of the bed so she could look out.

Each time the Owl hooted it sounded like it was in the room. We knew it was outside the window but couldn't see it. That's when we figured out it was perched right above the window on the eve.

On top of this it was having a lively conversation with two other owls. From the sound of it the closer of the two was either in our yard at the back, or in the trees just south of use. The second was further away to the north west.

We thought about running outside to see it, or perhaps from the attic window, but decided to just leave him alone. Like I said, I hate being started out of sleep because I have the hardest time getting back to sleep. So, I spent the next couple of hours listening to those three owls talk.

If you interested, here is some more info on this bird.

The great horned owl, commonly called the “hoot owl,” is the most aggressive and powerful owl in North America. It is named for the obvious feather tufts on top of its head. These feather “horns” are not ears. The ears are hidden below, and slightly behind the eyes. Vision is superb both day and night. Excellent vision, along with an acute auditory sense, makes locating prey a simple process. Like other owls, the eyes cannot move; they are fixed in the sockets. Fourteen neck bones allow the head to pivot 270 degrees or ¾ of a circle. It is the first of all birds to nest and lay eggs in Kansas. They are commonly sitting on eggs in February, occasionally in January.

Probably no other raptor in North America has a diet as varied as the great horned owl. It will kill whatever is available, including mammals, birds, reptiles, amphibians, fish and insects. With its poor sense of smell it is also willing to catch skunks.

This is one of the reasons we make sure the cats are in at night.

Well, till next time.....

Cheers!
Larry

Friday, November 21, 2008

Bubble Bubble Toil & Trouble

Okay - admit it...there's a mad scientist in all of us. Some of us just embrace that side more often than most.

This week has been one of those times when I have embraced the cackling maniac inside.

While doing the finish sanding on the kitchen woodwork I've been doing a lot of thinking about washcoats and stains. So, I decided to go to the pros I talk to on the internet as well as cracking open a few books.

So, between all the sanding I've been doing a lot of research as well.

I know it would more than likely benefit us in the long run to precondition the woodwork, but I wasn't happy with the test results when I tried it with the pre-made conditioners. Well, after several e-mails to knowledgeable people it was suggested I make my own wood conditioner.

The recipe I decided on (the one that was recommended the most) is a simple one. You take some Zinsser SealCoat and thin it with denatured alcohol.

Here is a the reduction guide:

Desired cut Mix in a separate container
3-lb. to 2-lb. 2 parts alcohol + 5 parts shellac
3-lb. to 1-lb. 3 parts alcohol + 2 parts shellac
2-lb. to 1-lb. 1 part alcohol + 1 part shellac

I went with the 50/50 mix.

Here are the ingredients.

The Masson jar holds the results.

Kind of looks like yak pee don't it?


On Wednesday I removed a piece of the mop board from inside the pantry closet. After sanding it, and prepping it, I applied the washcoat to two different spots.

Now before you sit there and question my madness let me explain.

I have been given a 'secret' recipe for stain that will theoretically make the woodwork look as though it has aged gracefully with a coat of orange shellac. I have seen photos of this recipe being used on woodwork like ours and it turned out great! We'll see what happens - that's what the test board/control sample is for.

Anyway, back to the control sample.

I have only placed the wash on two areas of the board. The reason I did this is so that I can test my two stain samples (there are two variations to the secret recipe) with and without a wash coat.

This will also help determine how many coats of stain I'll need. However, per the gent who gave me the recipe, he only applied one coat of stain (without a washcoat) and then applied four very thin layers of top coat.

Take a look at this.

You are seeing a closeup of the washcoat by itself.

Too bad we aren't wanting this color - it looks great!

I also noticed that this homemade washcoat has a different hue, and feel, compared to the commercial washcoats available. It'll be interesting to see what happens tomorrow when I mix the recipes and test them.

On another related area....

I got a couple new toys to help in this endeavor.

The first is a set of scraper blades that interchange with each other.

Kind of reminds me of a pimped out shaving razor!

This little thing has done wonders when scraping little spots and weird shapes.


This last one is so simple, so basic, it's one of those tools that make you say 'cool'.

All it is is a razor scraper for windows. It's a very sleek, almost retro, design that fits comfortably in the hand.

Yeah, I know I could have just used a plain ol' razor blade but I like my gadgets and toys!


Well, till next time...

Cheers!
Larry

Thursday, November 20, 2008

Tagged!!

I've been tagged...

Sandy, over at Curly‘s Corner, has tagged me with this interesting little exercise.

Here's how it works...

Share seven random or weird Book facts about yourself. Then tag seven other people.

Notify the seven others that they have been tagged.

So here are mine...

1. I have six library cards to six different libraries.

2. I collect children’s illustrated history books and cookbooks.

3. I can not take a road trip, or any other kind of trip, that will be more than an hour one-way without having at least two or three books with me.

4. I have ‘liberated’ some books that were slated for destruction because they were placed on a ‘banned’ list at a couple of colleges - I had accomplices for this.

5. I typically read one fiction book, one history book, and one book dealing with either woodworking /home restoration/Land Rover restoration at the same time.

6. Every room in my house has to have at least one book in it.

7. I love the smell of old, old books - I can not purchase and old book without smelling it first.

Here are my victims...

Jenni at ThirteenEleven

Anna at 1620 Timber Frame

Jennifer at Tiny Old House

Jessie at Shade of a Beech Tree

Jason and Heather at the Oxford-Boynton House

Gary at This Old Crack House

Gene at DIY Insanity

Till next time...

Cheers!
Larry

Sunday, November 16, 2008

Kitchen Built-In

Hello - Everyone!

Saturday I pick-up some of the items needed to finally finish the woodwork. Hopefully, the next post you see will be an update about it!

Anyway, today I spent some time mulling over the built-in cabinet in the kitchen. For safty's sake I've altered my plans slightly. Let's just say that the original plan would require me to cut through the drop-ceiling and then through the original ceiling just so I could tie the thing into the second floor joists.

I DID NOT WANT TO DO THIS!!

So, I spent the day playing with Google Sketchup, the on-line CAD system.

After a lot of trial and error I have been able to make a sketch of my vision. Hopefully the finished product will be better.

As you can see, it's basically the same as what's there now but there is now a cubby space under the upper cabinet.


From this angle you can see the side where our current pantry is.

As the schematic alludes to, you will not be able to see the door of the pantry, or upper storage, when closed.

Now, the big surprise is how the pantry area is going to be built. Be sure to stay tuned for that. SWMBO, on the other hand, bugged me untill I showed her a picture of what I'm planning on doing.


This is just a frontal shot.

You can clearly see the cubby here. I have a couple of details, not included in the schematic, that will be added.


Finally, this one will give you an idea of what it 'should' look like in relation to the powder room & basement doors. To help you picture the whole mess, the top of the cabinet, and yellowish wall, go right up to the ceiling.

Suggestions and thoughts, as always, are welcome.

Tell next time...

Cheers!
Larry

Thursday, November 13, 2008

Compassion

Like all of you out there, I get lots, and lots of e-mails that are forwarded by friends and family. For the most part they are often jokes and silly little things.

Normally I look at them, laugh, and either send them to someone I know will like it or just delete it.

However, once in a while one lands in the in-box that makes you stop and think.

When one of these lands in my in-box I will usually pass it along to a few people I think share the same views or have the same interest.

Then, once in a while, a rare one lands in your in-box that touches the soul.

My wife's uncle sent me one of those today.

Typically I'm not the kind of guy that is labeled a big softy. In fact I can be rather rude, crude, brash, and other wise socially unacceptable.

When it comes to animals though - I am a big softy. I don't care who knows.

Yes, I hurt when one of my pets hurt, I cry when one dies, I get bummed out when I see a dead animal in the road or on the shoulder. I even stop to remove turtles from the road.

When I received this e-mail it really pulled at my strings me. I thought about sending it to some people, which I did, but I thought that it would be best to share with everyone else out there.

It teaches a powerful lesson about compassion and in today's world we all need as much compassion as we can get.

This series of photos is telling the suffering of a poor bird shocked with his partner's fatal injury.


Here his mate is injured and the condition is fatal.


Here he brought her food and attended to her with love and compassion.


He brought her food but shocked to find her dead. He tried to move her.


Aware that his sweetheart is dead and will never come back to him again, he cried with adoring love.


He stood beside her, saddened of her death.


And some people think animals don't have a brain or feelings.


I wonder what happened to this little guy.....

It is said that the photographer sold these pictures for a nominal fee to the most famous newspaper in France. All copies of that newspaper were sold out on the day these pictures were published.

Compassion...this is something we all need to remember and share.

Till next time...

Cheers!
Larry

Wednesday, November 12, 2008

What a Day, What a Day

The title says it all.

Basically, yesterday was the day from HELL - seriously, it was bad.

Seriously.

The day started off well. I got that crack between the east wall and that half wall prepped for caulking.

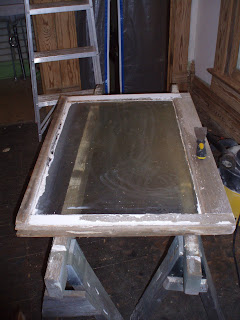
It didn't turn out so bad.

I don't like the color, but for some reason the store was completely sold out of the stuff in white.

I guess it's not that big of a deal; am planning on painting it.


There are still a couple spots that need to be touched up due to shrinkage but that's no big deal either. I also need to clean it up a bit along the edges.

I was kind of surprised when I saw this picture though; the digital camera brings out little flaws I don't really see when I look at it. Example, see those ripple type groves? They look smooth, and feel smooth, in real life.

Anyway, like I said, the day started off normally and then it happened.

I about burned down the house.

It's a rather strange and bizarre tell, but here it is.

I was doing some light cleaning in the kitchen and getting ready to fix myself an early lunch. Then I went upstairs and noticed the dog wasn't with me - forgot she was still outside. Down the stairs I go and out the door to find the dog. Got the dog and went back up the stairs to get some dishes that were up (I was going to do dishes while making lunch). While I was up there I fired up the PC and turned on the TV. I was watching some commercial when I all of a sudden smelled smoke!!

I walked out of the bedroom and bounded down the stairs. As soon as I got to the point where I could see the foyer I could see the smoke filling it. I ran into the kitchen and there, on top of the stove, was a smoldering pile of heavy duty oven mitts! Not wanting them to flare up and scorch the woodwork or even possibly damage the ceiling, I pulled them off the stove and onto the floor.

As soon as they hit the floor they flared up! Only a few inches but enough. I grabbed a wet wash cloth and threw it over the flames and then stamped it out. The house was filled with so much smoke I couldn't really see the other side of the kitchen.

I went to the back door and opened it (thinking to get the smoke out) when it dawned on me - the animals!!! The smoke was so bad I was afraid it would hurt them. I looked outside again and saw all the animals except for Brutus our tomcat. So I went back up stairs to find him (he likes sleeping on the bed during the day). When I got up stairs the smoke was as bad there as down stairs!

By now I was having trouble breathing and my lungs hurt. I grabbed Brutus from the bed, pulled my sweatshirt over my mouth and headed back outside. As soon as I hit the kitchen Brutus freaked, jumped out of my arms and ran for the basement. I knew he was heading for the pet door in the window there so I headed back outside. All the critters were there so I sat on the stoop to get some fresh air. After a bit I figured I'd better go ahead and open up the house and get the smoke out (thank the Lord it wasn't raining). As I stepped in the house I notice the smoke was worse, so I pulled my sweatshirt back up and went inside.

The oven mitts had flared back up!!! This time the flames were a foot or two high!! I grabbed the wet cloth again and dropped it on top of the flames; stamped on them and then picked them up and tossed them in the sink in the powder room (the kitchen sink had stuff in it). I then filled the sink and made sure the flames were out.

After this I spent the next hour getting windows and doors opened, setting up a fan, and getting the smoke out.

Luck was on our side; the burning oven mitts only burned on the top area and didn't harm the floor. There is some slight scorching on it but nothing bad - you can hardly see it.

I honestly have no idea how the burner was on. I had used the burner the night before but SWMBO said that when she cleaned the stove that night it was off. I will sometimes fix myself a cup of tea, or broth, at mid morning but I knew I hadn't. The burner knob was on the #2 setting so somehow it was turned on. The only thing I can figure is I must have bumped it somehow while I working in the area.

It was definitely a mess to clean-up and the smell is still in the house, but everything seems to be back to normal.

After cleaning up I called the wife to tell her what had happened. I didn't want her to just walk in and smell smoke. Anyway, we got to talking about the smoke. This is where the rest of the day took a turn for the worse.

From discussing the smoke we figured that it had to make it up to the second floor, other than through the stairwell, because there was no smoke in the area of the middle landing - just on the ground floor and second floor. We then remembered the vent in the kitchen that was inside the pantry cabinet. We had forgotten that it was there and have as yet to see where it leads.

Here's the vent. From what I can tell it vents into the chimney chase the master bedroom's heater vents into.

BINGO!

There was our answer. The smoke went through the vent, up into the chimney chase, and out through the heater on the second floor. This makes sense because the smoke was heavier in the master bedroom and then permeated into the rest of the rooms.

Just then I had a thought - if the smoke had made it's way to the second floor via the chimney chase did it fill the attic with smoke as well. So, up the attic stairs I go. No smoke, up the wind storm from the other day had knocked out a couple of the windows. The were not broken, but the one on the south side had the glass about knocked out. It would have to be cleaned up and re-glazed!!

SHEESH will the problem ever cease?!

While carrying the window pain down the main stairs a pain shot through my left hand! It was so bad I about let go of the window, but in order to keep a bad situation from getting worse I bucked up and carried on. By the time I got to the kitchen and placed the window on the saw horses my hand was throbbing. When I moved my hand away from the window to have a look, guess what popped out of the frame.

Yup, a wasp!! Not just one, but two!

This is the one that nail me.

The other one got whacked with a fly swatter (Tony Soprano has nothing on me).

The stinger was right smack in the middle of the bad of skin at the base of the two fingers you use to make the peace sign 'V'.

So up the stair I went again to get some tweezers to get it out.

Once that ordeal was over I went back down the stairs (you'd think I would loose some weight with as many times I go up and down the stairs each day) to start work on re-glazing the window.

Here it is.

It isn't in the best shape. The attic windows are the only ones we are thinking about replacing with new ones because of how bad they are.

In this case all I really cared about was cleaning it up enough to re-glaze it. We will either repair them properly when the attic finally gets finished out or we will replace them.

Do you see how filthy the glass is? You can barely see the sawhorse on the left and can't the one on the right.

Here's the window sans glass.


Here's a close up.

I'm showing it due to something I haven't ran across in the house yet.

You can see the grove the window sets in on the right. However, at the top all you see is a slot. I have not run across this before. All the windows I've worked with in the past have had a grove on all four sides.

Now, I could kind of understand the slot being there to help hold the glass in if it was in the bottom sash, but this is in the top sash! Have any of you ever ran across this?

Okay, the glass is out and the wood groves are lean. Now for the glazing.

Guess what?! I went and got my window glaze and it was dried out - hard as a rock!!

AAAAAARRRRRRRRGGGGGGGHHHHHHHHHHH!!!!!!!!

And now that the lumber yard in town has closed I have no place to just go get some.

So, I get on the PC, find a link to what I want and ask the wife to pick it up on her way home.

By the time SWMBO got home, and due to my massive headache and sore chest, I bagged the night and figured I would finish the window in the morning.

Fast forward to today.

First thing I did was make sure the stove/range is off!

These are the type of glazing points I use.

Okay, I always use DAP 33 Window Glazing putty, but this time I thought I would try their other choice. It is the same thing, but comes in a tube like caulking.

Before I go any further, go here to see how I normally glaze a window.

Here's the tube of stuff I used.

Notice, the glass is in and glazed. Do you see how nice and clean and sharp that strip of putty is? That straight out of the tube!! I didn't have to do a thing with it.

There is a down size to using this putty out of the tube though - the corners were hard to get right. Also, the edge of the putty does not match up with the edge of the wood. I do not think it is the fault of the putty tube nozzle either. The window sash is as thick as a typical one, but the glass is not in the centered in the sash. Instead of having 1/2" of sash on either side of the glass, ones side is 1/4" and the other 3/4". So, to get the putty even with the sash edge on this window it would have to be done by hand. If the window glass would have been centered, like normal, the putty edge would have been spot-on. All-n-all I would highly recommend this stuff!

One last thing. Did you notice the duct tape on the top of the tube? It was suggested to use this stuff to keep things like this, and caulk, from drying out. Well see if it works.

In closing, the window is in place and I have made sure it will not come out till next Spring when I work on it next.

NOTE: Typically you would lay a bead of putty into the groves that hold the window BEFORE you place the window in place. I left this step out because the attic windows will be redone this coming spring and I only needed it to stay put for the winter.

For an excellent, step-by-step guide that can be printed, go here.

Till next time...

Cheers!
Larry

Tuesday, November 11, 2008

In Memorium - Veterans Day

At the 11th hour on the 11th day of the 11th month of 1918, the guns fell silent along the Western Front - the Great War was over.

At 5 a.m. that morning, Germany, bereft of manpower and supplies and faced with imminent invasion, signed an armistice agreement with the Allies in a railroad car outside Compiegne, France. The First World War left ten million soldiers dead and 21 million wounded, with Germany, Russia, Austria-Hungary, France, and Great Britain each losing nearly a million or more lives. In addition, at least nine million civilians died from disease, starvation, or exposure.

It was the most horrible war ever know (and in some instances still is) and was to be the LAST war.

Veterans Day was intended to honor those who fought, and died, in that war. Today it is celebrated to honor all of those who fought, and died, in all of our Nation's wars - from the Revolution to the war ragging now.

Please take a moment of your time and visit the following links and remember those who gave a moment of their lives for you.

In Flanders Fields - the poem.

In Flanders Fields - the song - Lest We Forget.

The Green Fields of France.


Today - I honor them.


Remember - FREEDOM IS NOT FREE!!


Joseph Ambrose, a World War 1 veteran, attends the dedication day parade for the Vietnam Veterans Memorial. He is holding the flag that covered the casket of his son, who was killed in the Korean War.


Mary McHugh mourns her fiance Sergeant James Regan at the Arlington National Cemetery. Sergeant Regan, an American Special Forces soldier, was killed by an IED explosion in Iraq.

To those who served: I say "Thank You".

To those who sacrificed: I say "Thank You".


All gave some and some gave all.

Never forget the sacrifices made by others for the freedom you have today.

Never forget the lessons of history or you will be doomed to repeat them.

Pray for our troops and support them.

Monday, November 10, 2008

Getting Plastered

Prompted by Jason's comment left on the previous post I thought I'd share the method used in fixing all the cracks in the walls.

All of the pictures I'm using are from the How 2 Plaster web site - THANKS GUYS!!

Okay - with that said - buckle up and get ready to get plastered.

This first pic is a schematic of the process - fairly straight forward.


However, whenever possible I would underscore the plaster in order to create a better key.

He is what a typical spot looks like - but then again I'm preaching to the choir aren't I?!?!


To be honest, there were maybe one or two spots like this on the kitchen walls. Most of the cracks were just the typical type ones.

This shows the hardest, and messiest part, at least to me.

You need to scrape the old plaster back and get it down to the lath. It is also important at this time to make sure all the loose pieces are gone. Think about the crack, and any loose plaster, as a cancer. It needs to be cut back till you find good, strong plaster. Usually though, this cancer step applies to larger areas with loose plaster. However, when I scrapped the cracks I did find loose pieces I did not know where there to begin with.

Note: on the right tail-end of the crack you can see the typical type ones we had.

When finished, this is how it should look. Here you can see the lath, but notice the 'V' that has been formed.

Not sure why but every book and site says to make this 'V'. I guess it helps provide a better surface for adhesion.

The next step is a two parter.

First, use an old paint brush and get all the dust and small pieces out.


THIS STEP IS VERY IMPORTANT!!

Second, you are suppose to wet the old plaster to insure a good bond. I go one step further and use a plaster/concrete bonding adhesive.


This is what it should look like. If it is - then your ready to start plastering.


Fill the crack with your patching mix. Don't worry too much how it looks right now, just don't get too wild.


Now, with the crack filled, go over it again to scrape off the excess. You will need to hold the scraper hard against the plaster to make sure you get a nice, even, scrape.

This is about how it should look once you are done with the first scrapping. Again, don't worry how it looks. In fact, while it dries there will be some cracking and shrinking depending on the size of the repair.

After your first patch has dried it is time for your second patch.

At this point is where some controversy pops up. Some people say you need to put mesh on top of the patch before your second coat. Some say you only need to do this if the crack is more than 1/4" or more than 1/2" wide. There will also be those who tell you NOT to use the mesh (due to bulk) but use the standard mudding tape. It is really up to you. I have tried all the mesh, the paper and nothing. It just depends on the size and your preference. On small ones I usually go with the mudding tape and the larger ones I use the mesh. Mesh, nor paper, were used in this patch.

Also, this is the time to try and make your patch as smooth as you can when you scrape the excess off. Even though it is not your final coat, this one will help your final coat look as good as it can.

Here is what it should look like when you are done and the second coat has dried.

Your next step will be your finish/top coat. after this, especially if I have a lot of cracks to fill, or as was the case with our kitchen walls, I will finish it all out with a skim coat. This will give it a nicer, smoother, flatter look.

One thing I will point out - be sure to prime your finished plaster with the correct primer!! You can not just use your typical interior house primer. You MUST you a PVA drywall primer.

Well, till next time...

Cheers!
Larry